
Resources Needed for This Tutorial
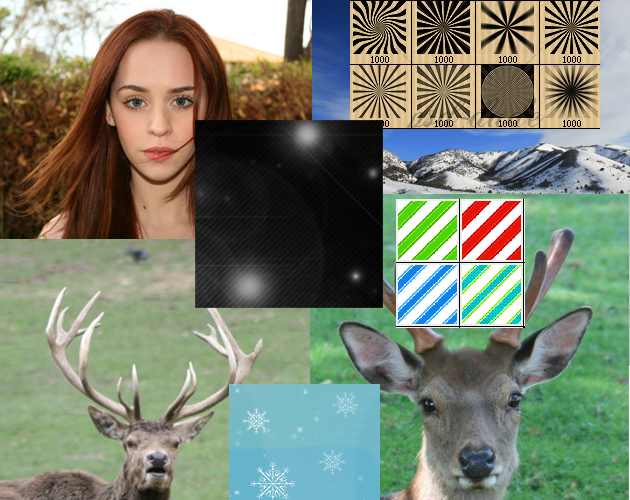
First download all the resources and all the stock images that we need for this Christmas Photoshop tutorial. Open a new PSD file, copy and crop the folowing images: the Girl, the Reindeer Antlers and the Reindeer Ears, removing the background.
- Girl
- Winter Landscape
- Reindeer Antlers
- Reindeer Ears
- snowfall texture 1
- snowfall texture 2
- snow brushes
Create Symmetry in Photoshop
I will start with the Girl layer. Here we have the image already croped and ready to work with. As you can see on the right side, the hair covers part of the face; so I've decided to select the left side of the face, duplicate and flip it.
By the way, you can not do this trick with any face, symmetry doesn't work for everybody. This is a really beautiful girl with perfect face features. Try using other images and you will obtain really hilarious results, see these photoshop funny pics
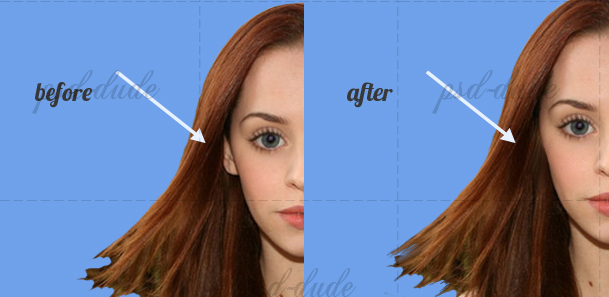
But first I will fix this side of the face to look perfect. With the Smudge Tool, strenght 90%, remove this hair area.
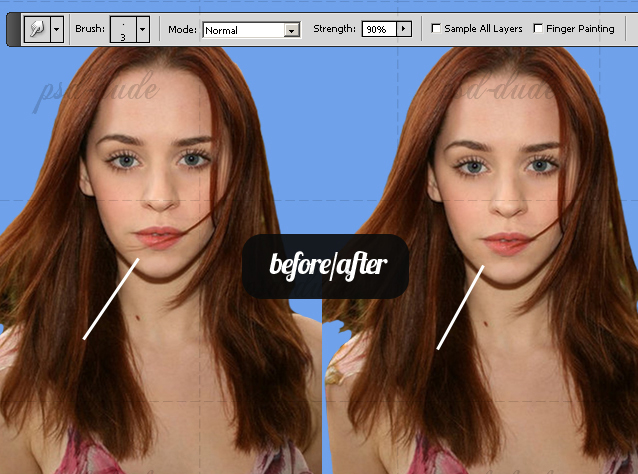
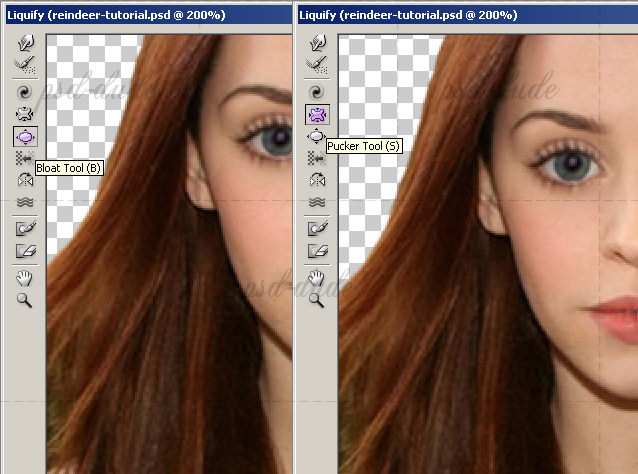
Remove the right side of the face. We are going to work only with this area. Open the Filter, Liquify and make the eye bigger using the Bloat Tool. Use the Pucker Tool to hide the teeth.
Use the Smudge Tool to hide the ear. Use a small size brush and drag the hair wires to cover the ear area. It helps to use the Brush Tool and paint over that area. I must warn you that without a graphic tablet this step will be very hard to complete.
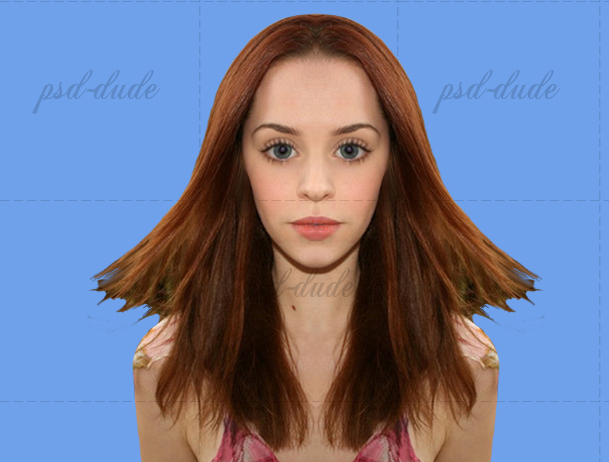
Duplicate this layer, Flip Horizontal and put the two face sides together. To do it right, use the Transform tool(CTRL+T) and do the settings shown in the image below. Set the Reference point location and set the horizontal scale to -100% .
Use the Smudge Tool and the Clone Stamp Tool to fix minor problems like skin color, duplicated elements, etc. The use of a graphic tablet is extremly useful for this step.
How to Create a Reindeer Girl in Photoshop
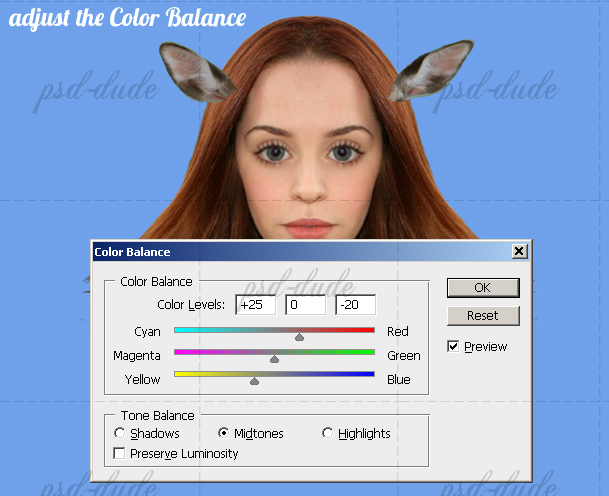
It's time to start the transformation of the girl into a Reindeer character. First I will add some ears. Crop, resize and place them above the girl layer as shown. Change the Color Balance of this layer to match with the Girl layer.
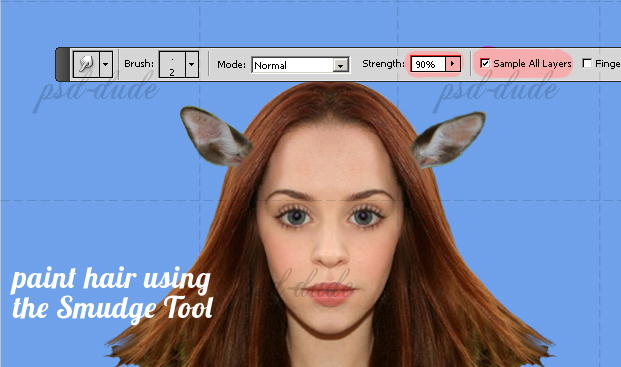
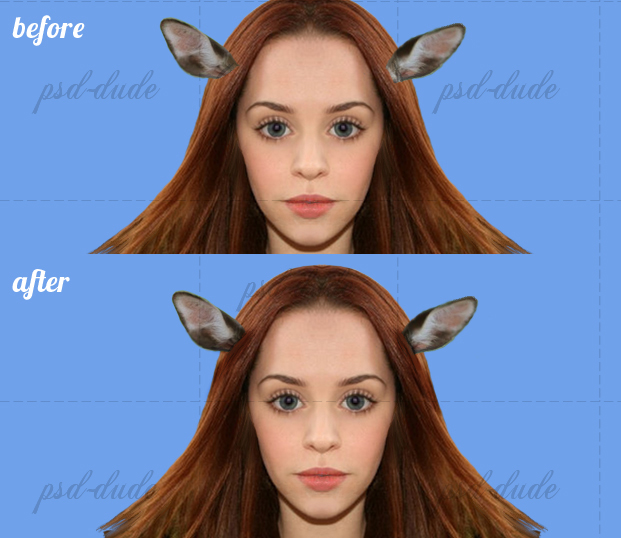
We have to blend the ears with the rest of the image so that it looks realistic. For that we have to blend the ears with the hair and add shadows. Create another layer above all the other layers and call it Blend Hair. With the Smudge Tool, 2px, 90% opacity start dragging the hair wires. You must check Sample All Layers.
Create another layer and call it Shadow. Change its Blending Mode to Soft Light and with the Brush Tool simply paint the shadow. Use a Soft Round brush and dark tones of gry and black.
How to Paint Hair in Photoshop
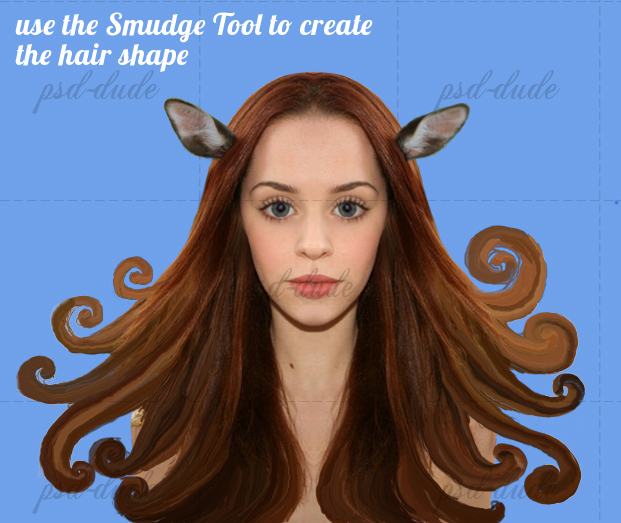
To paint hair in Photoshop is hard without a graphic tablet and even if you have one it will take you a while to do it. For example it took me about 1 hour to paint the hair from this tutorial. Simply use the Smudge Tool, 9px size brush, opacity between 90 and 100% and sketch the desired shape for the hair.
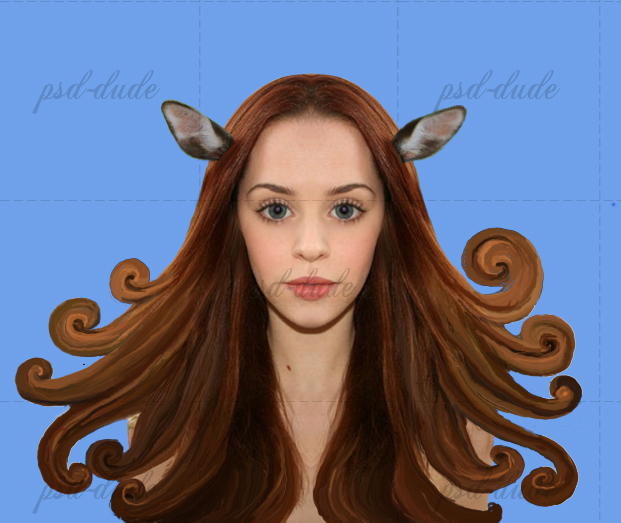
Now comes the time consuming part. With the same tool, lower the size brush to 2px and start refining the hair wires. You can use the Burn and Dodge Tool to make lighten or darken hair wires where needed. Use the Eraser Tool to erase the unwanted aras that are inevitable if you are a beginner in digital hair painting like myself!
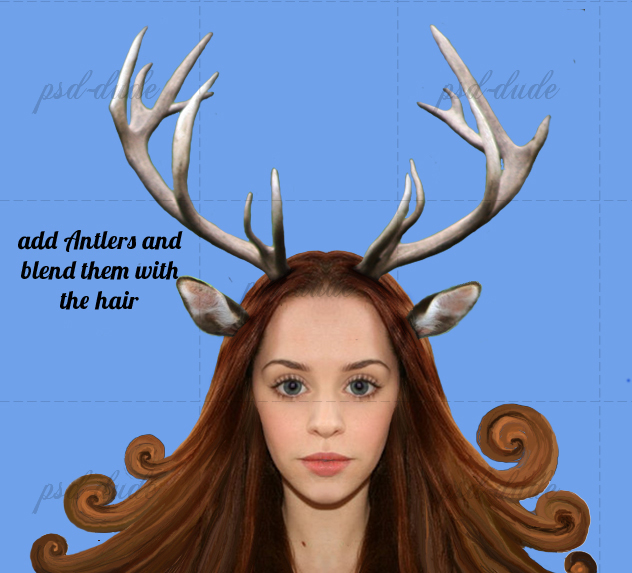
Adding Antlers
Add the Antlers cropped and resized. Next you have to adjust the Brightness and Contrast of the image because it is a little too exposed. You can see the settings that must be made in the image below:
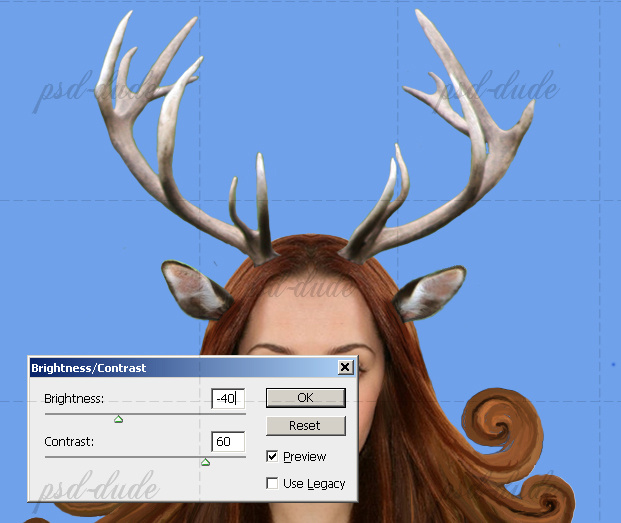
Blend the Antlers with the rest of the image using the Smudge Tool, Sample All Layers like you did with the Ears image.
How to Create Christmas Decoration
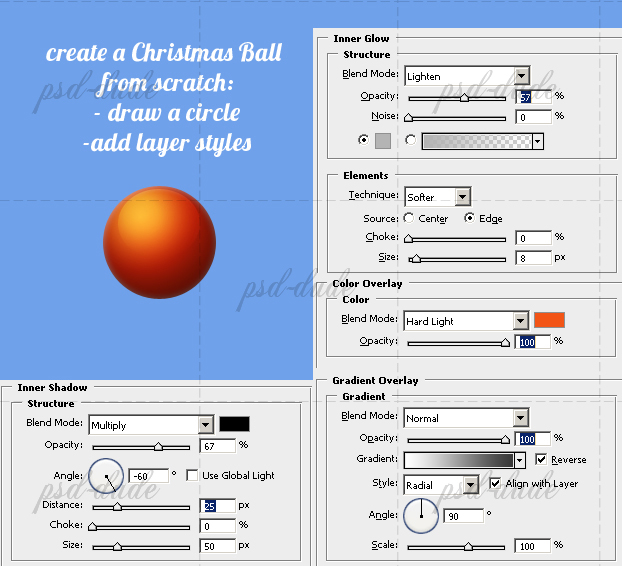
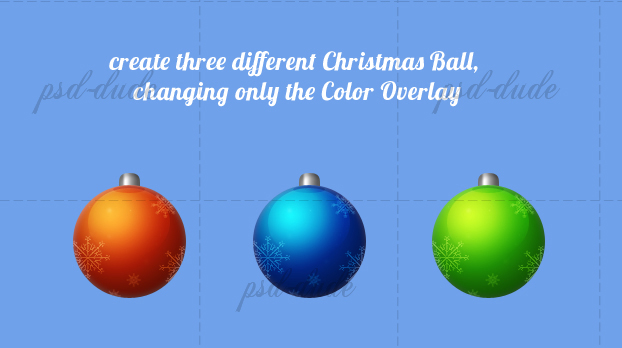
To make the image more festive I will decorate the Reindeer Girl by adding some Christmas Balls hanging on the Antlers. I decided to make a Christmmas Ball vector from scratch that way I avoid the annoying cropping process :)
Draw a simple circle shape and add the following layer styles to look like a 3D ball. If you want to learn how to make an even more realistic 3D effect check out this tutorial
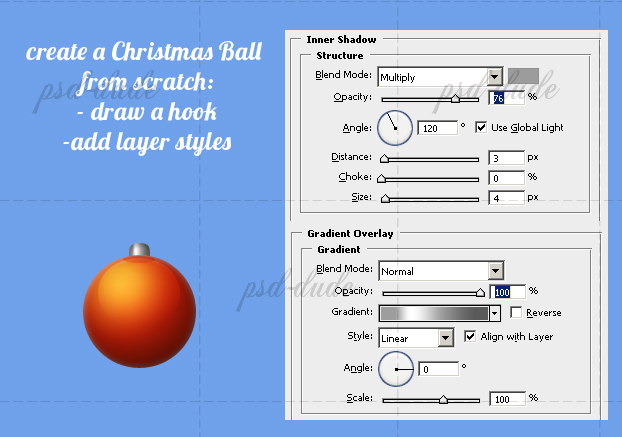
Now lets add a simple Hook. Draw a vector shape using the Rounded Rectangle Tool and add Gradient Overlay and Inner Shadow. Place it behind the Christmas Ball layer. Add another shape between the two layers to create the intersection shadow. Play with the opacity to look realistic.
You can add or not some Christmas decorations like snowflakes or stripes and that is all. You can now change the color of the Christmas Ball simply by changing the Color Overlay. Make an orange, blue and geen Christmas decoration balls.
 If we want to resize a layer that has layer styles added, you have to resize the layer styles also.
Go to Layer, Layer Style menu and choose Scale Effects that way we obtain the same look.
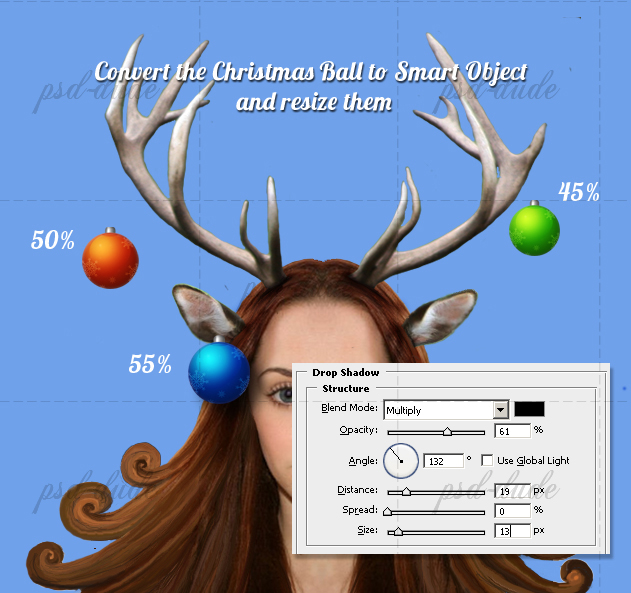
Or you can convert the layer(s) into a Smart Object and you can resize the
object without worries.
If we want to resize a layer that has layer styles added, you have to resize the layer styles also.
Go to Layer, Layer Style menu and choose Scale Effects that way we obtain the same look.
Or you can convert the layer(s) into a Smart Object and you can resize the
object without worries.
Now place the Christmas balls in the photo manipulation and resize them as shown in the image. For the Blue ball add Drop Shadow. Otherwise the image will not look real. As you know every object drops a shadow on the surrounding solid objects.
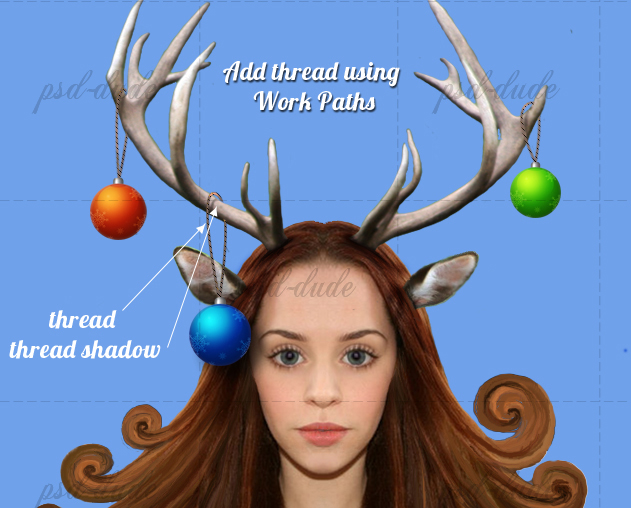
Add thread to hang the balls on the Antlers. Use the Pen Tool, Paths and draw the thread. Choose a Hard Round 3px brush, color #82695f for the Brush Tool. Choose Stroke Path and repeat the process for all the balls. Don't forget to add a shadow; just duplicate the Thread layer, set the Brightness to -150 and lower the opacity of the layer.
How to Add Christmas Stripes Pattern
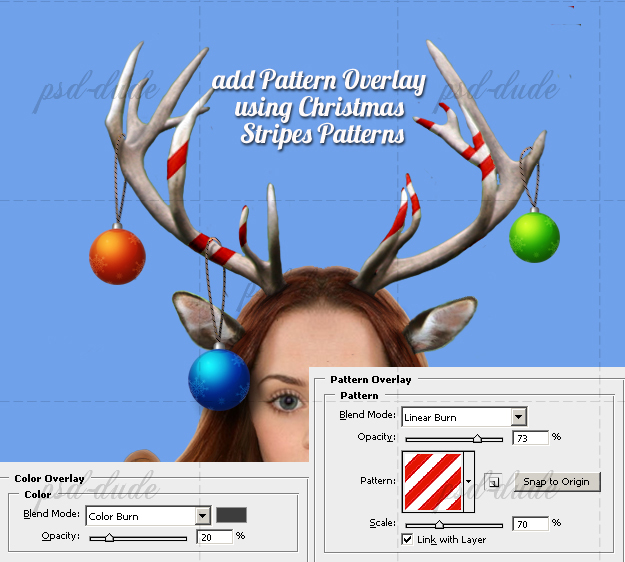
I have decided to add another Christmas feature. This happens to me all the time, to change the tutorial while I am in the writing process. Duplicate the Antlers layer and add Color Overlay and Pattern Overlay using my Stripes Patterns. With the Eraser Tool simply remove some areas, as if someone painted red and white stripes on the Antlers.
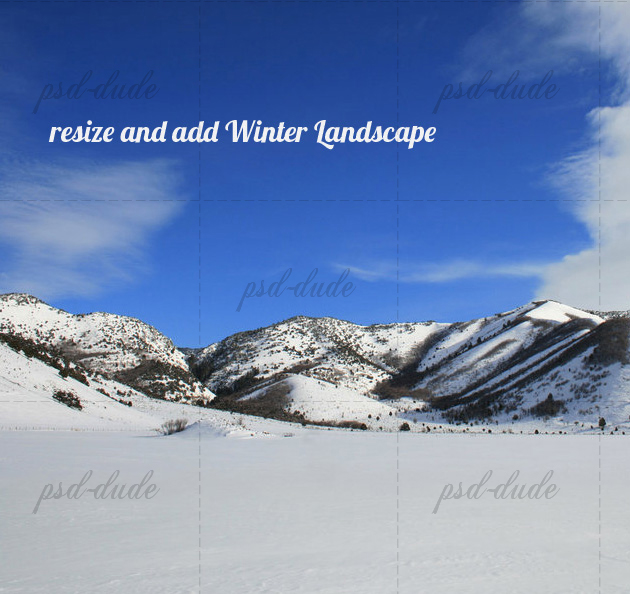
How to Add Winter Image Background
Resize the Winter Landscape and place it as background for this photo manipulation.
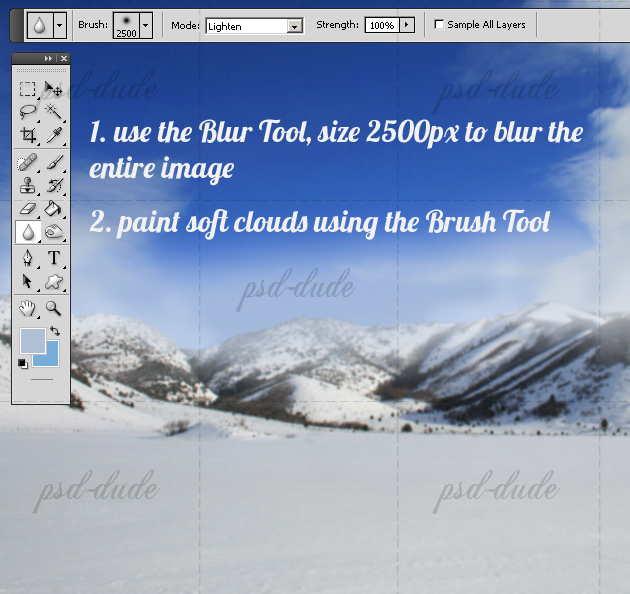
Use the Blur Tool, size 2500px, strenght 100% and click once in the center of the image. That way the background will not be the focus point, just a soft background.
Add a new layer above the Winer Image and with a Soft Round Brush, size 35px, color #b1bfd6, draw above the mountain peaks. You can play with Brush Hardness for better results. Lower the opacity of this layer to 80%. Use the Dodge Tool to create clouds effect.
Create a new layer and fill it with black. Make sure that the Foreground Color si black and the Background Color is white. Go to Filter, Render menu and choose Clouds. Set the blending mode to Overlay.
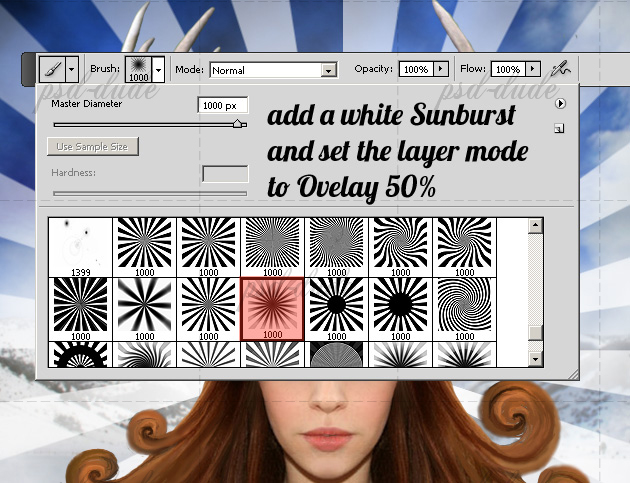
Create another layer above the previous Background layers and add some rays of light (sunburst no.10) using my Sunburst brushes.
How to Add Star Brushes
Now it's time to blend all the pieces together in terms of light and color tone. The best way to do that is to use gradient layers. But before I do that I will use other winter related brushes like star brushes and lens flare brushes. It is important to place these items below the gradient layers.
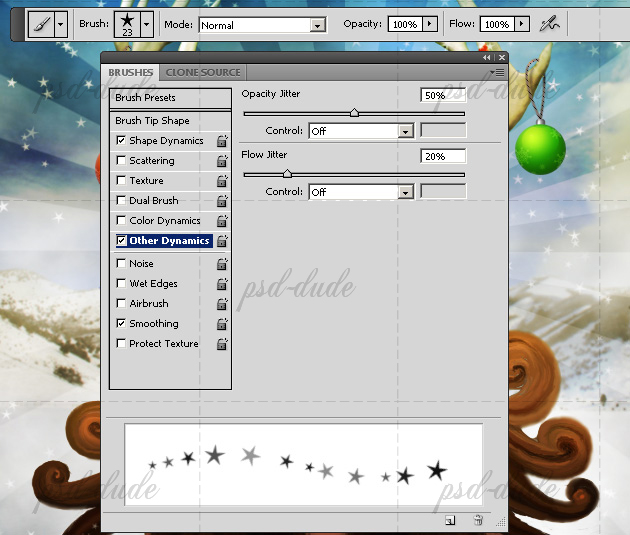
Made your own star trail brushes using a simple star shape. For that you have to open the Brushes Pannel and make the following settings. Set the Brush Spacing to 175% , that way we obtain a distance between the stars. Set the Brush Size Jitter to create different star sizes. The Brush Angle Jitter rotates the stars. The last setting is the Brush Opacity Jitter to obtain different opacities for the stars.

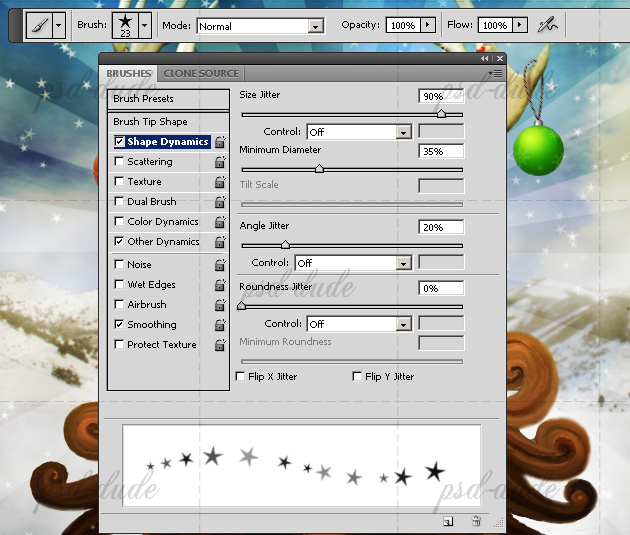
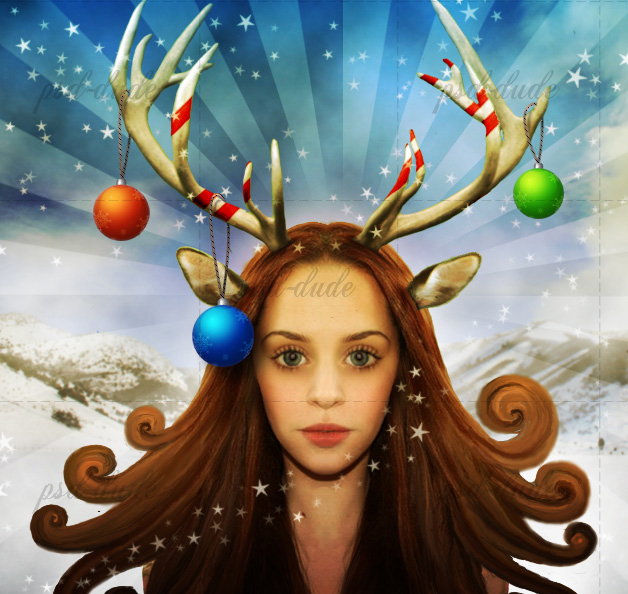
Set the foreground color white. Use the Star Brush that we have just created and add star trails like in the image.
How to Add Lens Flare Brushes in Photoshop
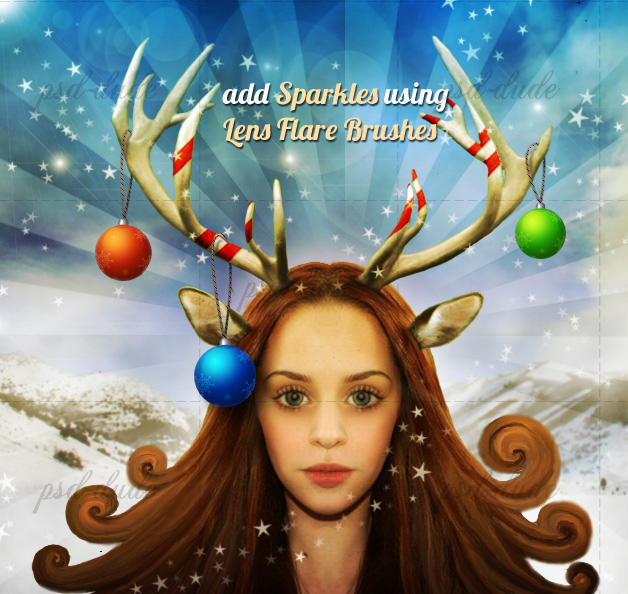
In another layer add some lights and sparkles using my set of Lens Flare brushes.
How to Create Snow in Photoshop
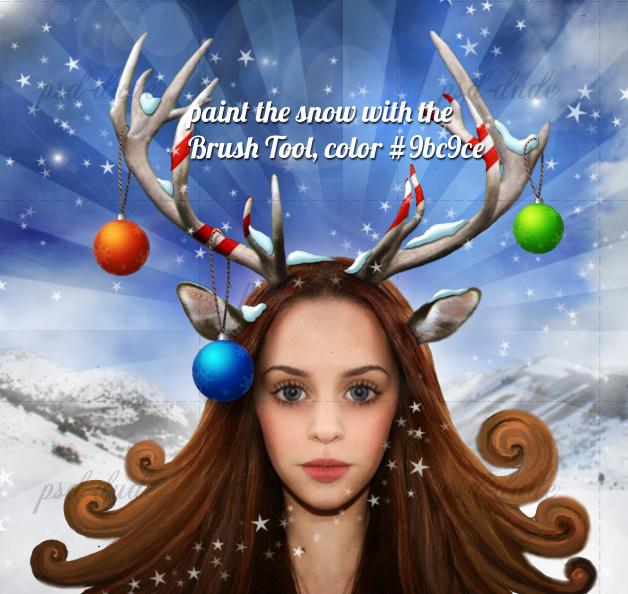
Use a small size brush and simply paint snow on the Antlers. Use the color #9bc9ce. And with the Burn/Dodge Tool add light and shadows to make it look tridimensional.
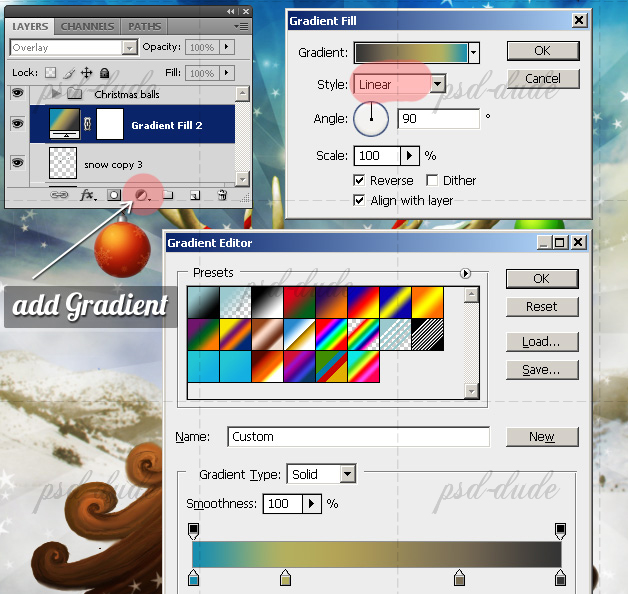
How to Add Gradient Layer
As I mentioned earlier we have to add a gradient layer to adjust the color tones of the entire image. So press the Create New Fill or Adjustment Layer and add Gradient. Make sure you add this layer below the Christmas Ball Group of layers. Set the blending Mode of this Gradient Layer to Overlay 100%.
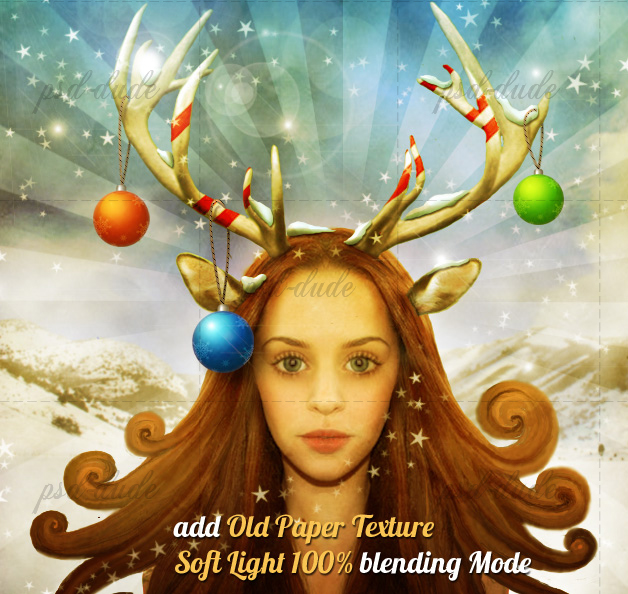
To make our photo manipulation look like a vintage Christmas Card I will use an old paper texture Use this paper texture and change the Blending Mode of this layer to Soft Light 100%.
How to Create Falling Snow Effect in Photoshop
Add the falling snow texture and set the blend mode to Screen. You can use these textures snowfall 1 and snowfall 2 with Screen blend mode. Also you can download this snow brushes and add snow using the Brush Tool and color #ffffff.
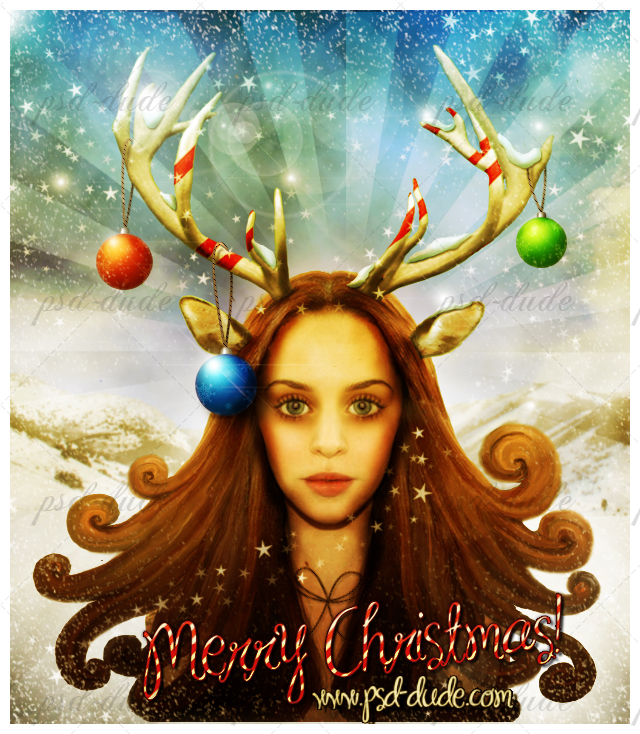
To add more contrast create another layer above all the other and change its blending mode to Soft Light 100%. Use a Soft Round brush, color black and paint over the image to darken some areas. You can add some extra Snow Effect using one of the many Snow brushes available for free on the internet. Add a handwriting text effect and that is all. I hope you like my Reindeer Girl Photo Manipulation.
Online Christmas Card Maker
Did you know you can use online tools like MockoFun to make Christmas cards? Combine Christmas vector shapes with text and create some amazing Christmas cards. MockoFun provides pre-made templates for making Christmas cards online in just a few minutes.
Check out this awesome list of over 50 Christmas fonts that you can use online or download for free to use in Photoshop. Combine Christmas fonts with text symbols like a star symbol for example.
Check out this tutorial on how to use the online Christmas Card Maker and all the awesome features that MockoFun has to offer.

9 comment(s) for "Create a Vintage Christmas Card in Photoshop"
http://www.photoshop-master.ru/users.php?id=705559
It was a great inspiration for the christmas cards for the shelter I volunteer in to give to our dog sponsors!