I will use one of my previous tutorials on how to create swirls in Photoshop, to create this nice lollipop icon.
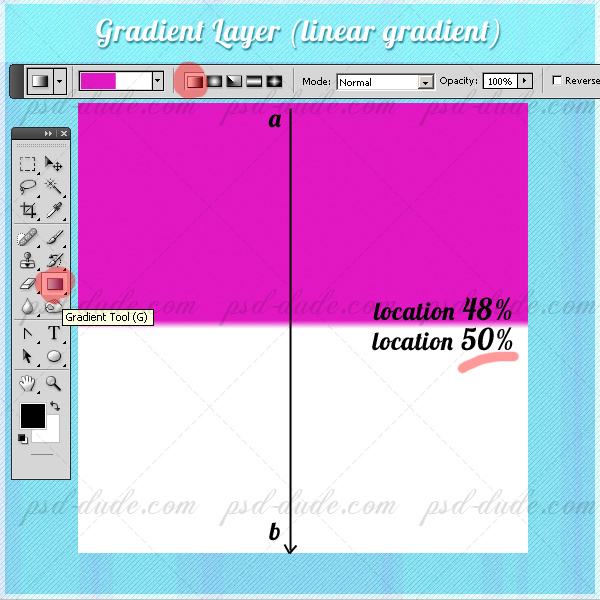
Photoshop Gradient Tool
First create a new layer and use the Gradient Tool to add a linear gradient to this layer. I will use only two colors for my gradient but you can always experiment and create unique effects. I recommend you this list of free Photoshop Gradients ; if you are a Ps beginner, you can find out how to install and use a gradient in Photoshop.
Ok, so let's call this first layer, Gradient Layer. Select the Gradient Tool, choose linear gradient from the gradient types. Set the gradient colors using #e118c2 (location 48%) and white (location 50%). The opacity is 100% for both colors. To actually obtain the gradient, draw a vertical line with the Gradient Tool from the center top of the layer to the center bottom.
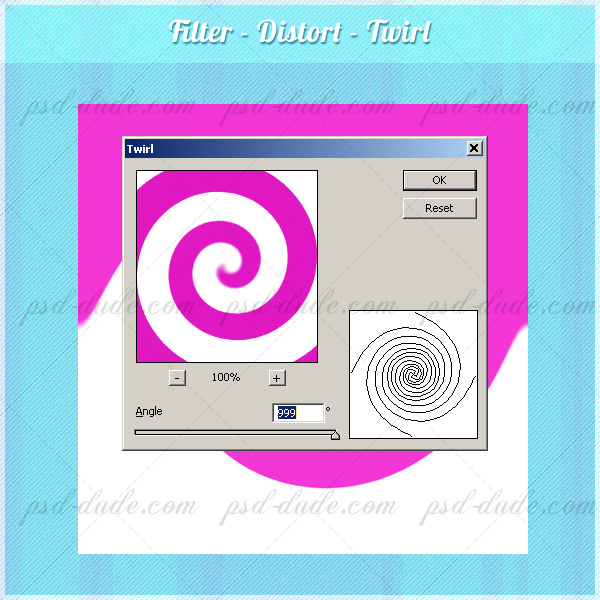
Twirl Filter in Photoshop
Go to Filter, Distort menu and from the list choose Twirl. It is pretty simple to use, just set the Angle to 999 degrees. You will obtain a well defined swirl from the two colors. If you want to know more about how to create different swirls in Photoshop and how to use Twirl Filter read this tutorial, Swirl in Photoshop Tips
Create the Lollipop Base
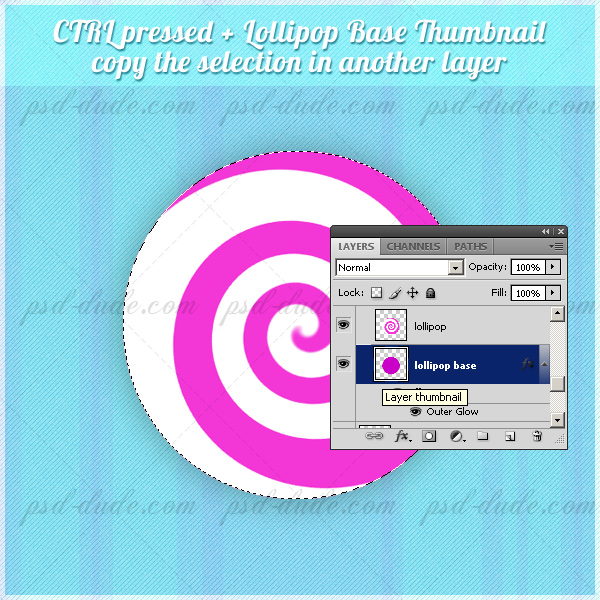
With the Elliptical Marquee Tool selected and SHIFT pressed, draw a circle like in the image below. Fill the selection with #ca00c8 color. Call this layer Lollipop Base.

Add Outer Glow effect to Lollipop Base layer. The settings for the glow are: normal, 30% opacity, color #515151, size 40. The other settings are the default settings. Keep CTRL key pressed and click the thubnail of Lollipop Base layer. Select the Swirl Layer and copy the selection in another layer. Call this new layer, Lollipop and place it above the Lollipop Base.
Add Bevel and Emboss Effect
As you can see the lollipop has a flat 2D look so to make it look more real we have to add Bevel and Emboss to obtain a 3D effect.
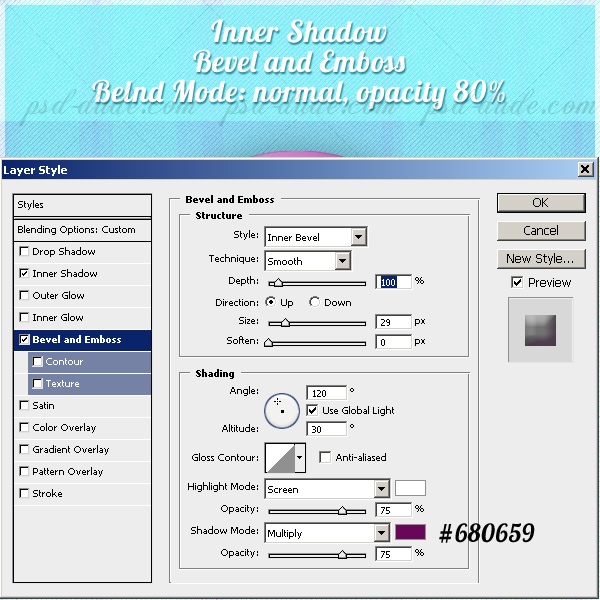
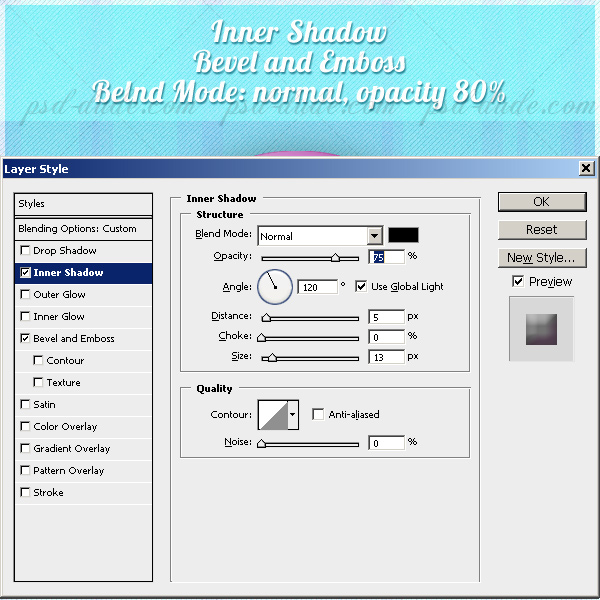
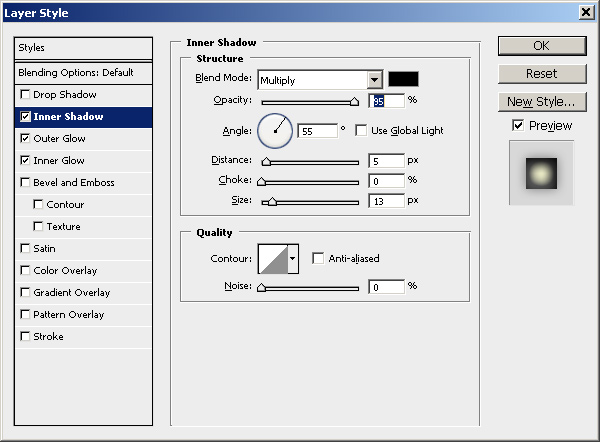
Next add Inner Shadow with the following settings. Change also the Blending Mode opacity to 80%.
Lollipop Swirl in Photoshop
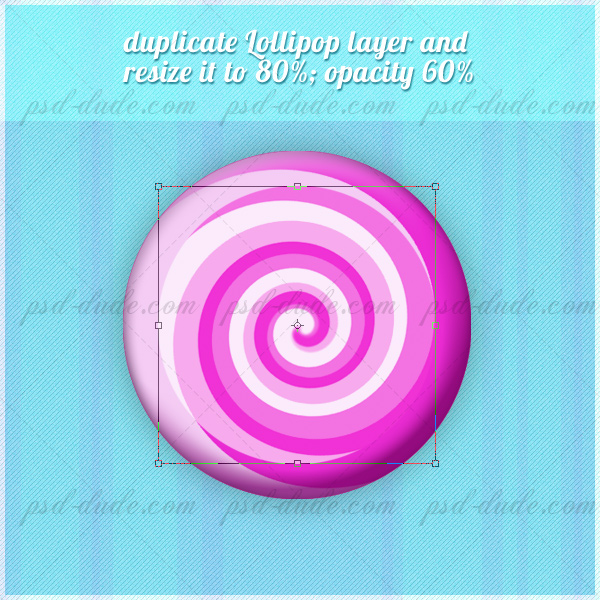
<>It now looks like a lollipop but I want to obtain another effect. For that I will duplicate the Lollipop layer and resize it to 80%. Call this layer Lollipop1.
Now let's add some layer effects and see what kind of lollipop effect we obtain. First set the opacity of the layer to 60%. Next add Outer Gllow, Inner Glow and Bevel Emboss with the following settings:
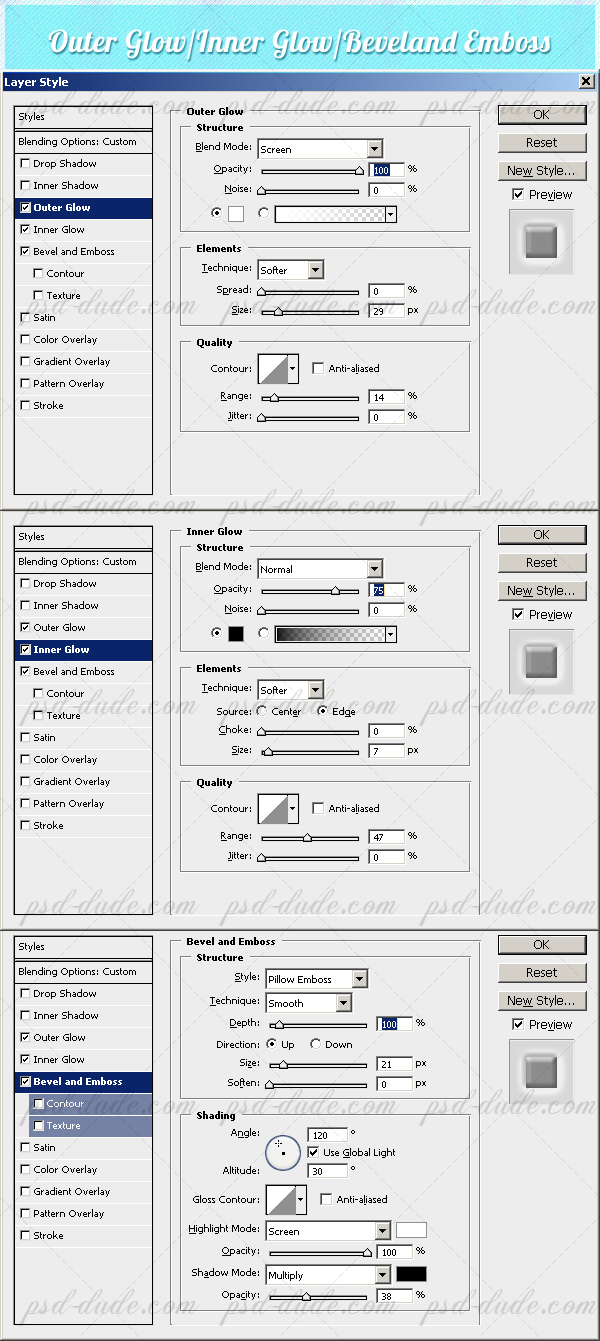
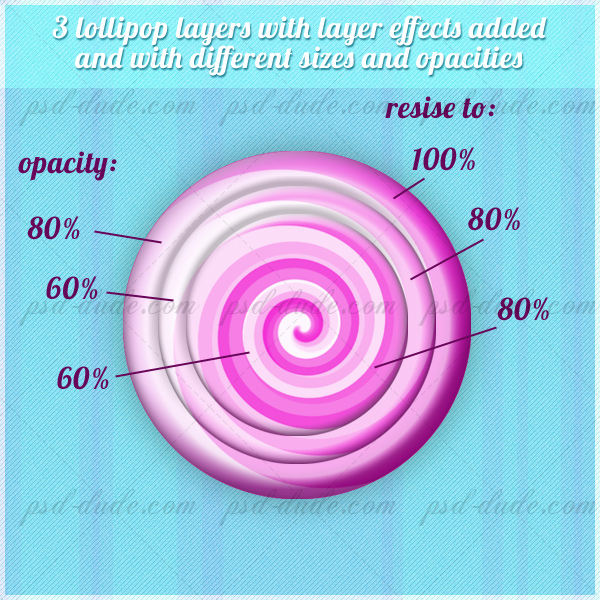
Duplicate the Lollipo1 layer and call it Lollipop2. Resize it to 80% and we add the same layer effects, Outer Gllow, Inner Glow and Bevel Emboss with the settings presented in the image above. So we have 3 lollipop layers with layer effects added and with different sizes and opacities.
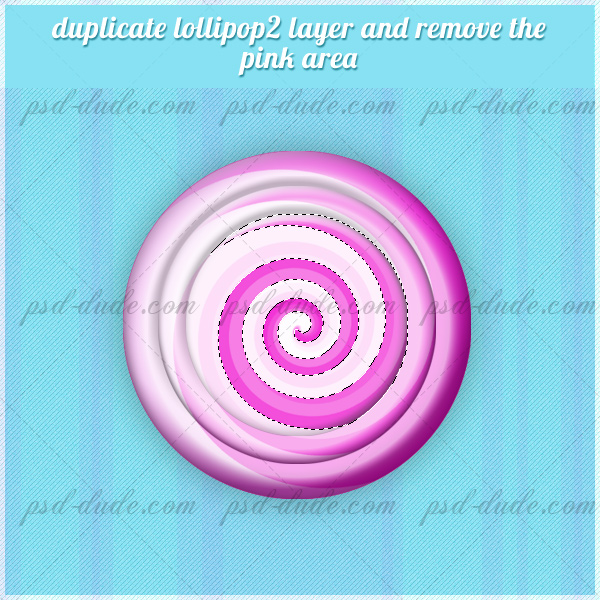
As you can see it looks pretty good, I will add one final touch. Duplicate the Lollipop2 and with the Magic Wand Tool select the pink area and remove it. Call this layer Lollipop Center.
Add layer style effects to the Lollipop Center layer. The effects are Inner Glow and Bevel and Emboss with the same settings like in the previous 2 steps.

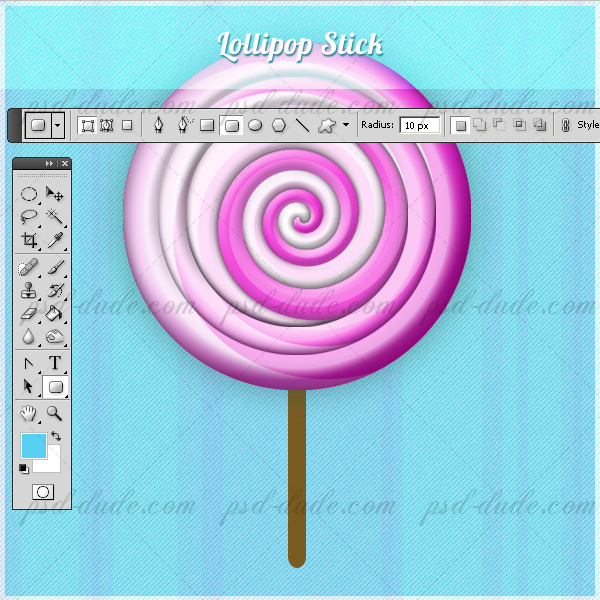
Add Lollipop Stick
Create a simple stick with the Rounded Rectangle Tool. The corners radius is 10 px and the color is #997337. Call this layer Lollipop Stick.
To make it looks like a real stick, open the layer style window of the Lollipop Stick layer and add some effects. I added a Inner Shadow and Inner Glow but you can add also Bevel and Emboss.

Add the final details like a Wood Texture to the lollipop stick. Just copy the texture into your file and select the Lollipop Stick to make a mask for the Wood Texture Layer. Also add a soft Inner Shadow.
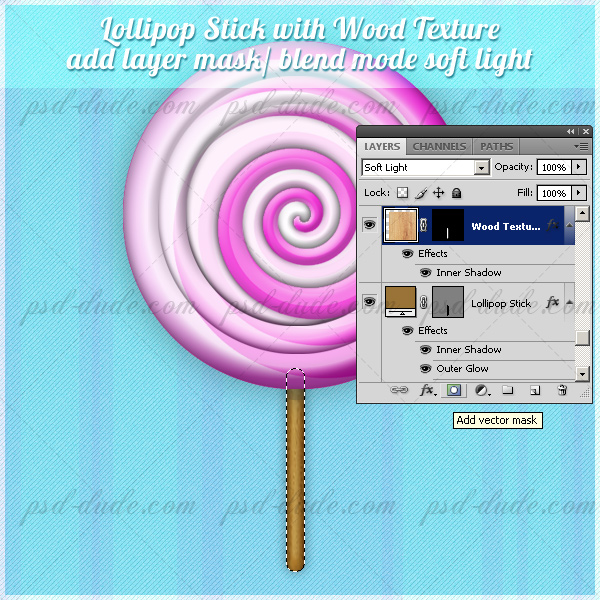
Don't forget to add a simple black shadow, with 30% opacity, where the lollipop meets the stick. As you probably know if you don't add shadow(s) to all the objects you draw or add in Photoshop, the result doesn't look realistic. So the shadow is a must.
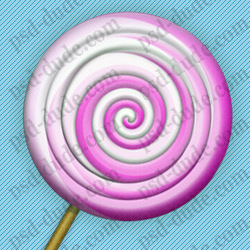
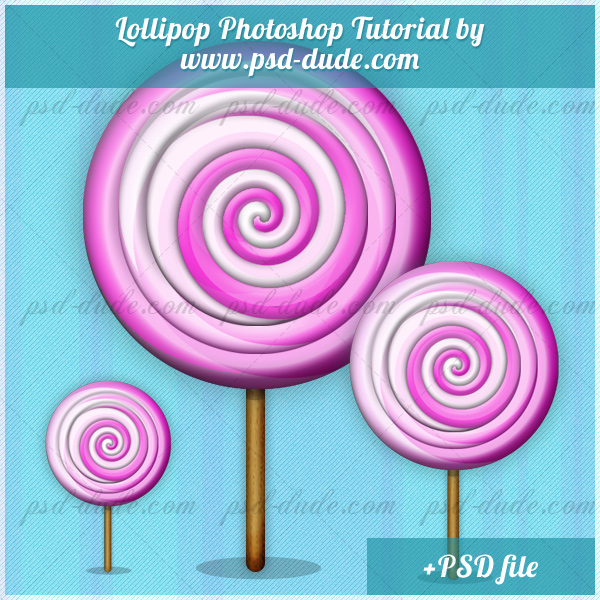
So here is my candy lollipop or lollipop cartoon however you want to call it, made from scratch in Photoshop. Hope you like it.
If you are one of our registered users you can download the lollipop PSD file for free.
DOWNLOAD!(2.44MB)
9 comment(s) for "Create a Lollipop Candy in Photoshop"