
Let's take a quick look at the Christmas tree floating island photo manipulation that we are going to create in Photoshop using some simple blending techniques, adjustment layers, textures, brushes and of course the wonderful winter stock images.

First I will add a nice looking sky with clouds texture as background for the Christmas tree island. Use the texture twice using a layer mask transition to cover the entire canvas.

Time to add the floating island rock. As you can see it has a lot of saturated rusty tones of green, orange; so I will add a simple Hue/Saturation adjustment layer.

Now I will use these tomatoe roots and add them on the rock island. First you have to extract the roots from the background. For that I will use a quick tip. Duplicate the Roots Layer and add a Threshold adjustment, level around 80.

Go to Filter, Stylize, Diffuse and choose Anisotropic; you will obtain a similar result.

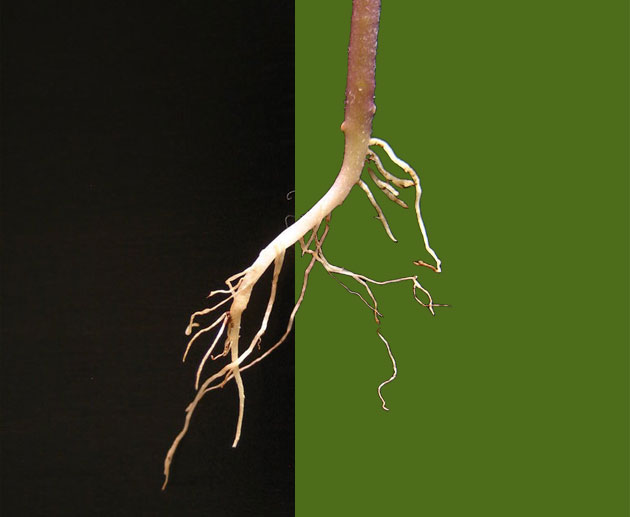
Now use the Magic Wand Tool to select the black area, and with that selection on use it to remove the background from the original Roots Layer.

That is a simple way to make selections and crop objects without using the Pen Tool method that will take a lot of time. If you want to know more about Photoshop selection tools check out these tuts.
I have added a colorful background so that you can see the before/after cropping result of the roots image using this advanced and rather fast technique. You should obtain a similar result.
To fix the brightness issue of the roots stock image I have added two adjustment layers: Exposure and Brightness and Contrast.

Resize the roots and duplicate them a couple of times and place in different parts of the rock island. You can erase some parts, rotate etc to avoid the anoying repetitive look. Place some behind the island and some in front of the island. Use the Burn Tool and the Dodge Tool to obtain the light and shading effects in some areas.

Use the Ellipse Tool to make plane surface that will represent the snow area on top of the rock island. And cover this area with this beautiful snow texture. Use the Perspective Tool and resize the texture so that it has the right perspective. You can choose another ice and snow texture from this collection.

Use the Ellipse selection to cut the snow texture. I have also added a Brightness/Contrast adjustment layer to make the texture more brighter and white.

To make the snow surface more tridimensional looking I will add a Bevel and Emboss layer style like shown in the image. You can use the Eraser Tool to change the ellipse area a little make it more realistic.

Where the snow touches the rock island create a shadow effect using the Burn Tool or you can create a separate layer and paint with black color different opacity levels. Use the Gaussian Blur to soften the shadow.

Download these amazing pine trees and use the third one like shown in the image. Because the pine tree looked a little too short I have decided to use two pine trees one on top of each other(different sizes of course) to make it taller.

Of course this tree needs to cast a shadow, so add one using a copy of the tree. Flip Vertical the copy, add perspective and use a gradient of black 0% opacity to black 100% opacity to create the fade effect.

Select all the layers of the Floating Island except the sky layer and merge all layers. Resize the island to 80% like in the image and start decorate the Christmas tree. So for the Christmas decorations I will choose some colorful glass balls, golden star and also some glitter tinsel.

Use the same decorations to hang them on the island rock roots like shown in the image. Use simple wires made with the Brush Tool to hang the Christmas decorations. Press the SHIFT key to obtain straight lines.

To make the image look more funny I have added as Christmas decoration this Santa Claus figurine. All you have to do is to remove the background, resize it and also make some color/saturation adjustments to blend with the rest of the image.

How to Create Falling Snow Effect in Photoshop
If you want to add falling snow effect you can add the falling snow texture and set the blend mode to Screen. You can use these textures snowfall 1 and snowfall 2 with Screen blend mode. Also you can download this snow brushes and add snow using the Brush Tool and color #ffffff.

Add a Photo Filter adjustment layer with the following settings to blend all the elements together.
If you want to turn this image into a Christmas card add this vintage frame with the Multiply blend mode.
Online Christmas Card Maker
Did you know you can use online tools like MockoFun to make Christmas cards? Combine Christmas vector shapes with text and create some amazing Christmas cards. MockoFun provides pre-made templates for making Christmas cards online in just a few minutes.
Check out this awesome list of over 50 Christmas fonts that you can use online or download for free to use in Photoshop. Combine Christmas fonts with text symbols like a star symbol for example.
Check out this tutorial on how to use the online Christmas Card Maker and all the awesome features that MockoFun has to offer.

11 comment(s) for "Create a Christmas Tree Floating Island in Photoshop"
Made by Carrot))
Made by kolobok555
I am glad you like the tutorial!
As for the image that you created, you have to click on the Upload button to load it. reply
Thanks so much for this tutorial! What font style did you use for your numerals and how did you create the shadow perspective? When I duplicate the text layer, I can't transform with perspective.
reply
The Christmas photo manipulations were made by the photoshop-master.ru community of artists.
I don't remember the font but you can use any thin font type:
http://www.1001fonts.com/thin-fonts.html
Here is how you can create a text shadow in Photoshop; you have to rasterize the Text layer to use the Perspective tool:
https://www.psd-dude.com/tutorials/create-a-text-shadow-in-photoshop.aspx
reply