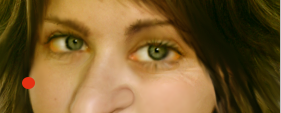
Go to stockvault.net and download this photo.
Step 1 – Change the color
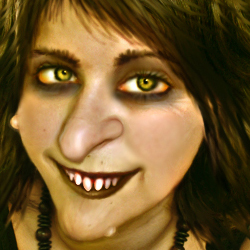
Let’s start by changing the color of the photo…as we all know a witch has a yellow-green skin tone.
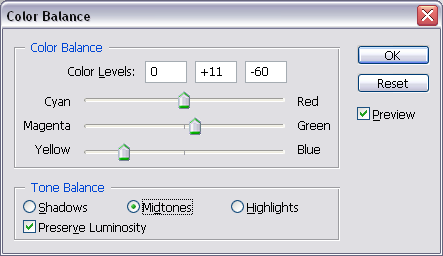
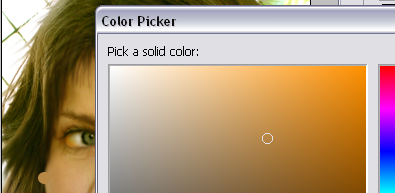
Go to Image – Adjustments – Color Balance and do the following settings:
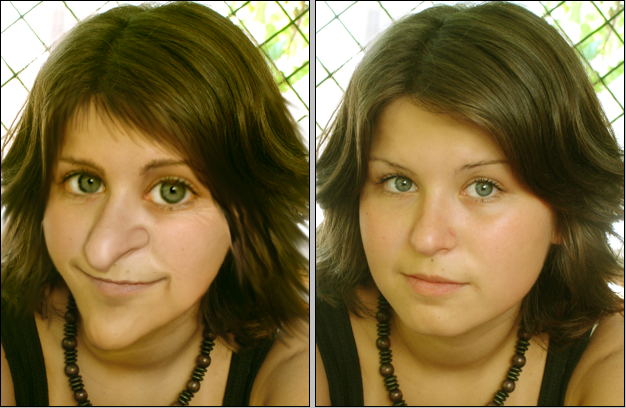
This should be enough for the moment…we will adjust the tone in the end of the tutorial.
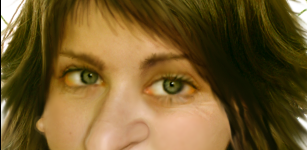
Step 2 – Liquify the face
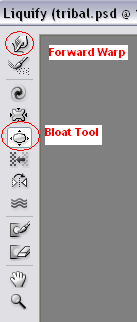
Here comes the hard part of the tutorial…..Go to Filter – Liquify – use Forward Warp Tool and modify the nose shape …make it bigger like in the picture below. Brush size between 31 and 50…you will have to play with sizes and pressure to obtain this result.
When you are using liquify filter it is very hard to obtain the same result twice…even if you have a video tutorial…so you don’t have to obtain the same result as I did.
Use the same Forward Warp Tool and change the size of the mouth and also the expression of the mouth.
Now lets make the eyes bigger …. You can use Forward warp tool but I used Bloat Tool, brush size 55 (you can play with sizes, density and pressure to see how they work) ….as you can see the little white points inside the eyes must be the same size…and also the eyes have to have the same expression.
The final part of this Liquify transformation is with the shape of the face (forward warp tool) and the shape of the chin(forward warp tool again).
Step 3 – Add Wrinkles
At the skin level we have to make the following transformations:
Accentuate wrinkles : with Burn Tool size 2, exposure 24 % find the eyes , chin and mouth wrinkles and accentuate it. Take the Dodge tool size 2, exposure 24 % and trace a line near the wrinkles to a bigger effect.
With the Sponge Tool easy desaturate the mouth

With the same Sponge Tool saturate the areas with red of the eyes.

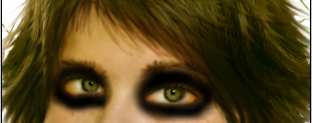
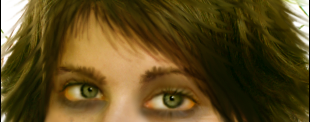
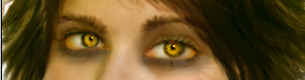
Step 4 – Pucker the Eyes
Give a meaner look to the eyes. Go to Liquify – Pucker Tool size 43 and make the eyes smaller like in the picture below…put the cursor in the middle of the iris(eye).

The Eyebrows – for bigger eyebrows I used Smudge Tool size 4 and I tripled the size of the eyebrow…with the Burn Tool I make the eyebrows darker and than I used Smudge Tool again this time a smaller size 2…and I draw rebel hair wires…It is important when you use Smudge Tool to use appropriate size and strength (I used 50 % strength) to obtain a realistic result.
Step 6 – The mole
Mole ….no witch without face mole…simply draw a circle with the ellipse tool and place it near the part of the skin where you want to attach it.
Than change the color of the circle by picking a tone closer to the skin.
Now right click on the circle layer and rasterize it…..now you can give it shape and 3D look with burn and dodge tools.
Now you can place as many moles as you want …I put one on the chin also.
Step 7 – Add make up
With Brush Tool and color #030201 paint in a new layer the area around the eyes. Now set the opacity of the layer to 25 %.
For the hair effect we will use Smudge Tool …you have to make straight lines from one move …it is easy with the mouse you don’t need a tablet. Take your time and do this step slowly…changing the size of the brush and strength when needed….
You can also use Burn Tool to accentuate some parts of the hair….I strongly advise you after a successfuly done step to duplicate the layer so if you do something wrong to have a copy and not to lose all the work.

Step 9 – Add a big smile
For the tooth I’ve used this photo http://www.flickr.com/photos/dey/77901012/
Crop the tooth and place it in the mouth area. Use the warp tool to make the tooth even more real (edit - transform – warp)
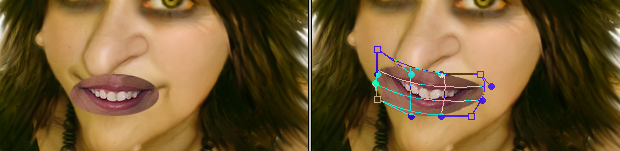
Zoom in the document and begin erasing the areas from the mouth that you don’t need. We will use the tooth and the bottom lip. Rotate the tooth 2,9 ( edit – transform – rotate)
The difference in color is evident so I changed the Blending mode of the tooth layer to Luminosity 100%....that solution seemed ok to me… When you consider that the mouth is in right place and that it looks ok, merge the 2 layers: tooth layer and face layer.
Go to Filter – Liquify zoom in the image and adjust the shape of the mouth and the shape of the tooth.
You can go even further and put some blood on the tooth……! Don’t forget after a good step duplicate the layer!
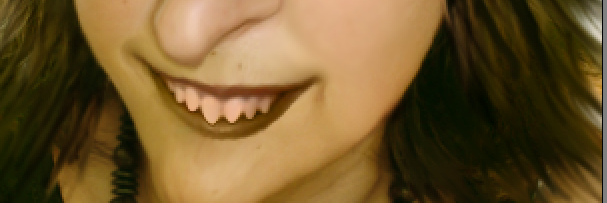
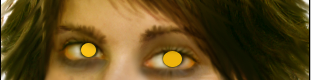
Step 10 – The eyes
Create 2 circles color # fcc316 and place them in the eyes area and change the Blending Mode to Overlay 100 %
Now, create a new layer and go to Image - Apply Image. This new layer contains now an image with all the visible layers merged. Go to Filter - Sharpen - Smart Sharpen ( Basic; Default; Amount 94%; Radius 10 pixels; Gaussian Blur ; Angle 0)
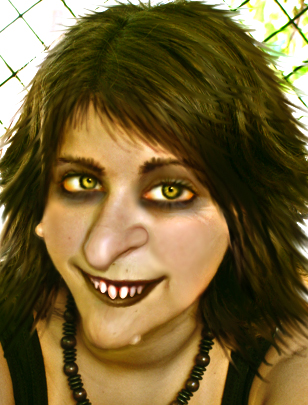
Here is my final result! I used this flickr photo
http://www.flickr.com/photos/76848838@N00/468408963/ to put my witch image into a nice photo frame!
1 comment(s) for "Turn a girl into a witch"