How to Draw a Line in Photoshop [Tutorial for Beginners]
In this tutorial you will learn how to draw straight lines in Photoshop. I will also show you how to draw curved lines in Photoshop. And, to have a little fun I will teach you how to draw a colored line in Photoshop.
[UPDATE 2019]: Though a few things have changed in Photoshop CC 2019, the same techniques apply for drawing a line in Photoshop. Check out the section about the new Curvature Pen Tool in Photoshop CC.
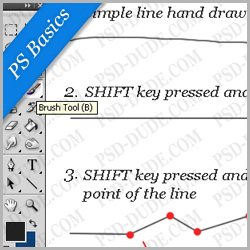
1. How To Draw Straight Lines In Photoshop With Brush ⚡
To draw a line in Photoshop use the Brush Tool or the Pencil Tool. Pick a small size, hard round brush and simply draw a line.
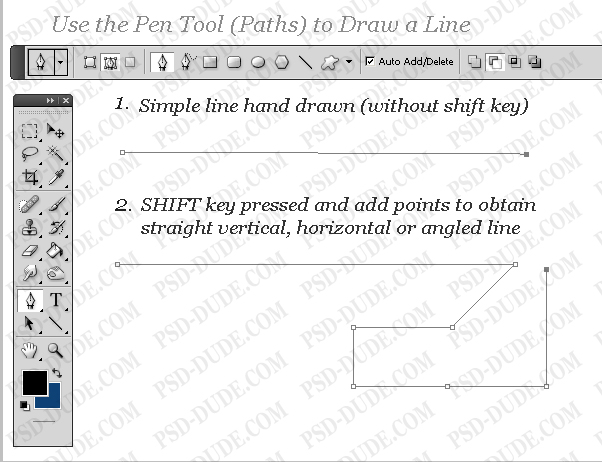
To draw a straight line in Photoshop you have to keep the SHIFT key pressed and draw. To make horizontal or vertical lines hold down the SHIFT key and draw the line horizontally or vertically. Use the Photoshop grid to make sure your lines are straight.
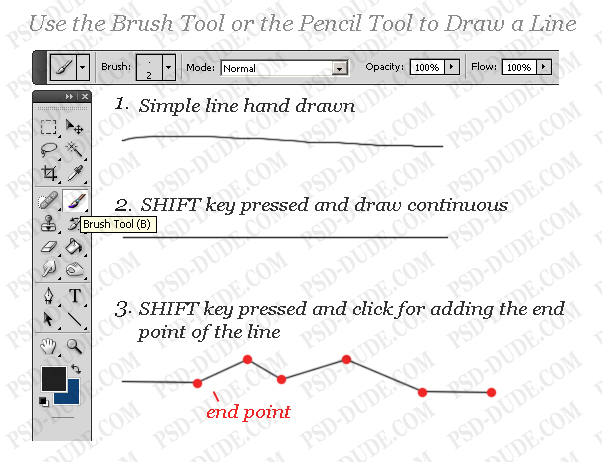
For angled lines or diagonal lines, hold down the SHIFT key and click to add the end points for the lines. Photoshop will connect the dots with perfect lines.
1.1 How To Draw Straight Lines in Photoshop Freehand Style Using the Brush
Here's the thing:
Most graphic designers like to do freehand drawing with the Brush Tool either using a graphic tablet or using the mouse. After you try it a couple of times, you will notice that it's easier to draw horizontal straight lines than diagonal or vertical lines.
That's just how our hand works.
How to Rotate the Canvas in Photoshop
One neat trick that you can do in Photoshop (CS5, CS6, CC 2018 and CC 2019) is to rotate the whole canvas. Just like you would rotate a drawing paper. You can do that by clicking R then click and drag with your mouse. If you hold down SHIFT while dragging the canvas rotation is snapped to 15 deg increments.
Here's a video showing how to draw straight lines in Photoshop and how to rotate canvas in Photoshop:
Note: While trying to do this on Photoshop CC 2019 I ran into the following error:
Rotate only works with OpenGL enabled document windows
Well, it turns out that there are higher hardware requirements to do this in Photoshop CC 2019. The solution apparently is to try to go to Edit > Preferences and then in the Performance Panel select the Enable OpenGL Drawing in GPU Settings. Please note that if your hardware is not up to par with the requirements then this checkbox will be grayed out.
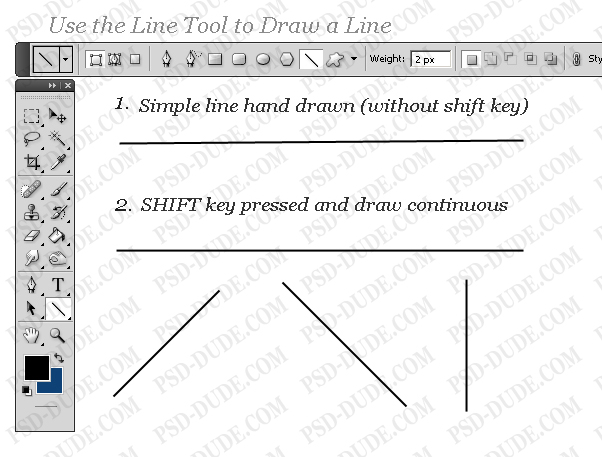
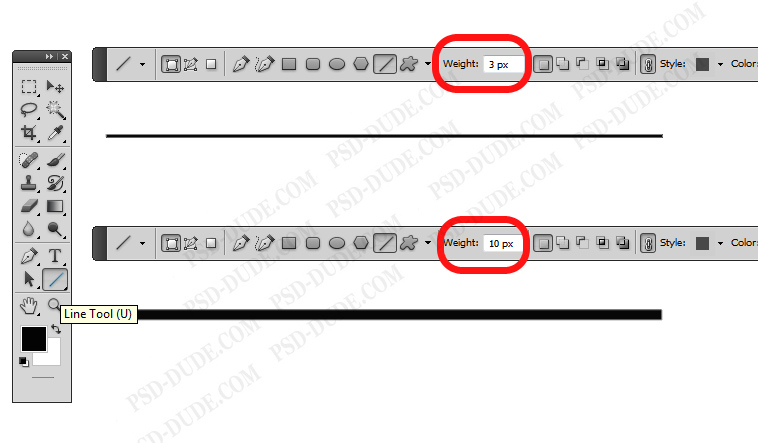
2. How To Draw A Straight Line In Photoshop with Line Tool ⚡
Another method will be to use the Line Tool available on the Photoshop Tools bar. This line is a vector shape so you can easily modify its shape, color, dimension without loosing quality. You can use the SHIFT key also for straight lines.
Download my Line Shapes for Photoshop if you need vector lines for your projects.
3. How To Draw A Line In Photoshop with Pen Tool ⚡
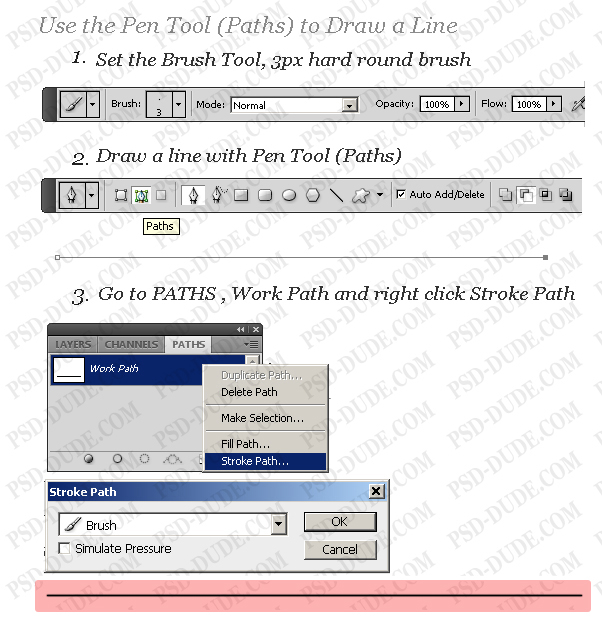
The third method is to draw a line using the Pen Tool. First, you have to check the Paths option. Then click to add the first point and click again to add the second point. For straight lines keep the SHIFT key pressed.
So, pick the Brush Tool and select a Hard Round brush, size 3px, black.
With the Pen Tool, select Paths and draw a line. The line is added as a Work Path.
To draw the line just right click on the Work Path and choose Stroke Path. From the list choose the Brush Tool.
You can now delete the Path or use it to draw other lines. You can move the path, resize it, change its shape, rotate it, etc.
TIP: You have to have a layer selected before you Stroke Path otherwise it might not work. Here is a quick tutorial on how to draw a path and how to Stroke Path In Photoshop With The Brush Tool (video tutorial). Also you can read the Stroke Path Photoshop tutorial for beginners.
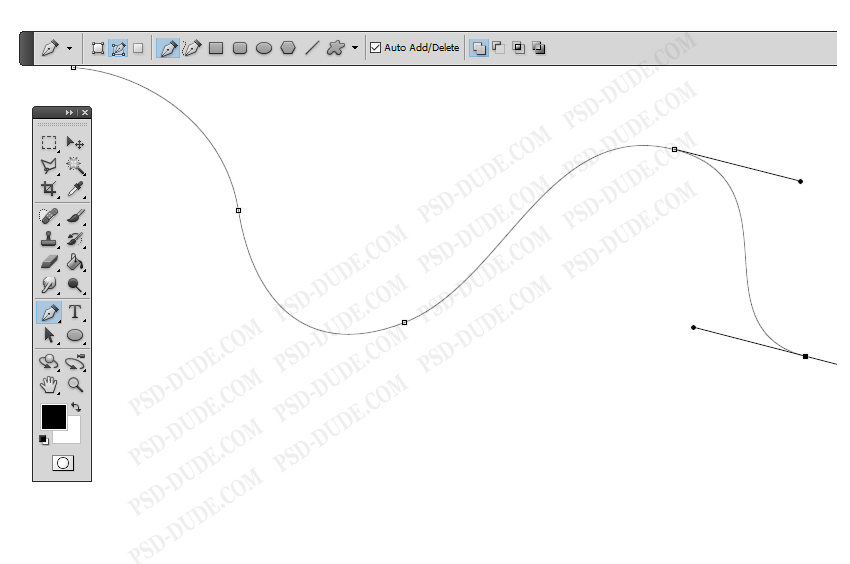
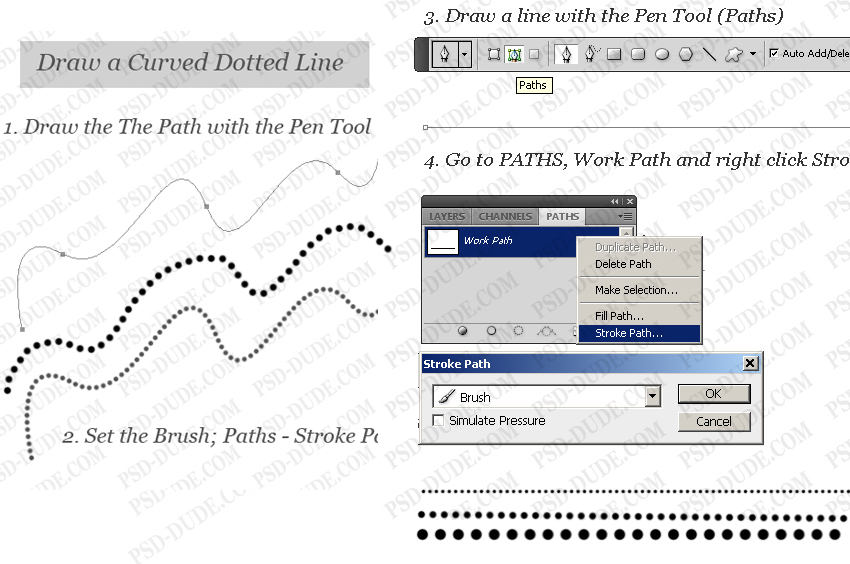
4. How to Draw Curved Lines in Photoshop ⚡
To draw curved lines in Photoshop you have to use the Pen Tool with Paths selected, to make a curved path. Using the Pen tool, drag to create the first smooth point of the curved segment, and release the mouse button.
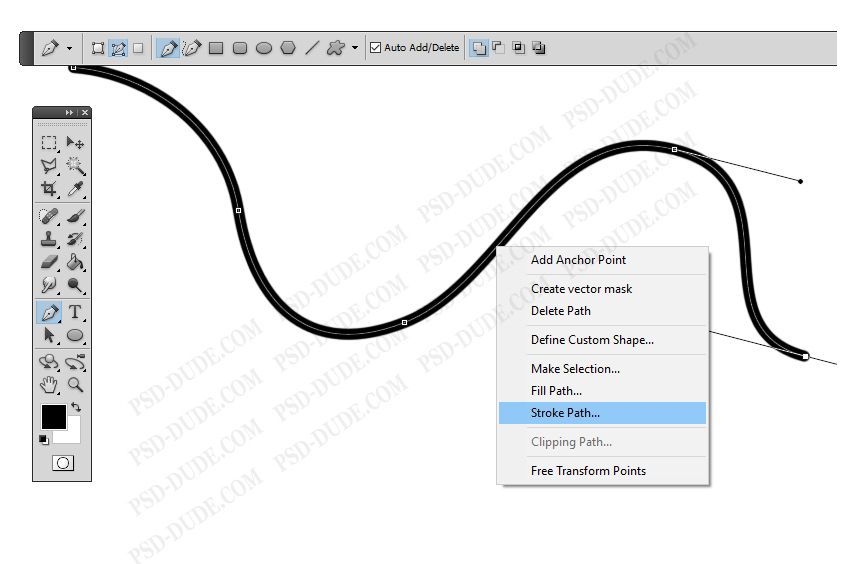
To draw a curved line just right click on the Work Path and choose Stroke Path. From the list pick the Brush Tool.
How To Draw Curved Lines In Photoshop CC 2019
Photoshop CC 2019 comes with a bunch of useful and new stuff. One of them is the new Curvature Pen Tool. You will find this under the Pen Tool icon if you long press it.
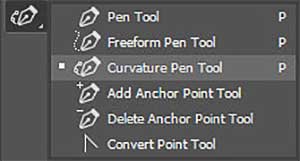
To use the new Curvature Pen Tool you have to click once and Photoshop will draw curved lines that connect the points you click. Double clicking will create sharp corners. If you click on the line between 2 points you can add and drag an extra point to create a curved line.
After you created the curved line you have to Stroke Path to draw the line.
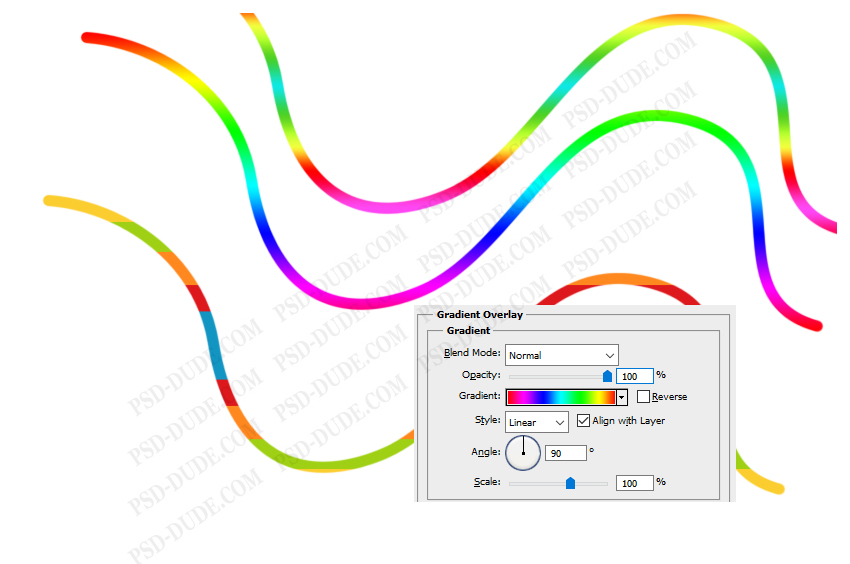
5. how to draw a colored line in photoshop ⚡
To draw a colored line in Photoshop, add a layer style to the layer where you've drawn the line. Use a Gradient Overlay layer style to make colored lines in Photoshop.
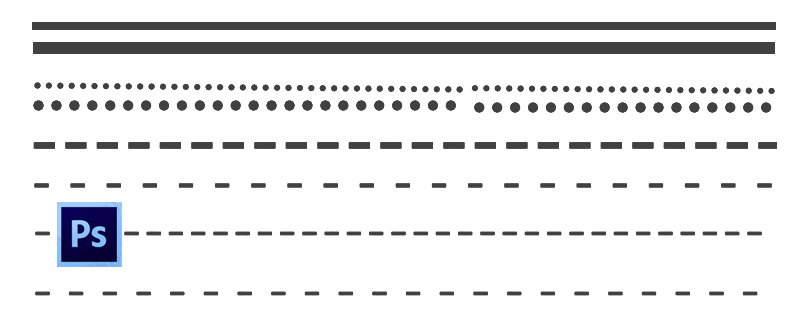
6. Dotted line in photoshop ⚡
To draw a dotted line in Photoshop you have to use a dotted line brush. In this tutorial you will learn how to create Dotted Line in Photoshop.
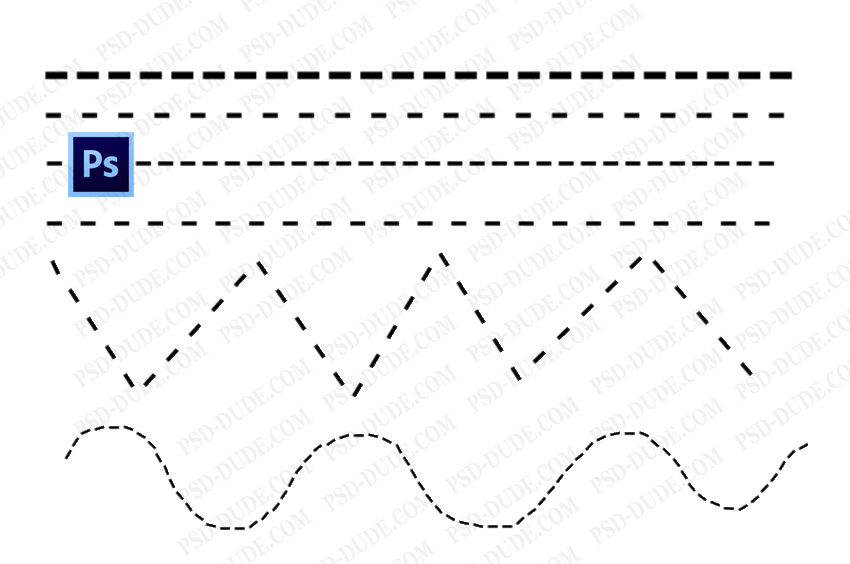
7. Dashed line in photoshop
To draw a dashed line in Photoshop you have to use a dashed line brush. In this tutorial you will learn how to create Dashed Line in Photoshop.
8. How to extend a line in Photoshop
Press Control-T to extend a line in Photoshop. This resize method only works for straight lines (vertical lines and horizontal lines).
9. How to make a line thicker in photoshop
How to modify line width in photoshop? If you use the Line Tool you have to set the line thickness.
If you use the Brush Tool, to make a thicker line in Photoshop you have to set the size of the Brush Tool to a larger size.
How to Thicken Existing Lines in Photoshop
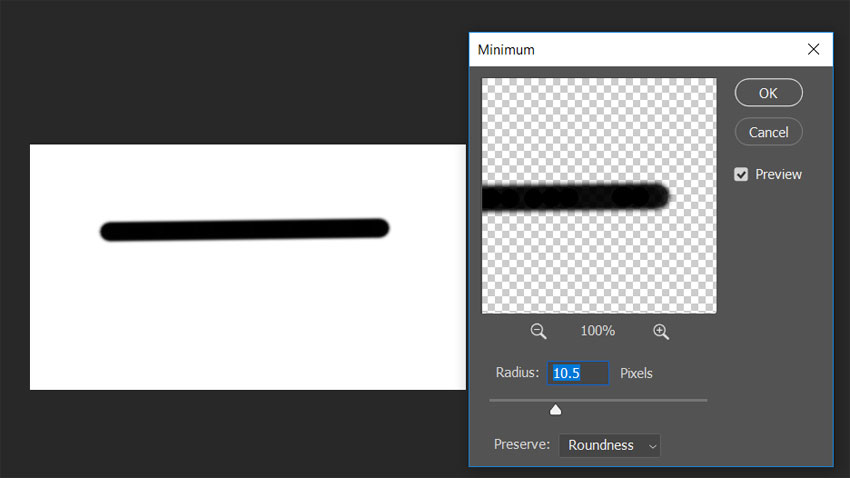
The answer is quite simple! Go to Filter > Other menu and choose the Minimum filter. Using this filter you can increase the size of your lines and thicken existing lines in Photoshop.
If you want to do it quicker & cleaner for your line art, try this FREE action to thicken lines in Photoshop.
10. draw parallel lines in Photoshop
To draw parallel lines in Photoshop you draw a straight line (vertical or horizontal) and press Control-J to duplicate. Then you move the line and you get parallel lines.
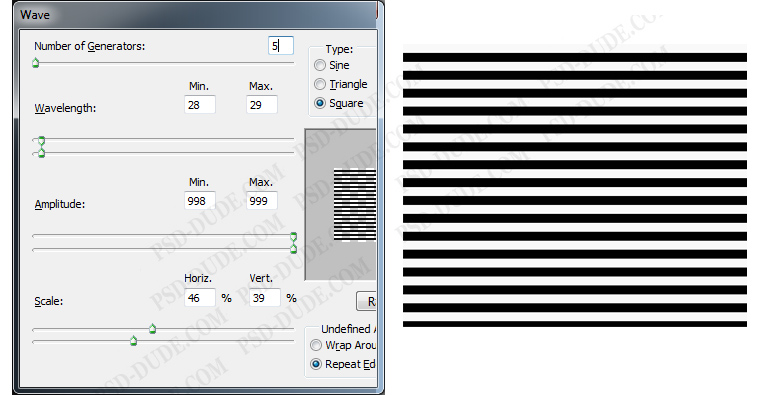
Quick tip: create a new layer with a horizontal/vertical gradient (#000000, opacity 100% and #000000, opacity 0%). Go to Filter > Distort > Wave and make these settings to draw parallel lines in Photoshop.
11. How to draw smooth line digital art using Photoshop
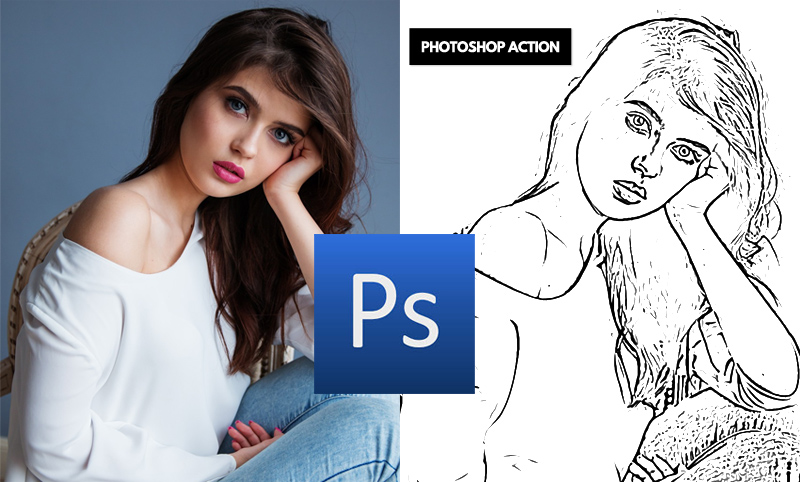
If you want to convert a photo to line drawing you can use this Line Art Photoshop action.
Here's how to draw smooth lines in Photoshop CC 2018, 2019, 2020 and above:
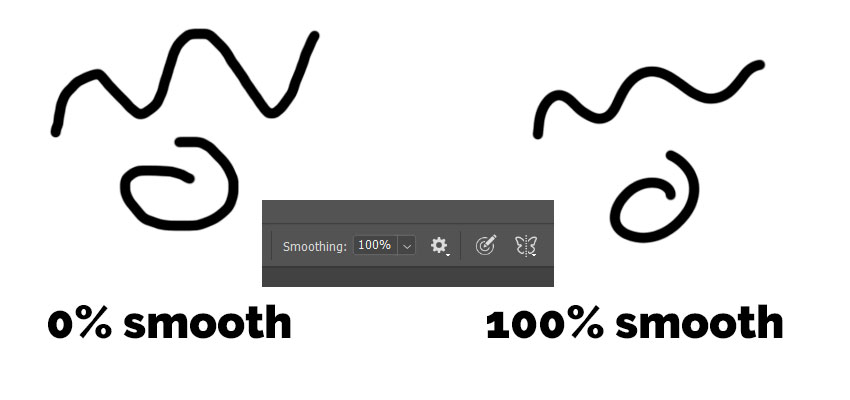
Photoshop CC 2018 introduced a cool little feature that is a real improvement to how to draw smooth lines in Photoshop. Using the Smoothing setting (which goes from 0% to 100%) you can adjust how smooth the brush strokes are.
First thing I noticed when drawing smooth lines using this feature, was that there is a gap between where the cursor is and where the brush stroke is drawn.
Don't worry! This is normal!
The gap is part of the algorithm use by Photoshop CC to calculate how smooth the curves and lines you draw should be. The way Photoshop CC draws the smooth curves can be adjusted by a few extra options other than Smoothing. Click the cog wheel next to the Smoothing slider and you'll see the Smoothing Options:
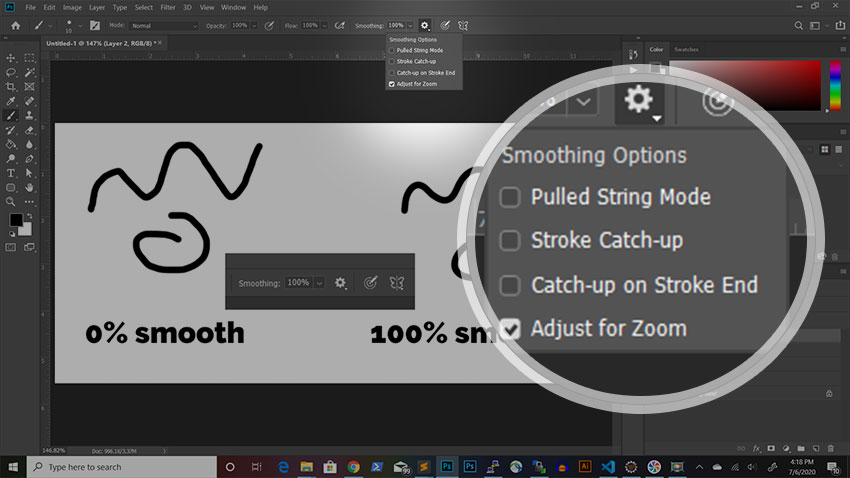
Pulled String Mode
For each of the brush stroke smoothing options I will try to find some analogies that will help explain how the smooth drawing algorithm works. At least for me it helped understanding this better.
For the Pulled String Mode smoothing option, imagine that you tie a string to a ball dipped in ink.
Put the ball on a paper and start drawing by pulling the string.
The longer the string, the smoother the lines you will draw. Here the Smoothing slider controls how "long" the string is and therefore how smooth the curves are.
Tick this option and when drawing, the length of the string is displayed as a circle around the starting poing of the smooth brush stroke. The higher the Smoothing, the larger the circle.
Stroke Catch Up Photoshop
This option does not work together with Pulled String Mode, so you'll have to turn that off first.
When you tick the Stroke Catch-Up option and start drawing you will notice again a gap between the start point and the mouse cursor. But, this time the gap gets smaller. So, the algorithm makes the brush stroke catch up with the mouse.
So, it's like the brush stroke is a missile tracking your mouse cursor and getting closer and closer to it. The higher the Smoothing slower "the missile". Also "the missile" slows down as it gets closer to the mouse cursor.
In this way the shaking of the strokes you draw are smoothened and you will get much smoother curves.
Catch-up on Stroke End
This works like the previous Stroke Catch-Up option, only that when you release the click it will fill the gap between where the brush stroke (or "missile") was and the mouse cursor position.
Adjust for Zoom
This option applies to all other Smoothing Options and when activated it will scale the smoothing effect according to the zoom level of the canvas. This is very useful for large drawings where you switch from brush strokes at high level and brush strokes for small details where you are zoomed in.
Use these Line Art Photoshop Brushes to create beautiful line art in Photoshop.
Related Tutorials to Drawing Lines In Photoshop
Here's a quick video tip about how to draw shapes with straight lines, sharp corners and rounded corners using the Pen Tool.
If you are still having problems mastering the Pen Tool, I recommend this very extensive tutorial on How To Make A Triangle In Photoshop.
That's really all you need to know to start drawing vector art like a pro. I've used these techniques to very quickly draw this cool mountain vector landscape in Photoshop:
How to draw a vector landscape in Photoshop Using Pen Tool And Lines

9 comment(s) for "Draw a Line in Photoshop"
Can any of your lessons, actions, and patterns be used in PSE 10?
I have never used PS or PSE at all but I can't afford the BIG one (PS CS) so I'm going to purchase PSE 10 and really would like to know if any of your awesome TUTs would work for that program.
Thanks for being here reply
I don't have PSE, so I can not tell you if they are working or not but I have read some things about that issue on the internet and it seems that most of the brushes are working on PSE too...
But you have to research more about this problem before you purchase, there are lots of topics on this subject, search on Google!
reply