Christmas Card Photoshop Tutorial Assets
In this tutorial we will be using a few free Christmas Photoshop assets:
- Moon Surface Texture
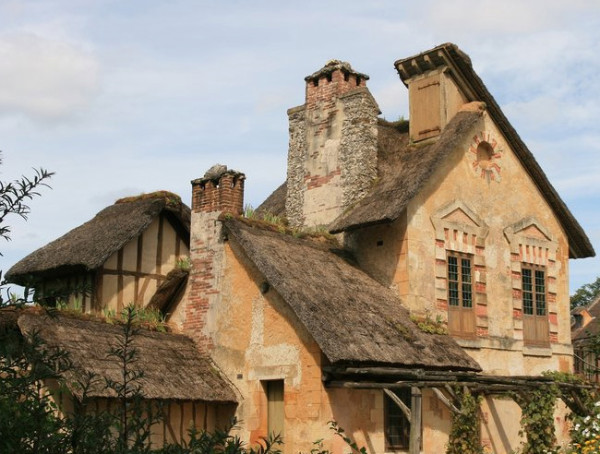
- Cottage House
- Winter Landscape
- Icicle PNG Texture
- Light Beams Overlay
- Christmas Tree With Snow
- Christmas Ball Ornament
- Christmas Angel Ornament
- Wood Garden Signs
- Santa Claus
- Free Snow brushes
- Snowfall 1 - Big Snowflakes Free Texture
- Snowfall 2 - Falling Snow Texture Free Background
How to Create a Christmas Night in Photoshop

Add the House in the Scene
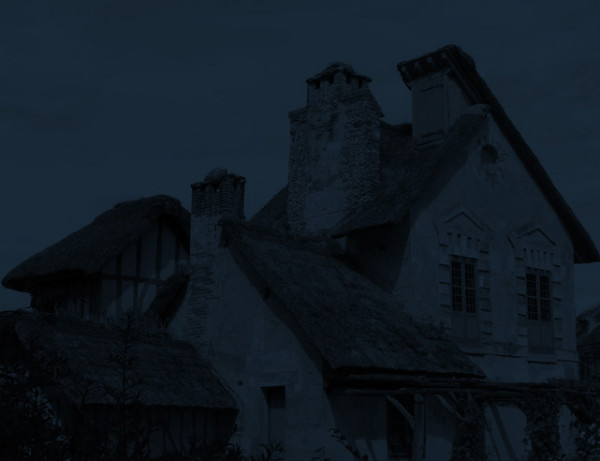
In this first step I will tell you something about the initial steps. First of all I have to open a new psd file, size 650/900 px and to copy this beautiful cottage image Cottage House into this file.
This photo was taken in summer and it is a day time image. And I need exactly the opposite. So I will have to turn the photo from day to night and also change the season from summer to winter. Not a very easy task but I will do my best. This is an excellent technique practice.
Select and remove the grass area. I will replace it with snow later on.
How To Turn Day to Night Effect in Photoshop
There are many ways to turn a day photo into a night scene using Photoshop. I recommend this video tutorial for turning day into night in Photoshop. However, in this tutorial I will show you a slightly different technique.
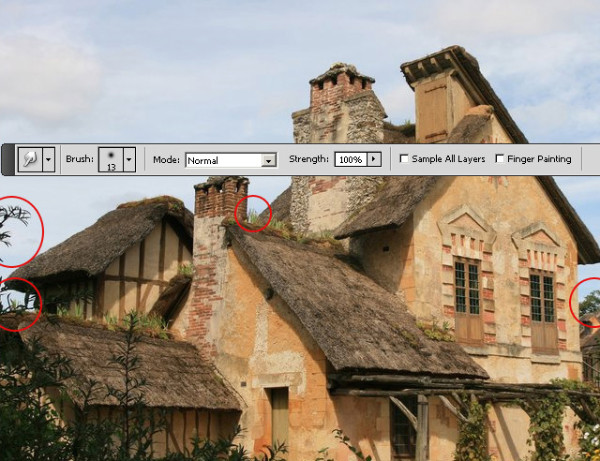
With the Smudge Tool try to cover the tree from the left side and any other trees that are in the sky area. Use horizontal moves for this tool to obtain better results. I will cover the rest with snow.
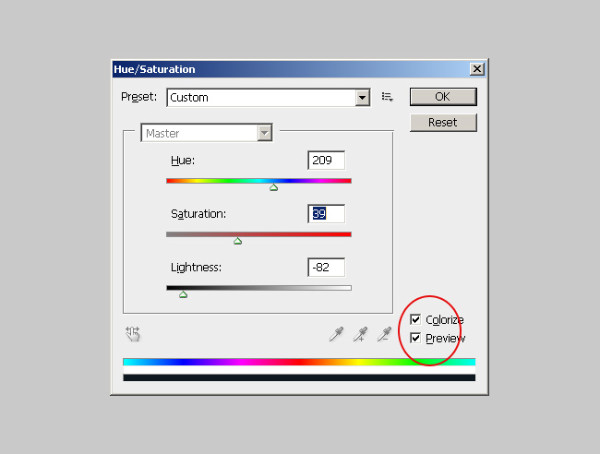
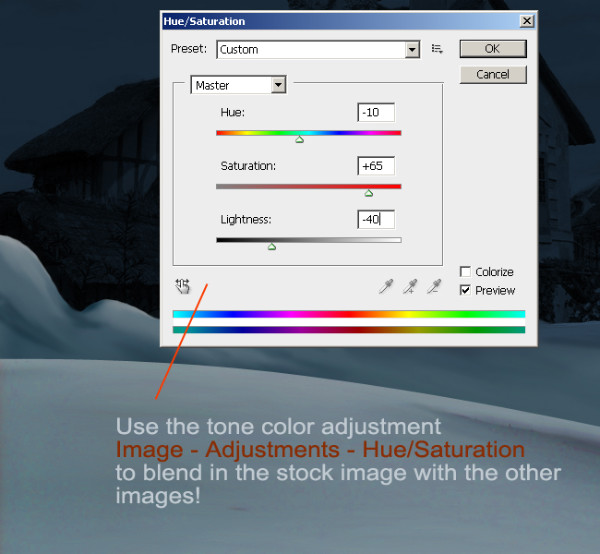
Go to Image > Adjustments > Hue/Saturation menu and make the following settings:
This is the result so far, it starts to look like a night photo.
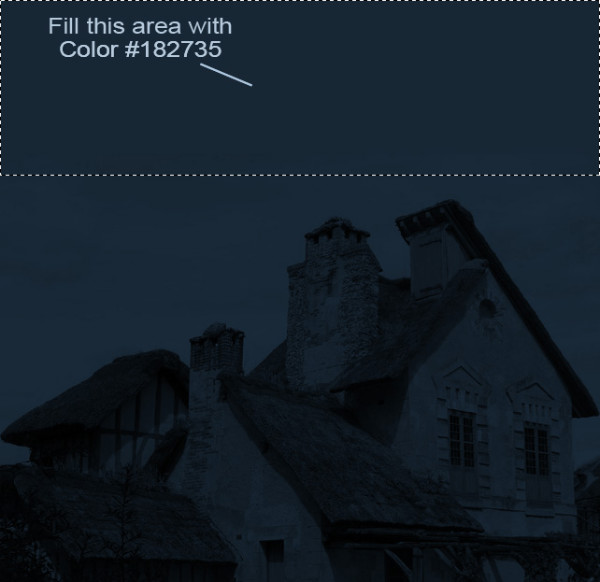
Because the image is placed in the center of our file we still have an empty space on the top and on the bottom of the image. So lets fill out the top area with the Paint Bucket Tool, color #182735.
Change Season from Summer to Winter in Photoshop
Now let's begin the winter season transformation. For the bottom part simple paint over with the Brush Tool. Create a new layer and call it Bottom Snow. Set the foreground color #485f6c , Brush Tool size 14px and paint to cover all the grass and trees and leafs to create a snow surface.

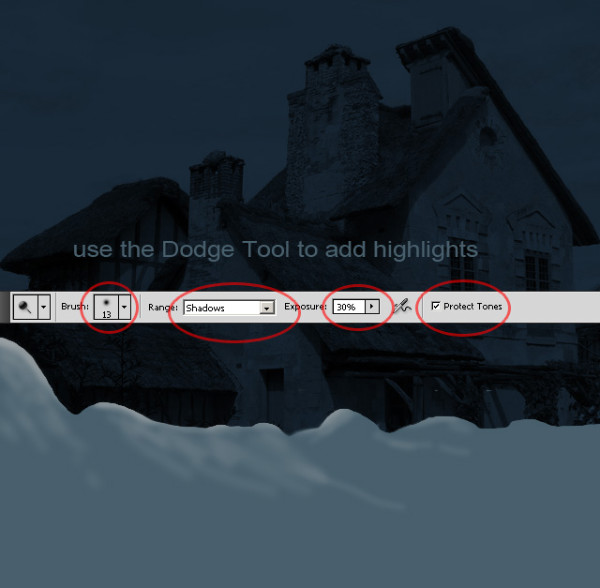
Now I will use the Dodge Tool and the Burn Tool to create highlights and shadows on the snow surface. It it similar to painting over with the Brush Tool.
First use the Dodge Tool, small size brush, Shadows Range and Exposure 30%. Don't forget to check Protect Tones. Pass over certain areas several times to to create depth.
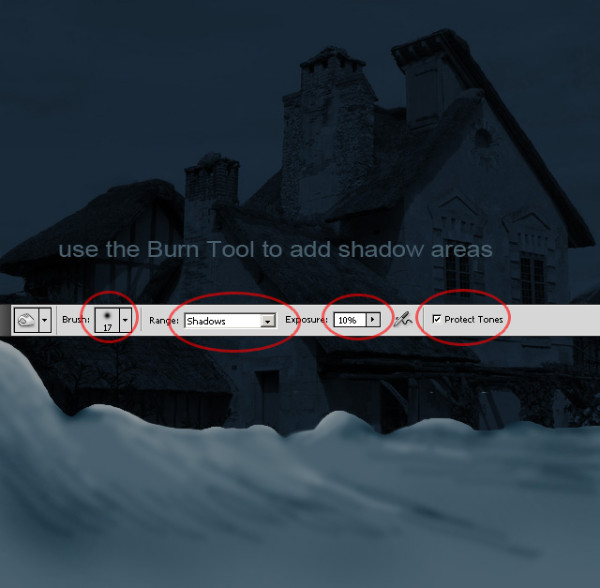
Now I will do the same but with the Burn Tool. Burnt certain areas several times also. It is important to work slow and carefully.
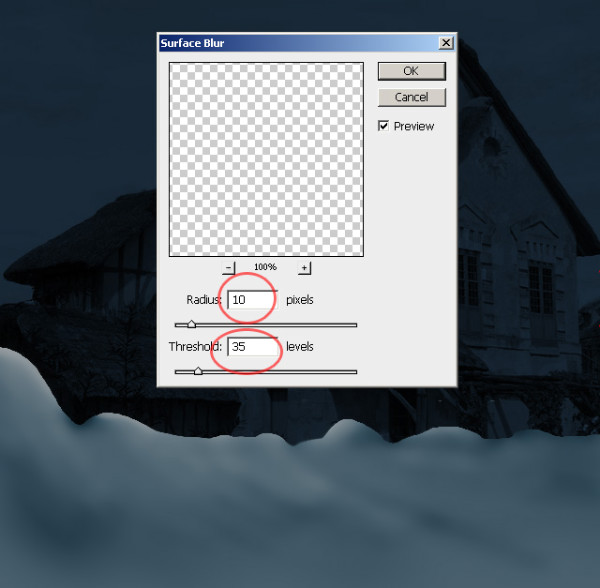
To soften the surface and blend the different tone colors use Filter > Blur > Surface Blur, with the following settings.
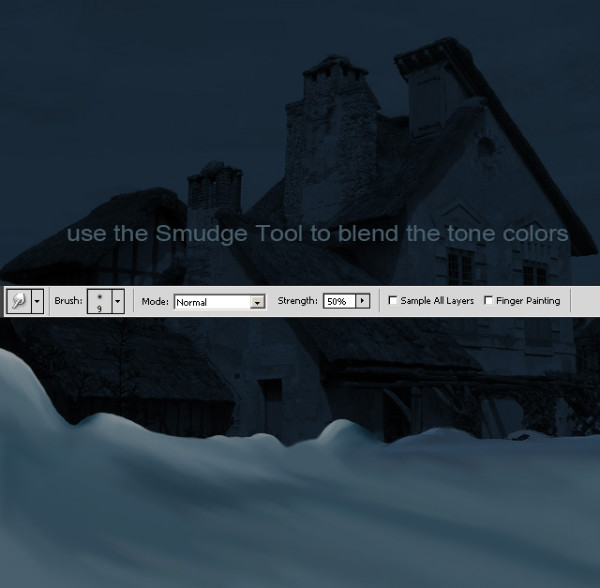
Use the Dodge Tool and the Burn Tool again with a smaller exposure to paint the surface again. But instead of using surface blur I used the Smudge Tool to blend the colors.
Add Snow Surface in Photoshop
Now I want to improve the winter landscape by adding another snow surface. I will use this Winter Landscape stock image.
So download the image and resize it to 40% so that it fits in our file. Then with the Pen Tool, paths selected draw a simple shape to keep only the snow area. Right click on the path to make a selection.
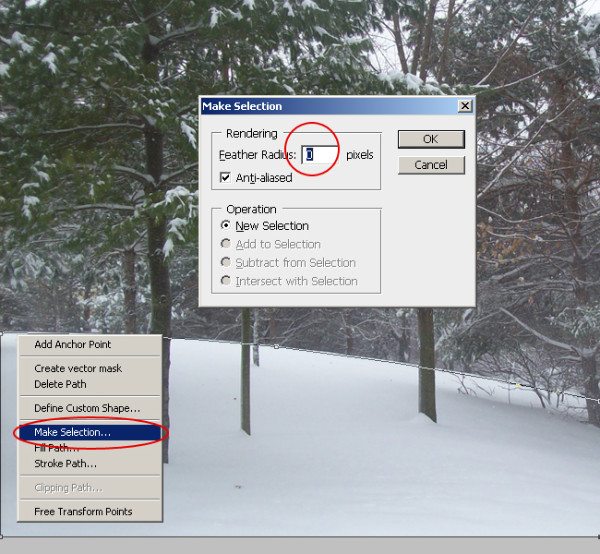
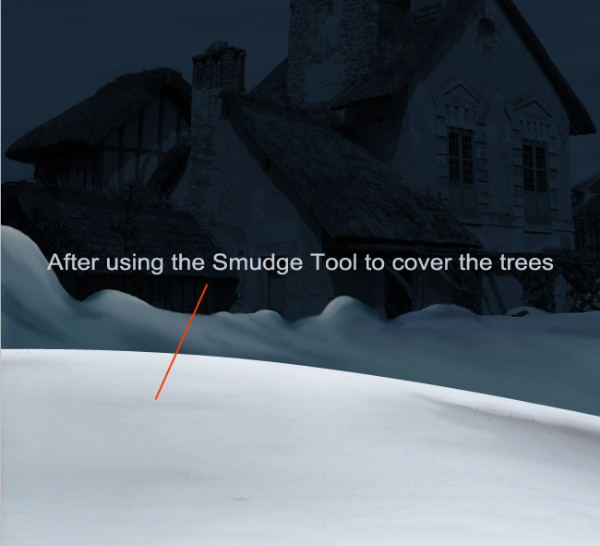
Copy the selection in a new layer and call it Snow Area 2. With the area selected use the Smudge Tool to cover and hide the trees. Use Surface Blur if you obtain a surface that does not look realistic.
Another obvious thing that we need to fix is the tone color, the lightness and the saturation. For that let's change the settings of Hue/Saturation as shown in the image.
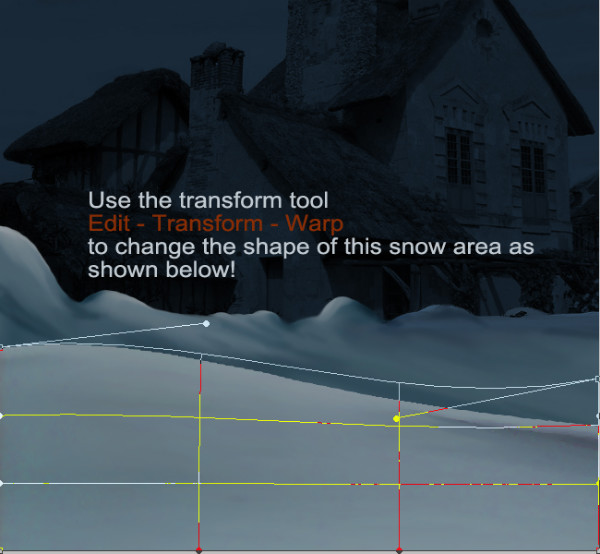
Use the Transform Tool from the menu Edit > Transform > Warp, to change the shape of this snow area like in the image:
You can use the Dodge/Burn Tools to create highlights and shadows, but only with small size Exposure and with Protect Tones checked.
Add Snow on The House Roof
There is no snowy winter without snow on the roof of the house. So, practically with almost the same technique used on previous 2 steps, we will add snow on the roof.
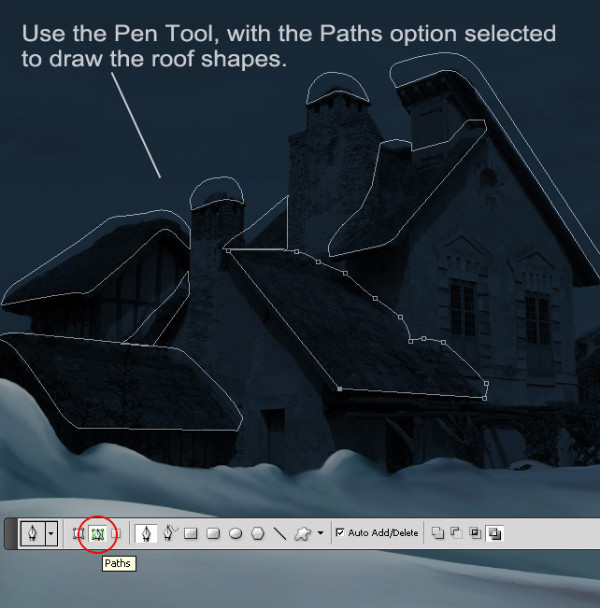
Create a new layer, called Roof Snow. With the Pen Tool, path selected draw the roof shapes. In fact draw the roof shapes exceeding the initial shape so that we can give volume to the snow surface later on.
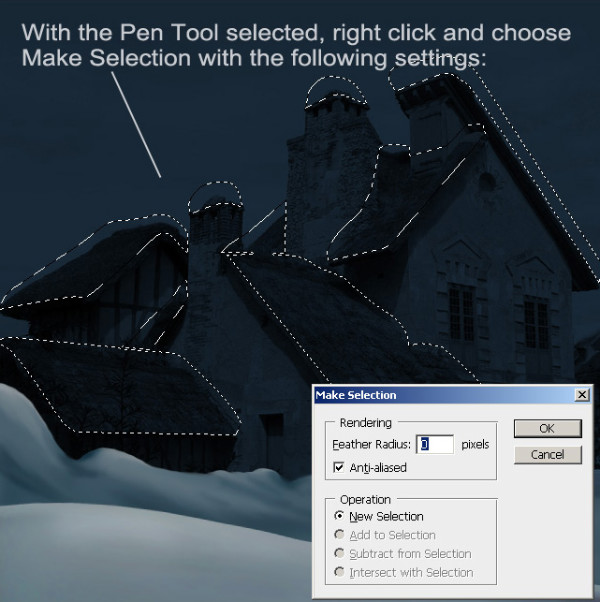
With the Pen Tool selected, right click and choose Make Selection with the following settings:
Set the foreground color #596d79 and with the Paint Bucket Tool fill the selections.
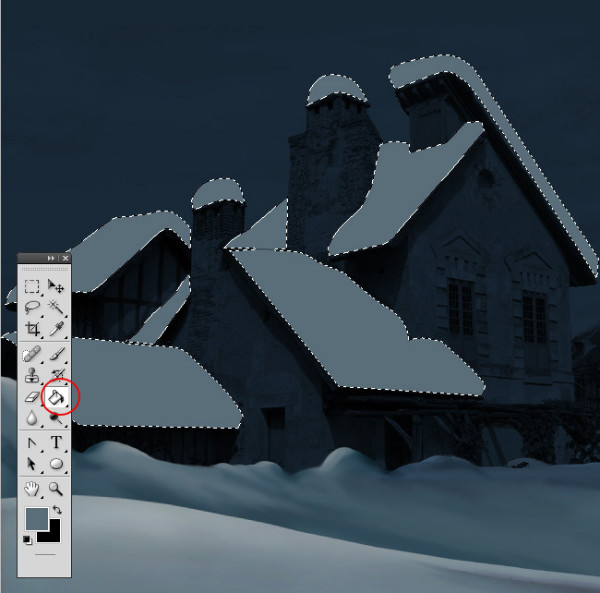
Use the techniques from the previous steps to create the snow effect. Try to add depth, volume and a tridimensional shape to snow on the roof. So with the Brush Tool and a graphic tablet(if you have one for better results), I will start painting the snow.
Make a copy of the Roof Snow layer before you begin. With the Brush Tool paint the shadow areas as shown below using the following color pallet: #576e76, #385462 and #22394b .

Add Surface Blur with the settings: Radius 10 pixels and Threshold 30 pixels. Now with the Burn and Dodge Tools accentuate the light and shadow areas.
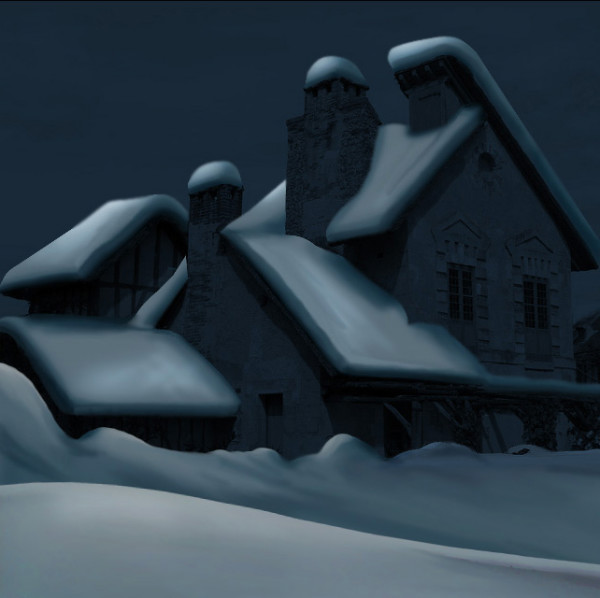
Winter Night Sky with Moon in Photoshop
Add this Moon stock image in a new layer. Call this layer Moon. Set the blend mode to Screen.
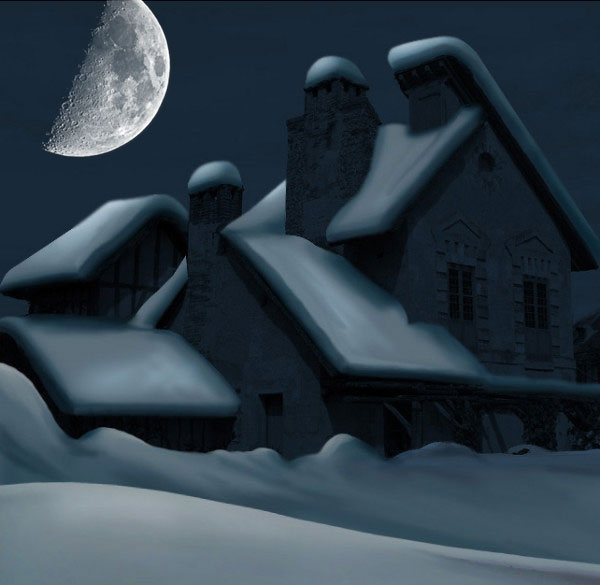
Add a Layer Mask to the Moon layer and use the Brush Tool inside the mask to hide part of the moon. Use color black and a soft round brush to hide this area.
Create a new layer and call it Moon Glow. Use the Brush Tool and a soft round brush to paint a glow effect. Use color white and reduce the opacity of the layer to around 60%.

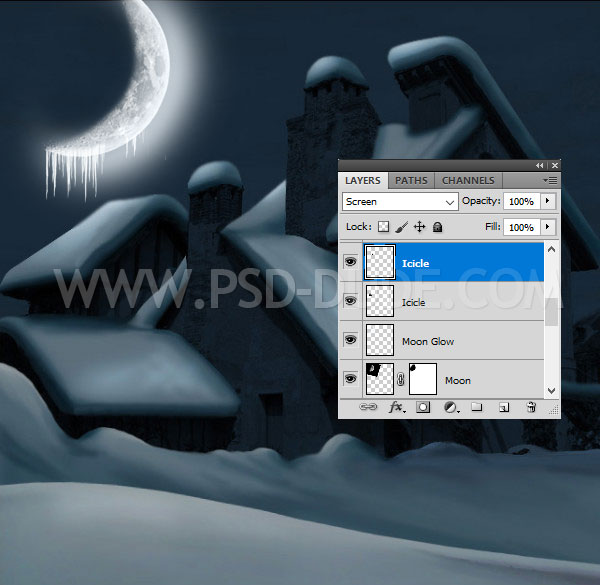
Add Icicle in Photoshop
Create a new layer and add this icicle PNG image. Set the blend mode to Screen. Add as many icicles as you want and use the Eraser Tool to remove the unwanted areas.
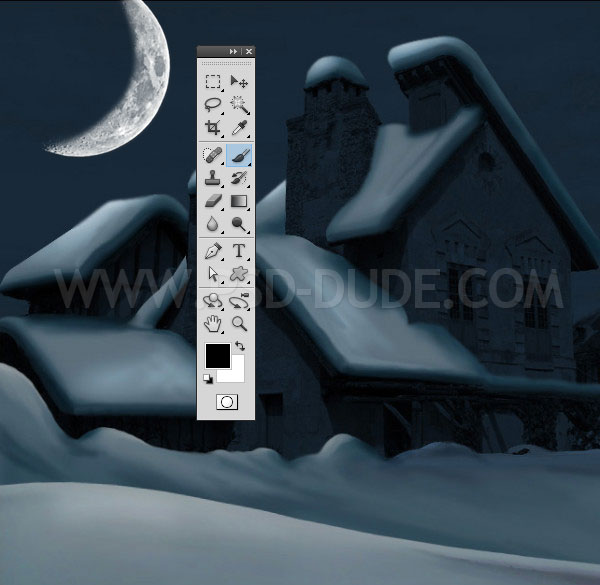
How to Make a Window Glow in Photoshop
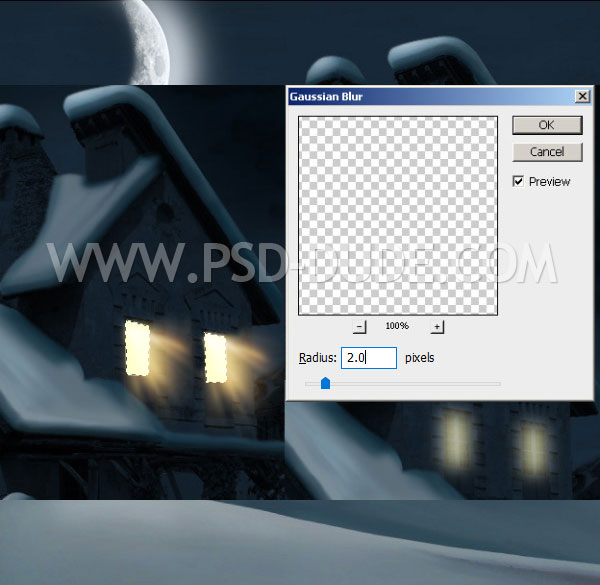
Now I am going to add lights to the house. For that create a new layer called Window Light. With the Pen Tool create two selections like in the image and fill it with color #fbffbe. Add Gaussian Blur like in the image and change the blending mode of the layer to Linear Dodge 70% opacity.
With the Eraser Tool carefully erase the left and bottom area of the light that exceeds the window. You should now have something like that:

For a more realistic window glow effect add this light beam texture overlay. Set the blend mode to Screen. Resize, rotate and use the Eraser Tool to create a realistic light effect. You can also use the Gaussian Blur filter.
Add a Christmas Tree
To complete the winter scenery I will add a little Christmas tree in the background. Copy this Christmas Tree With Snow stock image. Cutout the big tree from the left(in fact only the top part). Resize the image to 35% and adjust the Hue/Saturation balance as shown:

Work with the Burn and Dodge Tools to blend in the tree better and to add shadow and light.
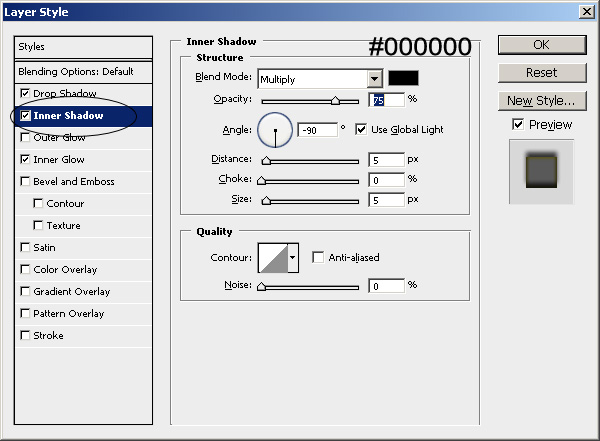
Create a new layer and call it Tree Decoration. Take the Brush Tool and draw tree decorations like in the image. Play with different sizes and pick the color #73231a.
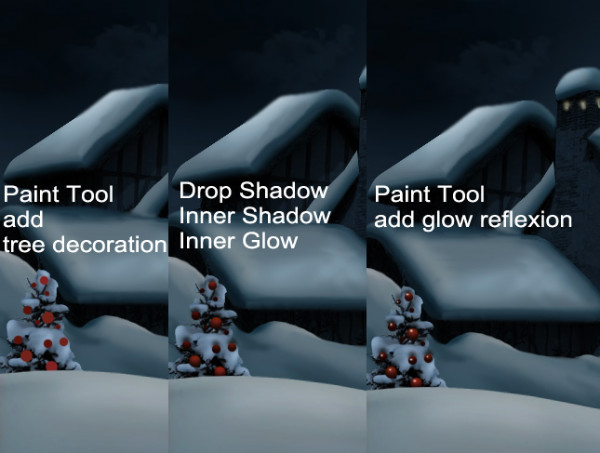
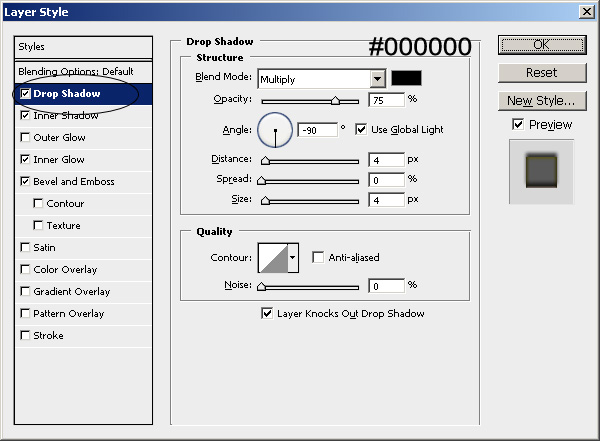
Add Drop Shadow, Inner Shadow and Inner Glow as shown in the images below:

For the glow simply draw the highlights with color #c29c95.
For faster results you can use PNG Christmas ornaments: Christmas ball ornament, Christmas angel ornament and other decoration that you like.
Add the Street Sign
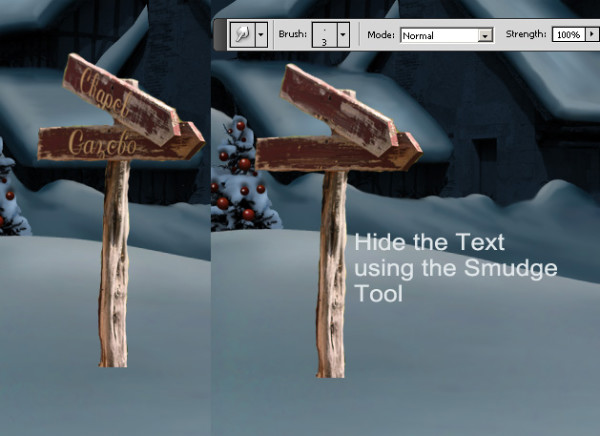
I want to add a nice street sign so for that I will use this Wood Garden Signs stock image. Copy and cut the image, then resize it to 40%. Now hide the text with the Smudge Tool. Use a lower size brush to obtain a realistic result.
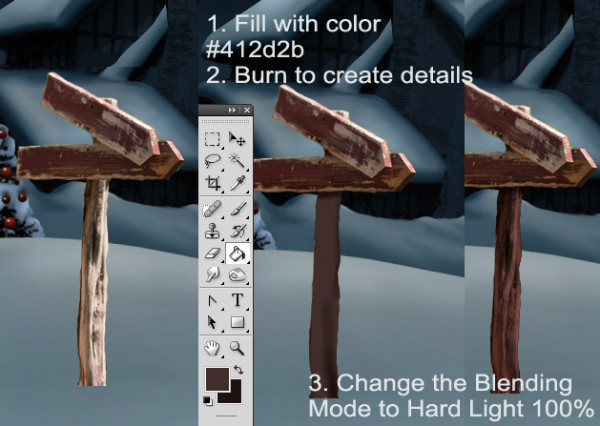
You can see that the photo is too exposed and was taken on a bright summer day. For that I will create a new layer and I will paint over the sign using the color #412d2b. Change the blending mode of this layer to Hard Light 100%. Now merge the two layers and you will notice the difference.
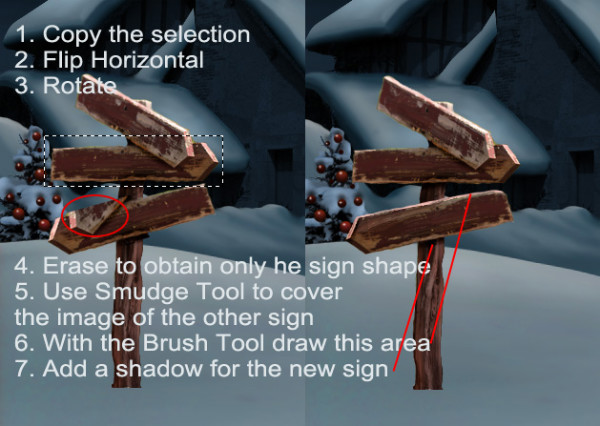
I will now add to my sign a new direction sign using the same image. So make the selection like in the image. Erase to obtain only the sign. Flip the sign horizontaly and rotate. With the Smudge Tool retouch the image to hide the incomplete sign area.
For a realistic result adjust the shape and add a shadow. When it looks good merge the two layers: Street Sign and the Third Sign.
Add a text on every sign: psd-dude.com / wishes you / a Merry Christmas! Choose the color #b29986 and font Amienne. Merge the Text Layer with the Street Sign Layer.
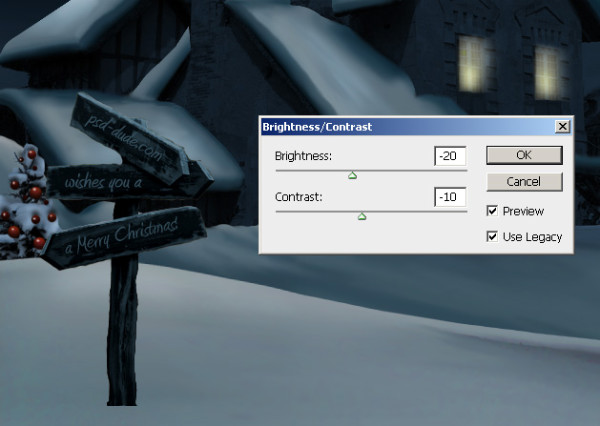
Adjust the color tone, to blend in the sign with the other layers. For that use a Hue/Saturation adjustment as show in the image:
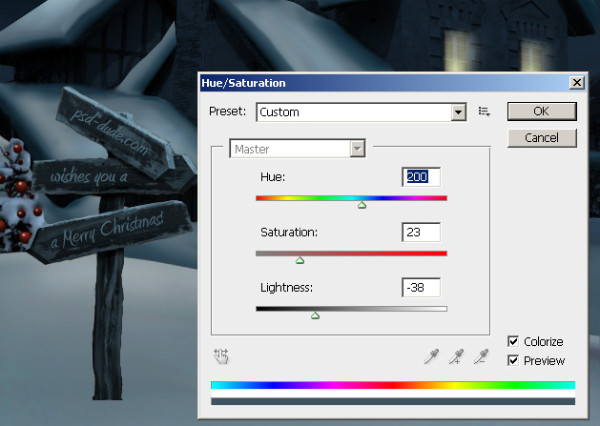
Adjust the Brightness and Contrast following these settings:
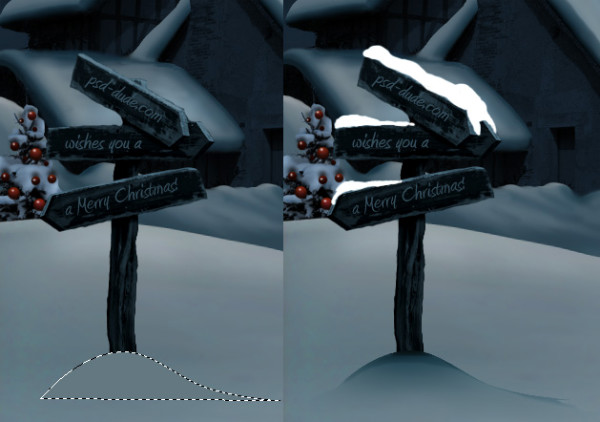
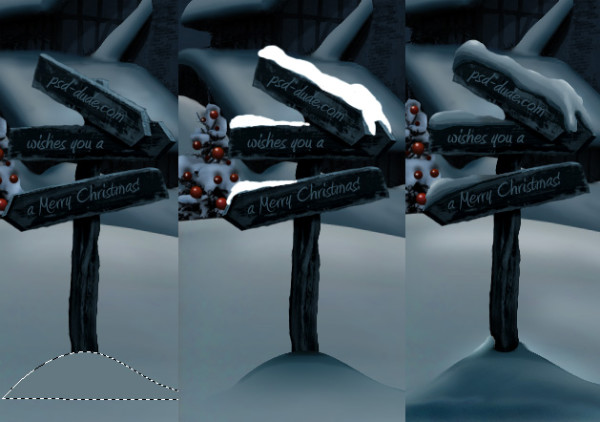
Add Snow On the Street Sign
Create a new layer called Street Sign Snow. Draw a shape with the Pen Tool, fill the selection with color #637881. Use The Burn Tool and Surface Blur to give it shape. I will also add snow on the street sign in the same way I added snow on the roof of the house in the first steps of this tutorial.
Add a Cast Shadow Effect for the Street Sign
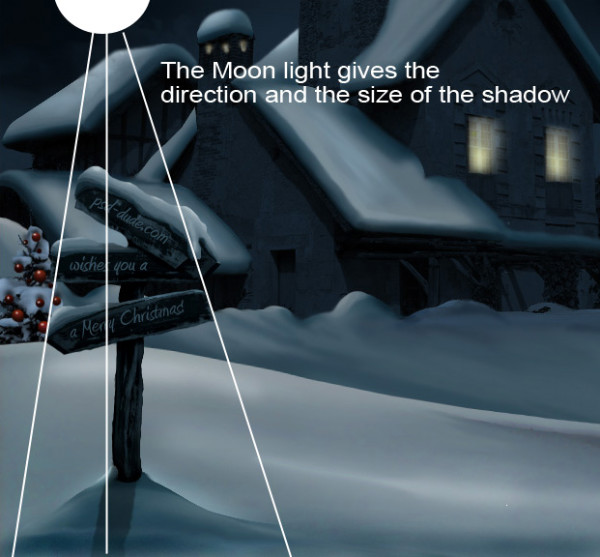
Duplicate the Street sign layer and make it black. Flip it vertical and then distort it like in the image below. The direction of the shadow is given by the moon light.
Add the Santa Claus
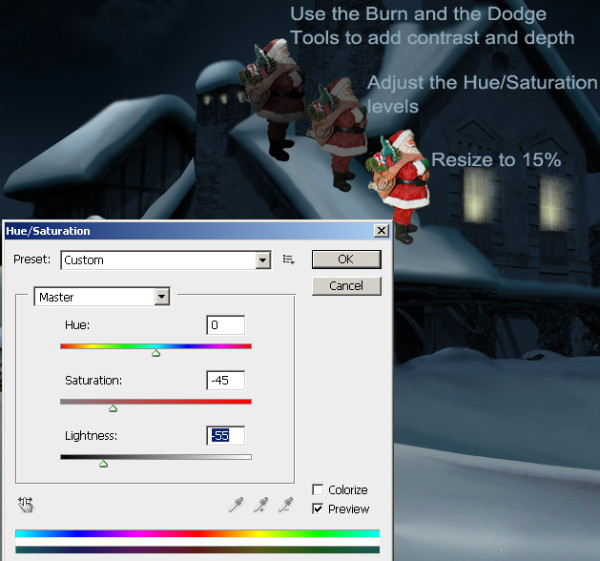
Now I will add the Santa Claus on the house roof. Simply copy this image Santa Claus in your PSD file and remove the background. Resize the image to 15%.
The Santa Claus needs a little color tone adjustment and light adjustment. For that change the Hue/Saturation balance as shown in the image. Another thing that must be done is to use the Burn Tool to darken the lower part of the Santa Claus and the Dodge Tool to lighten the upper part where the moon lights are dropping.
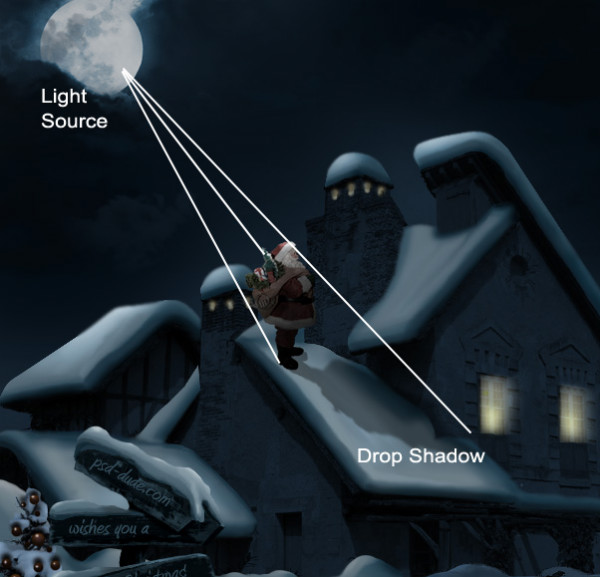
Following the rule that every object or person casts a shadow, it is a must to add a shadow for the Santa Claus. So duplicate the layer, make it black and flip it vertical.

And then Distort the shadow like in the image, lower the Opacity to 40% and add Gaussian Blur.
Create a new layer, called Sparkle and download this beautiful sparkle brushes Pixie Dust Trails brushes . With white color add a little sparkle accents. Use a lower size brush and do not add to much sparkle.
How to Create Snowing Effect in Photoshop
The last and final touch is adding a new layer, called Snow. Download this snow brushes and add snow with white color. You can also use these textures snowfall 1 and snowfall 2 with Screen blend mode.
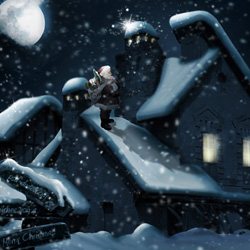
So here is the final result for our Christmas Night Photoshop Manipulation. If you like it don't forget to share it with your friends.
I think this Photoshop ice effect tutorial will help you learn how to create amazing Christmas cards for the winter holiday. Also, check out this list for more beautiful Christmas Photoshop tutorials
Online Christmas Card Maker
Did you know you can use online tools like MockoFun to make Christmas cards? Combine Christmas vector shapes with text and create some amazing Christmas cards. MockoFun provides pre-made templates for making Christmas cards online in just a few minutes.
Check out this awesome list of over 50 Christmas fonts that you can use online or download for free to use in Photoshop. Combine Christmas fonts with text symbols like a star symbol for example.
Check out this tutorial on how to use the online Christmas Card Maker and all the awesome features that MockoFun has to offer.

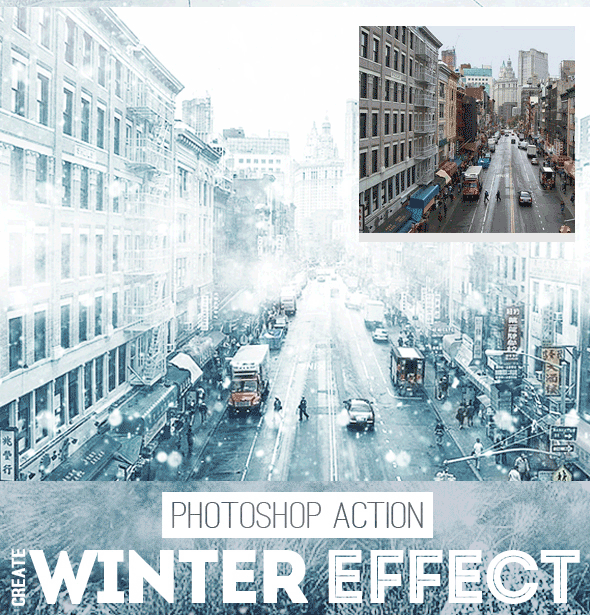
If you enjoyed this tutorial, you must not miss these Premium Photoshop Actions for quickly creating frozen winter scenes effects from any image:
Frozen - Winter Photo Effect Photoshop Action

Winter is Coming Photoshop Snowing Effect Action
29 comment(s) for "Christmas Photoshop Tutorial"
I also checked up your result and it is pretty good: the Santa Claus seems too dark for the image but the image looks like Christmas to mee :) reply
Thanks for stopping by my little site! Merry Christmas! reply
reply
every step is so clear.....even a child can do dat...by readin dis one....u r doin really a great job........
thnx fo dis one........ reply
I am attempting to follow your tutorial, but the bit where you do the shadow on the snowy roof you seem to have put the same colour code for each shade.
I just thought you should know. reply
For a first work in Photoshop it looks really nice. Thank you for practicing the tutorial and keep up the good work!
Thank you for sharing this tutorial with us! It took me all day to make it, but I learned a lot. Even though I struggled hopelessly with the windows light. It didn??t work exactly like you said it would.. every time I drew a new window the yellow light became more white for some reason.. oh, well.. this became ugly and not very well in my picture, but I like the picture noen the less :) It??s my first drawing in photoshop! :) So thanks for sharing!
Trine :) reply
After using the brush, a 1px 100% Opacity outer glow would give a bit of a smoothness to the reply
Good one ;) reply