
How to Make a Gradient in Photoshop
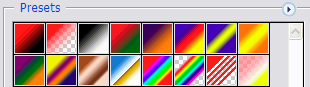
You can make your own gradients in just a few steps. But if you are looking for pre-made Photoshop gradients make sure to check out these collections:
- 30 Photoshop Gradient Sets
- FREE Sky Gradients for Photoshop
- Sunset Gradients (Photoshop GRD & JPG Images)
Sunset gradients for example were part of the retro synthwave style along with chrome 80s font and typography. Also metal gradients like chrome gradients were used in the 80s style designs.
Where Is The Gradient Tool In Photoshop?
Sometimes the gradient presets aren't
what you need. It's easy to mix your own gradient, and save it for
future use.
Open the gradient tool 
Photoshop Elements: The gradient tool is to the
right of the paint bucket tool in the toolbox, and the keyboard shortcut
is G.
Adobe Photoshop: The gradient tool is under
the paint bucket tool in the toolbox, and the keyboard shortcut is G.
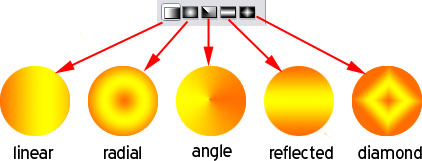
Choose a gradient type in the options
bar. I have linear selected.
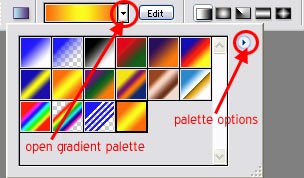
Choose a gradient
to alter if there is one close to what you want. Otherwise the gradient
editor will use the currently selected gradient. In the options bar,
click the arrow beside the gradient preview to open the gradient picker. Note:
Your gradients may not look like mine, because it depends on the gradient
set you have loaded! If you are using Elements you
will have an Edit button. If you are using Photoshop,
you will not have an Edit button.
| Elements |
Photoshop
|
 |
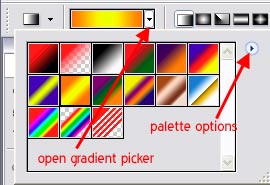 |
Elements: Click the Edit
button next to the gradient preview to open the gradient editor.
Photoshop: Double-click
the gradient preview in the options bar to open the gradient editor.
Working With The Photoshop Gradient Editor
The gradient editor
in both Elements and Photoshop is
the same.
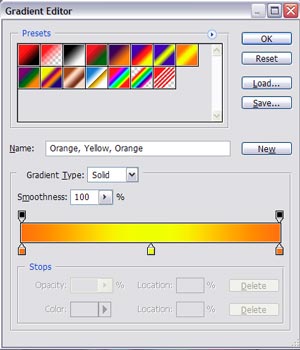
Choose a Gradient
Type: Noise or Solid. (Noise gradients contain
randomly distributed colors within
a range of colors that you specify. If you want more
info on noise gradients, go to the Online Help and enter Noise Gradient
in the search box.)
Choose
a smoothness setting: the smoother you want the colors to blend, the
higher the setting should be, up to 100%.
How To Use The Photoshop Gradient Ramp
The ramp lets you choose the colors and how they blend
together. The markers are called Stops and moving
them edits the gradient colors or opacity. You can have many colors,
and you can have many different opacities, but for this exercise we'll
use three colors and two opacities.
On top of the ramp are the opacity stops that
edit the transparency of a gradient. On the bottom of the ramp are color stops that
let you edit the colors included in the gradient.
Setting Up Color Stops In Photoshop Gradients
First let's look at the color stops. Selecting a color stop activates
the color controls under the ramp.
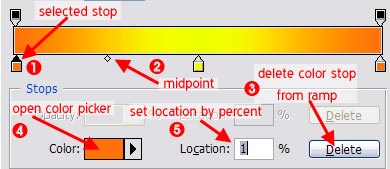
1. Selected Stop: Select stops by clicking
on them. A selected stop has a dark colored point. Any manipulations
you do to color or position will affect the selected stop only. Drag
the stop to a new location to change the "speed" of the gradient (how
fast it blends together) or use the Location box
to manually type in a percentage. Try sliding one of the color
stops and see how it affects your gradient.
2. The small diamond between
stops is called the midpoint.
You can use this diamond to determine where the midpoint of the colors
are and affect how they blend. If you wanted more orange tones in the
above gradient you could slide the midpoint diamond to the right, for
example. Try sliding it to adjust the midpoint. When the midpoint diamond
is selected it is solid colored, rather than hollow.
3. Delete button: Clicking this deletes
the selected stop from the gradient ramp. You can also drag the stop
away from the ramp and drop it to delete it. Try both, and then use undo (cmd/ctrl
+ Z) to get it back.
4. Color
picker: Either double
click on the color chip to open the color picker, or click the arrow
to open a popup where you can quickly choose the background and foreground
colors, or User color. If you choose User color, you still will need
to double click on the color chip to open the color picker. Try changing
the color.
5. Location: You can set the location
here manually, by percent, 0% to 100%, 0 being far left and 100 all
the way to the right. This is most useful when you want to divide colors
exactly.
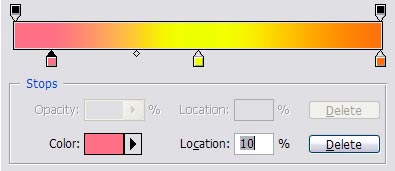
Select the last color stop on the right. Drag it off
the ramp or click Delete to get rid of it. You can
also press the delete key on your keyboard, but if you use the delete
key it will reappear on the other end of the ramp!
You should have something like this:

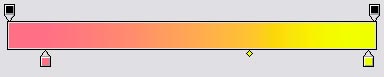
If you select either color stop, you'll have a midpoint
diamond you can adjust between them. Slide the yellow stop to the right,
and adjust the midpoint diamond to suit you.
Adding Additional Color Stops In The Gradient Tool
Not only can you remove color stops, you can also add
them. This is as easy as clicking once under the ramp where you want
the color stop to appear. Then use the color section to determine the
color for the stop.
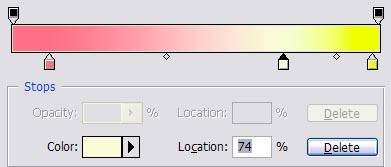
When you add color stops you will have additional midpoints
automatically added as well.
Photoshop Gradients Custom Opacity Stops
The opacity stops let you adjust the transparency of the gradient.
Click on either opacity stop to select it. In the screenshot below
I have the left opacity stop selected. The point is black to show it
is selected. The Opacity controls will now be active
below the ramp rather than the Color controls. Notice you also have
a midpoint just like with the color controls. You can adjust this the
same way as adjusting a color midpoint, and it will determine how the
transparency is distributed on the gradient.
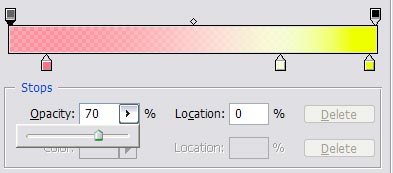
Notice the Opacity setting: you can
use the slider to adjust the opacity of the selected opacity slider
from 0-100%, and the stop will change too, to reflect the opacity.
Notice also that you
can see a transparency grid under the colors to show you how the gradient
will look. My Location is
still 0%, because I have not moved the slider, but you can also change
it by typing in a percentage or moving the stop.
Opacity Midpoint: Click on the midpoint
to select it, and the location will show in the location box. When
you move the midpoint watch the transparency grid below the gradient.
This will show you how the transparency is being distributed. When
you are done, let's save it.
How To Create And Save A Custom Gradient In Photoshop
To save the gradient you made, the natural thing to do
it click the Save button, right? Wrong! Here Adobe has thrown you a
curve. You have not yet added the new gradient to the swatches, and
it must be added before you can save it. If you click save now, the
gradient will not really be saved.
Type a name for the new gradient in the Name box, and
then click the New
button.

Now the gradient will appear in the swatches.
Now you can click the Save button  to
the right of the preset previews at the top of the editor.
to
the right of the preset previews at the top of the editor.
When the browse box opens, probably to the default gradients
folder in your Elements or Photoshop folder, type a unique name. The
file will be saved as a .GRD file, the format for Photoshop gradient
presets. Click Save.

This not only saved the new gradient you just made, but
it also saved the ones that were already loaded.
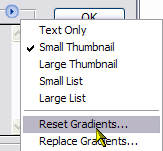
Open the palette options and choose Reset
Gradients. When asked if you want to replace the gradients
with the default gradients, say Yes. the gradients return to defaults.
(Note: Sometimes when loading gradients you may wish to append the the
gradients you are loading to the current ones. This will keep the current
gradients loaded, and add the new ones to the end of the presets. If
that is the case, click Append. )
Loading A Custom Gradient GRD File In Photoshop
Click the Load button next to the presets
previews. When the dialog box opens, choose the new gradient file you
saved, and click Load at the bottom of the dialog.
The whole gradient file is loaded so you will have duplicates of all
but the custom gradient you saved loaded.
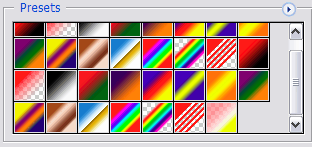
You can avoid this by opening the palette options and
choosing Replace Gradients from the menu. Choose the
new file and click Load.
What if you don't want all of those extra gradients loaded?
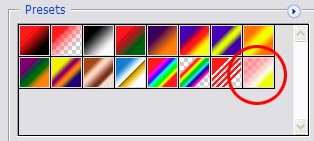
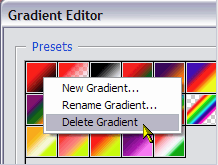
How To Save Photoshop Custom Gradient Sets
I have gone ahead and followed the steps outlined previously to make
a couple more custom gradients. I want to save them as a set. The gradients
outlined in red are new, and the ones I want to keep. We need to get
rid of the others.

Right click (Mac users Control
+ Click to get the context
menu) on the first gradient in the upper left corner, and choose Delete Gradient.
The gradient is deleted from the presets.
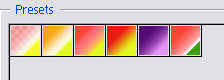
Repeat this for all of the gradient presets you want
to get rid of. They are being deleted from the default file, so the
next step is to save the file under another name. This is what I have
left.
Now click the Save button, and you can
choose a new name for the gradient set. I named these fruit_gradients.GRD.
Click Save at the bottom of the dialog and you now have a new
set of gradients presets.
Click OK to exit the Gradient
Editor. They can now be loaded as we
did before.
If you wish, you can download
the fruit gradients here. They will work in Photoshop 7 and PS, CS5, CS6, CC, and
Elements 2. (They may work in Elements 1 and lower versions of Photoshop,
but I have not tested them as I don't have them installed on this machine.)
This tutorial originally appeared on http://www.northlite.net, a website that no longer exists. I've saved this content for all Photoshop lovers out there that want to know more about Photoshop custom gradients.
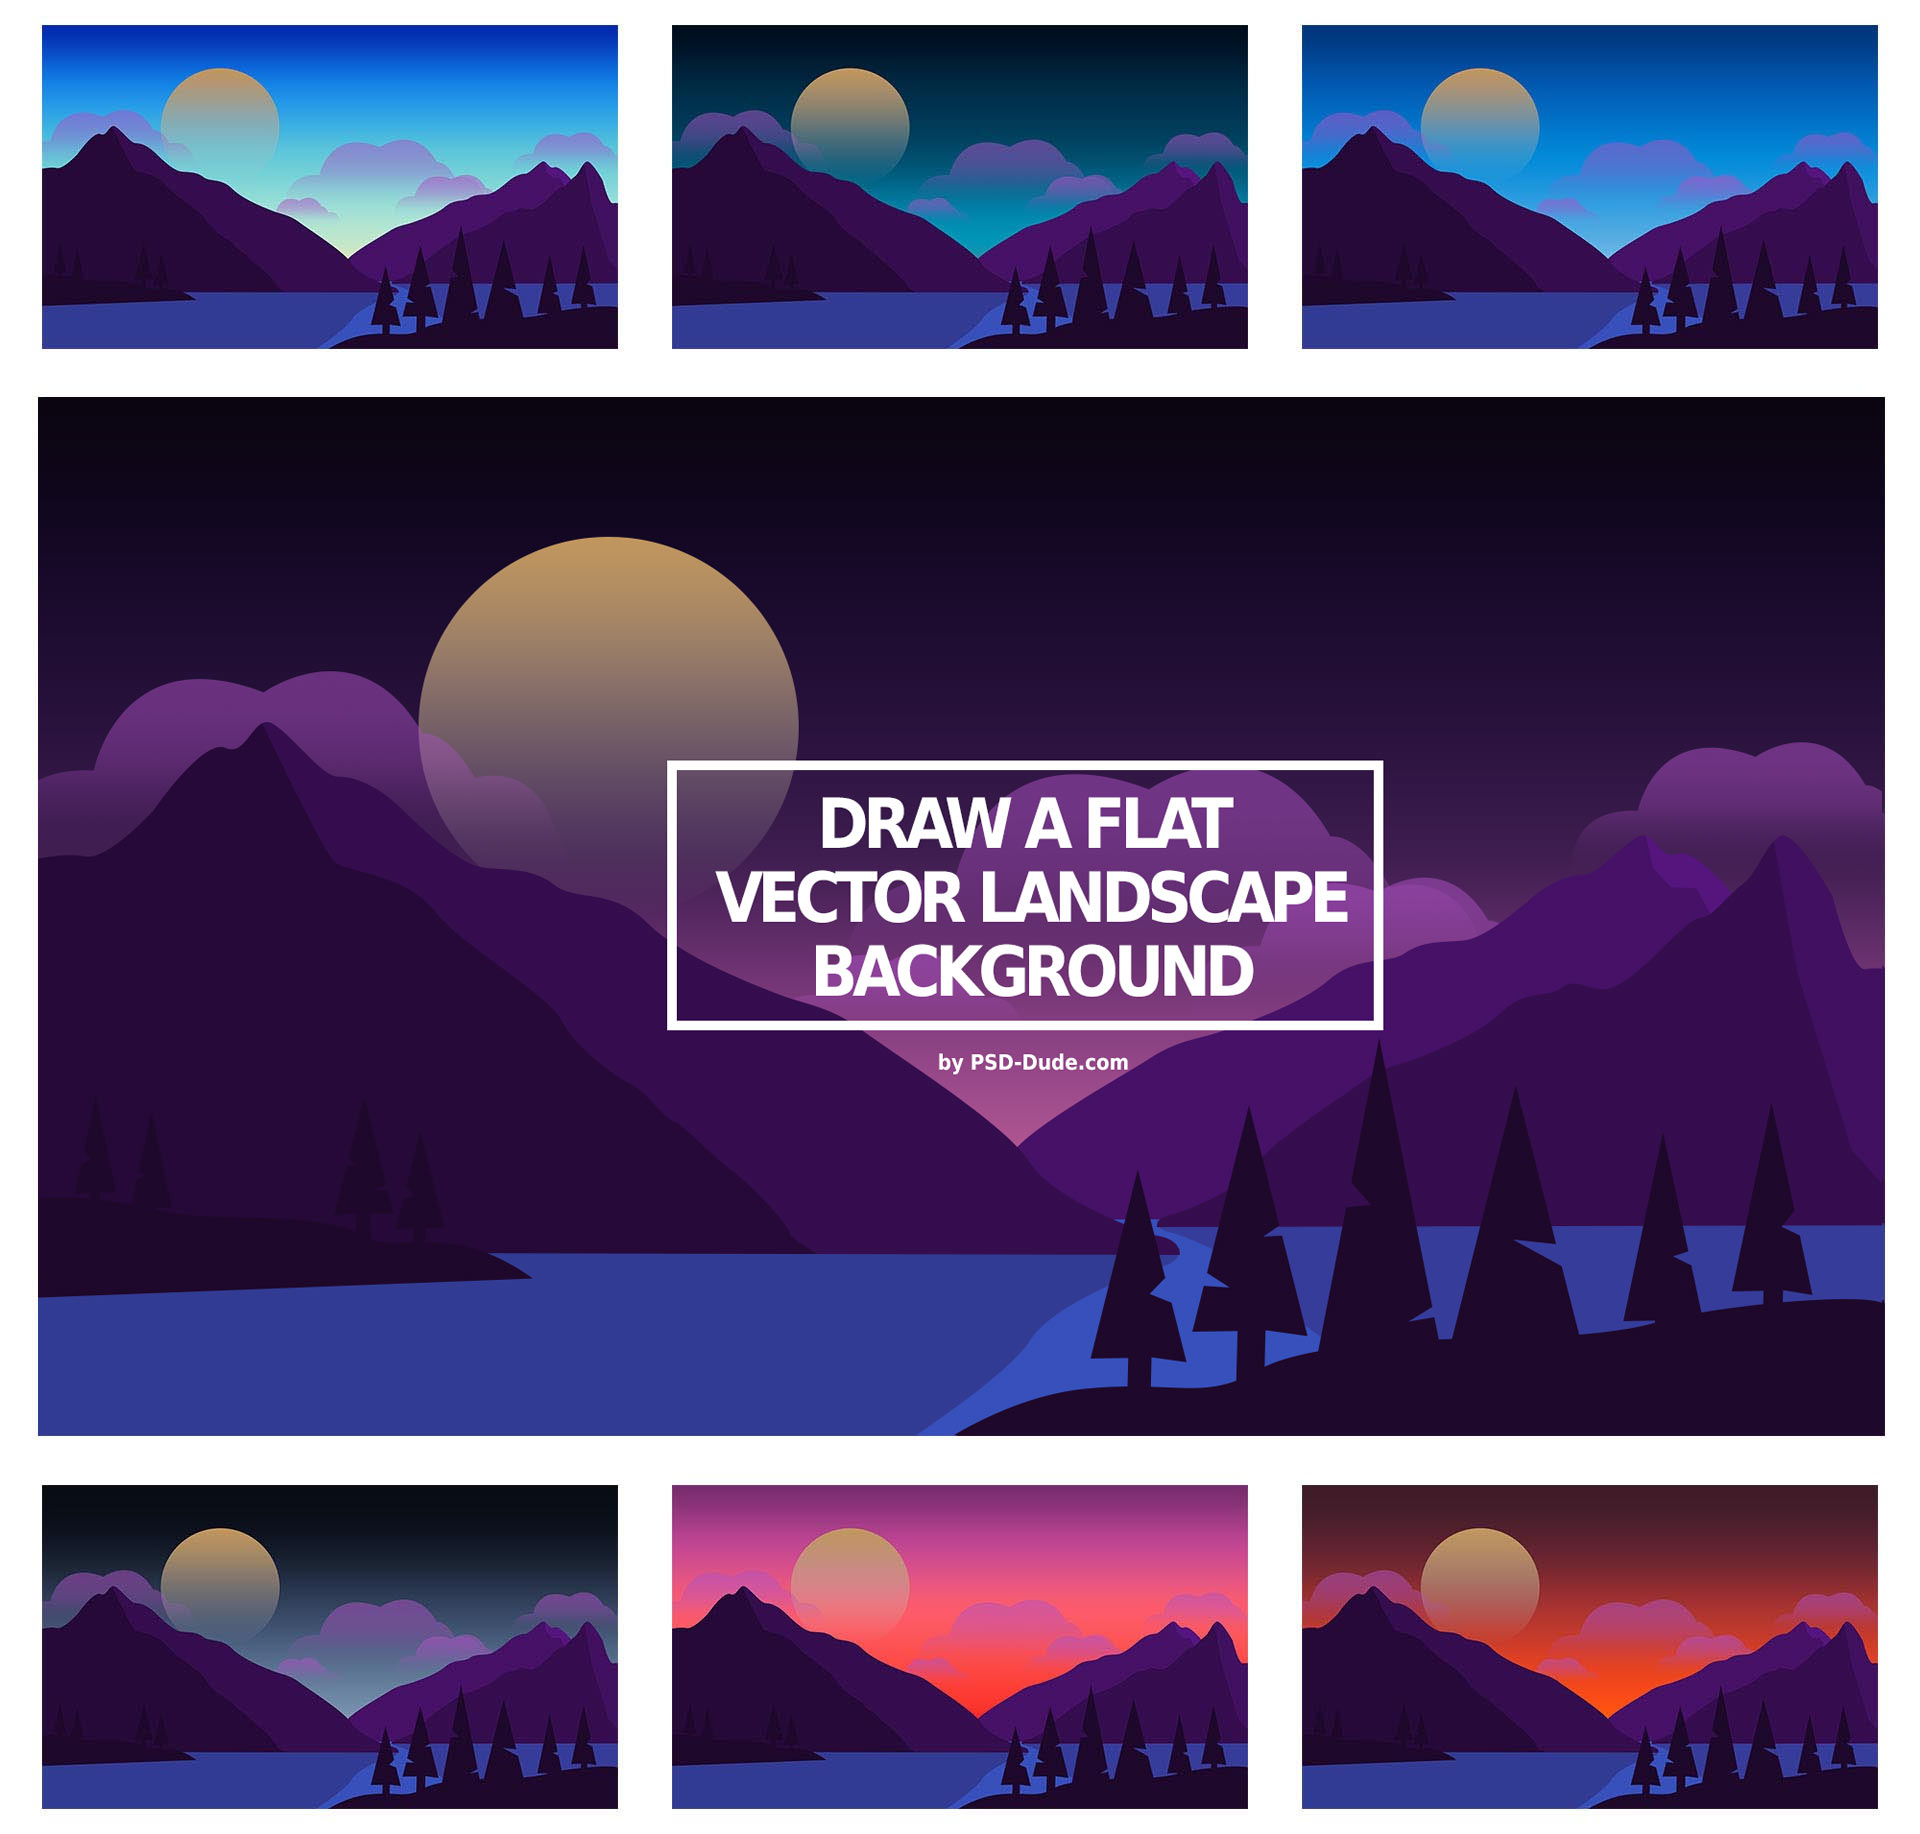
There are a lot of uses for Photoshop gradients. For example, I've used a sky gradients pack to make multiple versions of a Photoshop vector landscape at various times of the day:
Now you know how to make a custom gradient in Photoshop. What gradient will you make?
Check out this list of over 1800 different Photoshop gradients and experiment with them in your projects.
2 comment(s) for "How To Make A Custom Gradient In Photoshop And Elements"
Thanks, too, for the Fruit Gradients! reply