Painted Wood Photoshop Action Comics Book Photoshop Action Infographic JS Library Textures for Photoshop Online Label Maker

Fairy Tale Landscape in Photoshop

www.psd-dude.com
Tutorials Photo Manipulation 45189 April 12th, 2018

A Photoshop landscape is not hard to create if you think creatively, and of course if you are lucky enough to find the perfect stock images. In this new photo manipulation tutorial we'll create a beautiful fairy tale landscape using adjustment layers for blending and brushes for creating the right mood. So nothing fancy almost anyone can practice this tutorial.

Fairy Tale Landscape in Photoshop

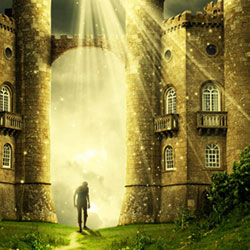
Before we beging this photo manipulation tutorial let's take a quick look at the final image.

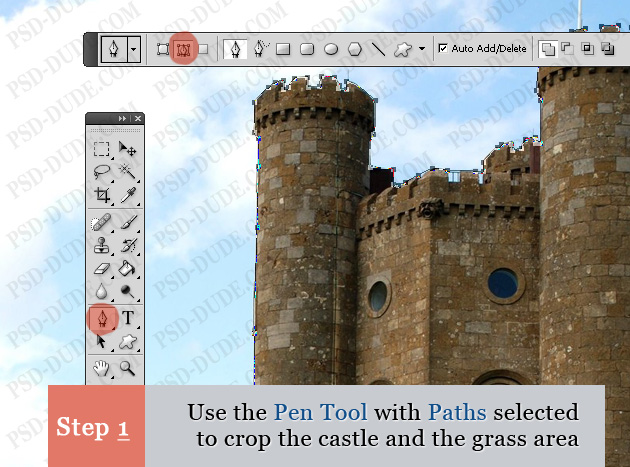
Open this beautiful Castle stock image and use the Pen Tool to trace the caste shape and the grass area. Make sure you have the Paths option selected.

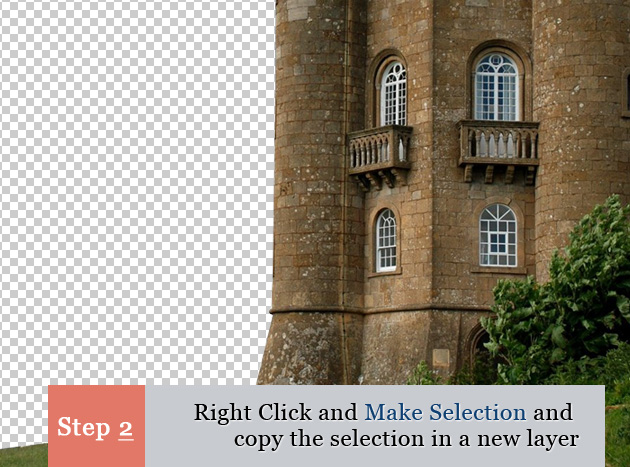
Right click on the path and choose Make Selection. Press CTRL+J to copy the selection in a new layer called Castle layer. Use the Eraser Tool to adjust the selection.

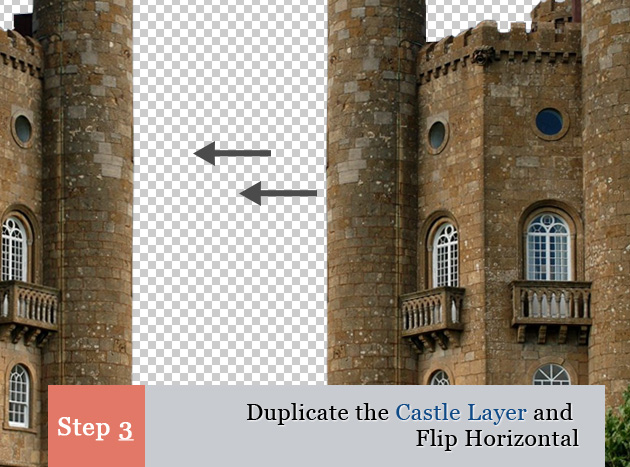
Duplicate the Castle layer, Flip Horizontal and place it like shown in the image below:

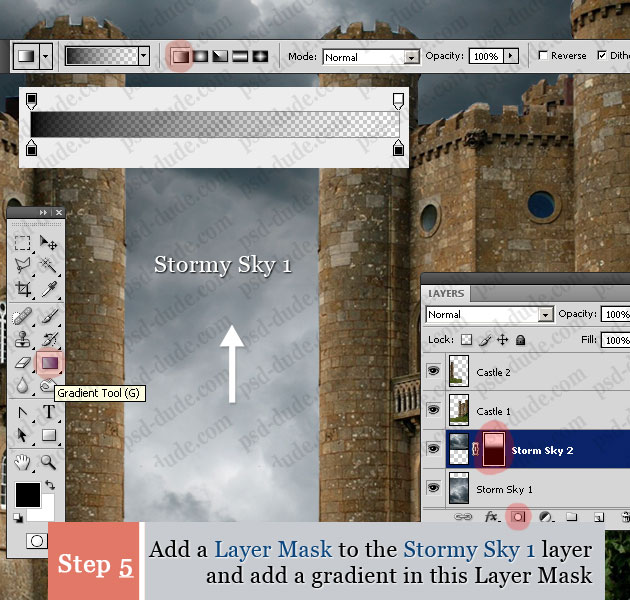
Time to add some clouds in the background so place this Stormy Sky stock image below the two Castle layers. Duplicate the image and place them as shown:

Add Layer Mask to the Stormy Sky 1 layer. Pick the Gradient Tool and add it in the Layer Mask. For the Gradient Map use a black, 100% opacity to black. 0% opacity map.

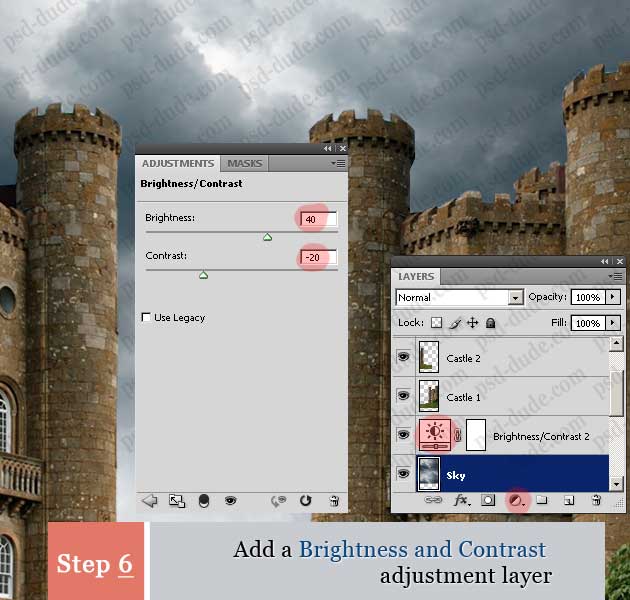
Merge the two Sky Layers and use a Brightness and Contrast adjustment layer. Make sure you add this layer right above the Sky Layer.

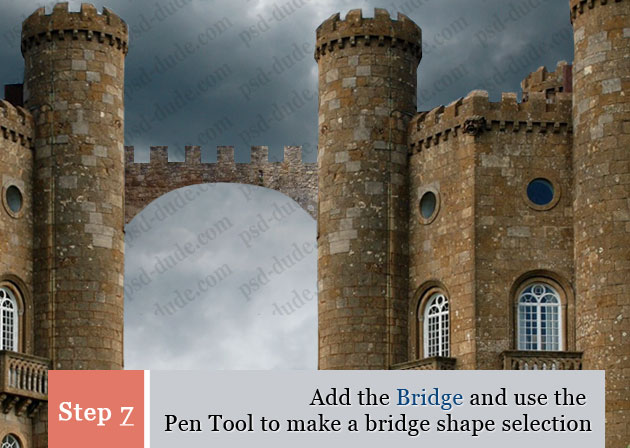
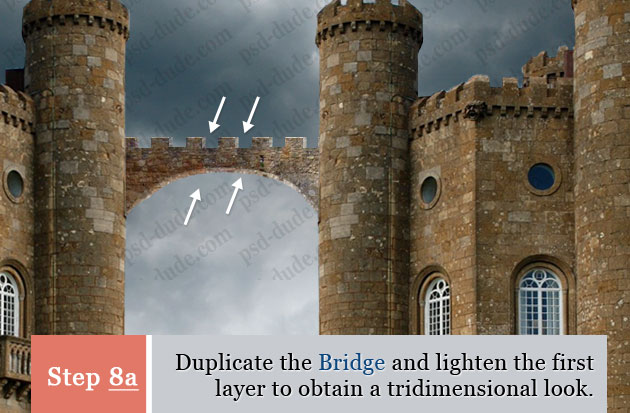
In this step we will add a bridge betweet the two castles. For that we'll use this Bridge stock image. We'll use the Pen Tool like we did in the first step and make a bridge shape selection.

Because the color of the Bridge is very similar with the Castle tone color we don't have to make color adjustments. But I decided to duplicate the Bridge and move the initial layer down and to the left. Increase the Brightness so that you obtain a 3D look.

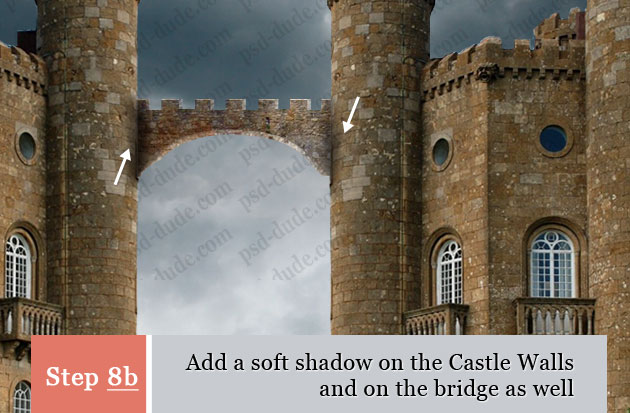
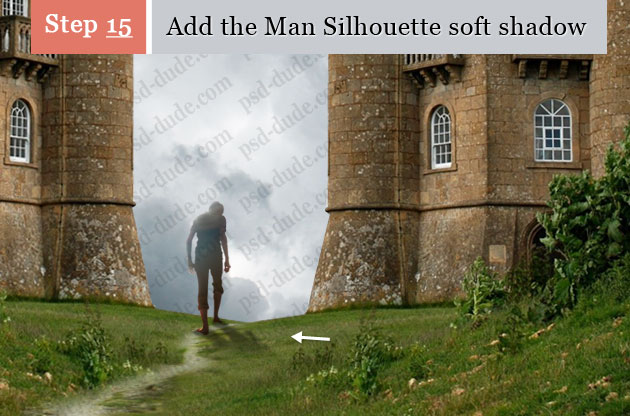
To blend the Bridge even better to the rest of the image we have to add a soft shadow on the Castle Walls. So create a new layer and use a Soft Round Brush to paint the shadow with black color. Use Gaussian Blur to soften the shadow.

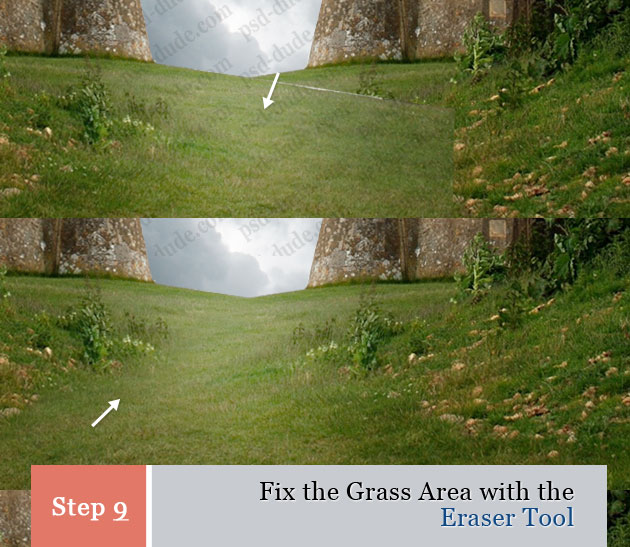
In this new step we'll fix the grass area. As you can probably see the mirror effect has left us with some problems. We can either use the Clone Stamp Tool or we can add some extra grass. For start use the Eraser Tool to remove some parts of grass from the left side area.

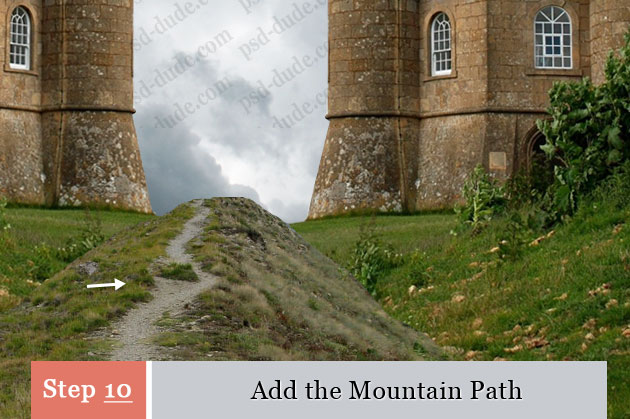
Add this Mountain Path stock image and place on the grass.

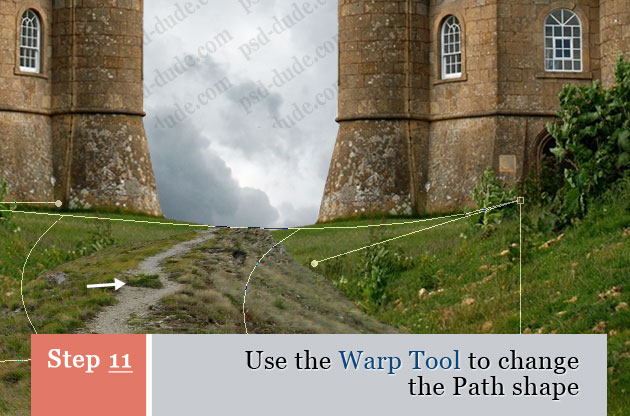
Use the Warp Tool to change the Path shape.

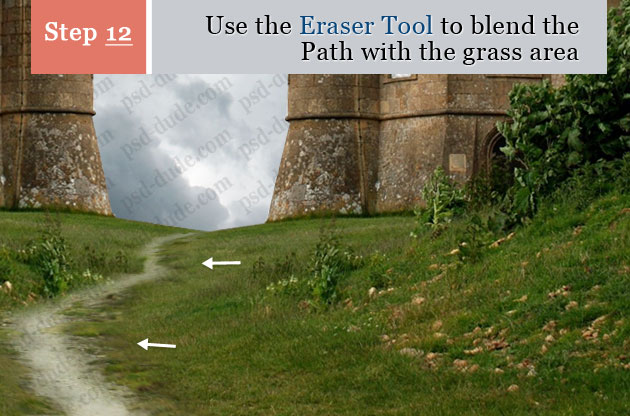
Use the Eraser Tool to blend the Path with the rest o the image. You can even use the Smudge Tool, Saturate to fix the little color differences.

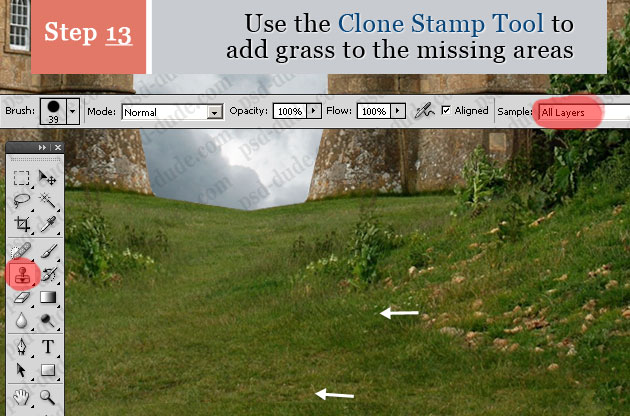
Create a new layer called Grass. Hide the Path layer and use the Clone Stamp Tool to add grass to the missing areas. Make sure you have the sample All Layers selected.

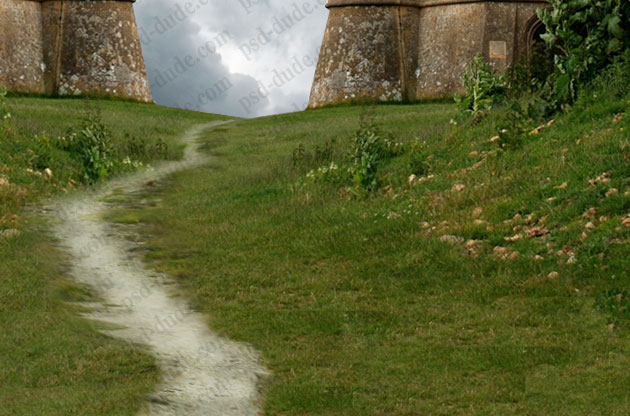
So the grass with the path atached it should now look like this:

Add this Man stock image. Crop only the man silhouette and adjust the Brightness and Contrast.

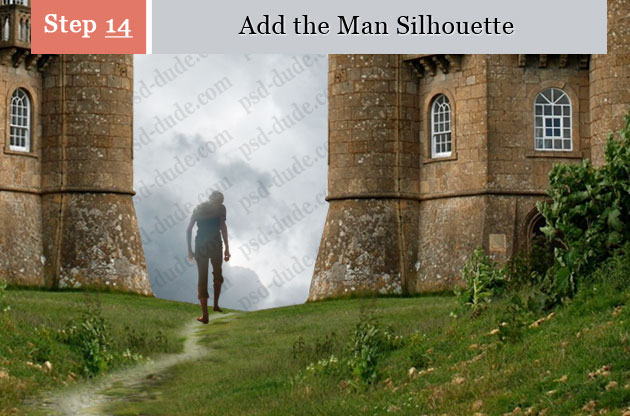
Duplicate the man silhouette and transform it with the Perspective Tool. Use also the Gaussian Blur.

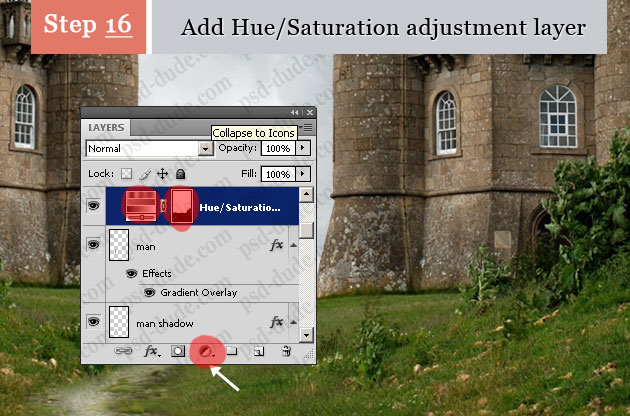
For the final touch we'll add some adjustment layers and we will start with a Hue/Saturation layer. Add a Layer Mask to this layer and paint with black color over the grass area.

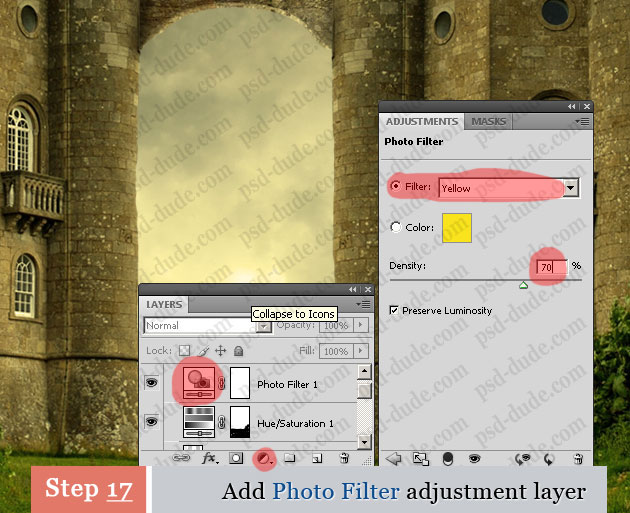
Let's add another adjustment layer, this time is a Photo Filter that will make all the elements blend together better.

The third adjustment layer is the Brightness and Contrast with the following settings:

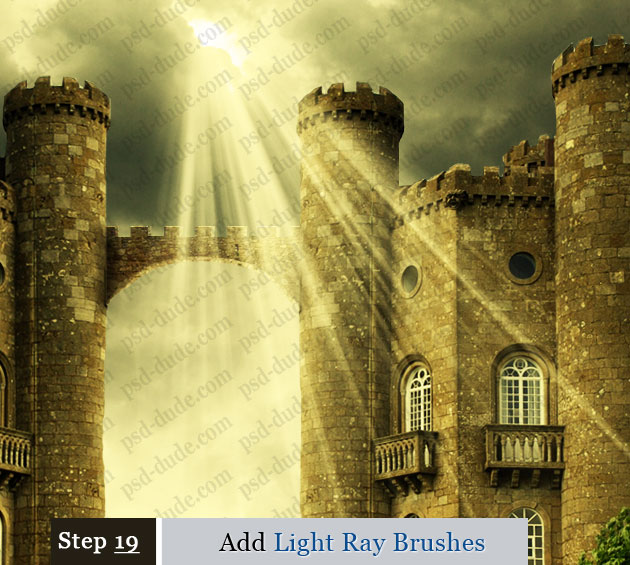
To make the image look more magical I decided to use some light rays brushes. Use the Beam2-particles brush; the color for the brush is white and the size 800px.

Very important! Add the brush in a new layer that must be placed below the 3 adjustment layers.

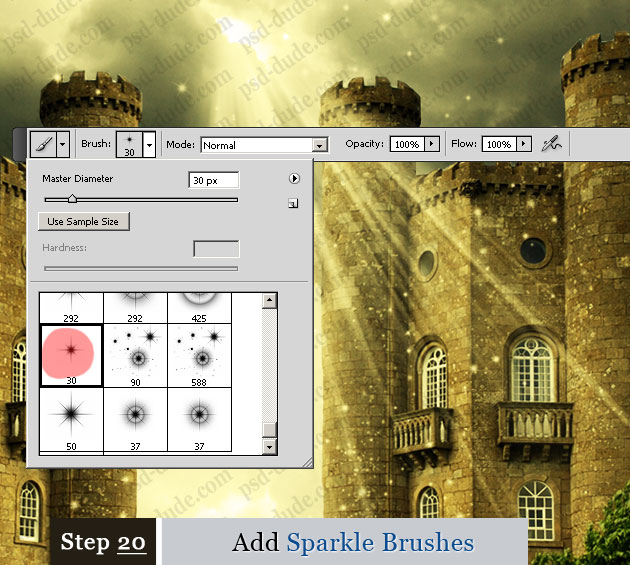
Create a new layer, again place it below the 3 adjustment layers and use these sparkle brushes to make the image look like a fairytale landscape.

In the end I created a layer called Light Areas, placed below the 3 adjustment layers. With the Brush Tool I've painted over the areas that I wanted to lighten. Change the Blend Mode of this layer to Overlay and use the Gaussian Blur to soften the surface.

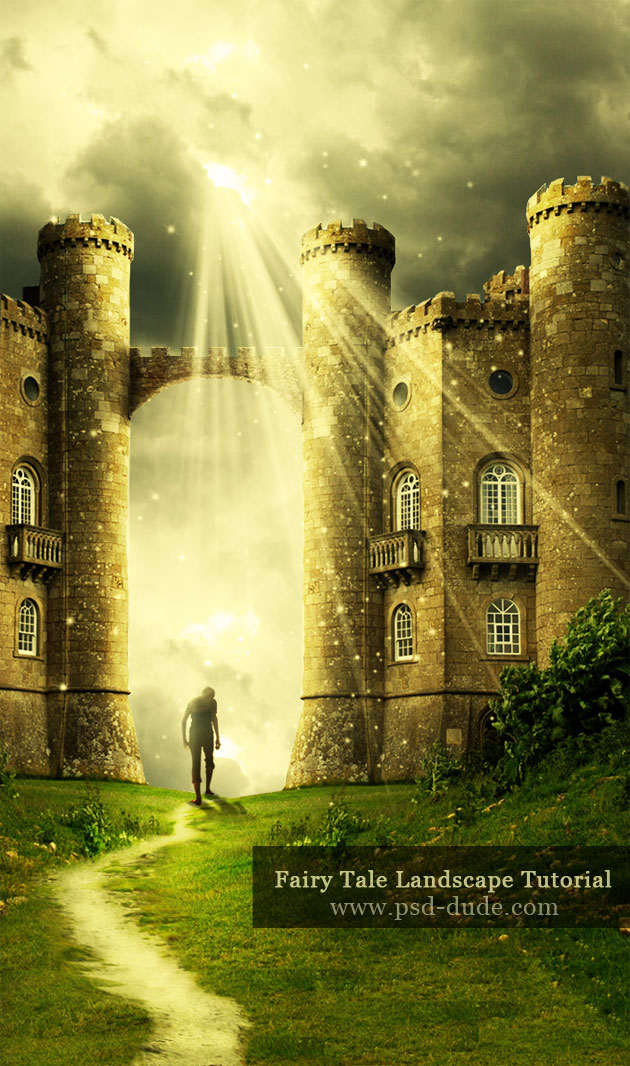
That is about all, I hope you have enjoyed reading this photo manipulation tutorial and most important that you are pleased with the result. As always I wil be very happy if you decide to create your own fairytale Photoshop landscape inspired by my tutorial.

5 ( 101 votes)

If you're looking for amazing textures and backgrounds for Photoshop, explore Textures4Photoshop where you can find 1000+ unique images. You can download all these textures and backgrounds for free to use in personal or commercial projects!

Be a Cool Dude!

With your donation you can help us maintain this website and keep producing free resources many months to come! Any amount counts

30 comment(s) for "Fairy Tale Landscape in Photoshop"

PsdDude
11:11 AM Thursday, April 12, 2012
Thanks Daniel! reply
PSDDude
6:25 AM Friday, April 13, 2012
Thank you Andrei, we are glad you like it! reply
PsdDude
5:57 AM Thursday, April 19, 2012
Hi Mich????le, I am really glad you like my tutorials. I always try to create new and interesting photo manipulations :) If u practice a certain tutorial, you can upload your work on my blog, I am always curious to see them! reply
PSDDude
8:57 AM Thursday, April 19, 2012
We prefer small size images of around 630 px width, because the larger images make our page load very slow.
You have to follow three steps to upload your image:
1. press Browse
2. press Upload and
3. press OK reply
PSDDude
10:23 AM Thursday, April 19, 2012
Thanks! reply
PSDDude
2:05 PM Thursday, April 19, 2012
It looks really beautiful, I like the religious theme especially this time of year ! reply
PSDDude
7:35 AM Monday, April 23, 2012
Thank you, I'm glad you like it :) I saw that many people practice the tutorials and I am always curious to see their result!

This work for example was made by a friend fom facebook, Cris Mena and it looks in my opinion better than the original reply
Glenda
Glenda
5:58 AM Saturday, April 28, 2012
Thank you very much for this tutorial! When I read it, the creative juices started to flow for a new project. Very inspiring. reply
PSDDude
6:12 AM Saturday, April 28, 2012
Thank you Glenda, I am glad that my tutorial inspired you. Upload your result when it's done ! reply
PSDDude
5:55 PM Tuesday, May 8, 2012
Thank you Su, we are always happy to hear that our site is appreciated and if you can spread the news about us we'll be very happy! reply
Daniela
Daniela
10:57 PM Thursday, June 28, 2012
Here is mi work :D It was a little difficult to do, but enjoy! excellent tutoria.

From: Costa Rica reply
PSDDude
10:59 PM Thursday, June 28, 2012
Your result looks great Daniela! I am glad you like my tutorial :) reply
Alwayseasy
Alwayseasy
4:12 AM Wednesday, July 18, 2012
Here is my work resized !
i from indonesia . my religion is muslim so i create the picture like muslim pray to god :D reply
PSDDude
4:46 AM Wednesday, July 18, 2012
nice, keep up the good work! reply
PSDDude
12:01 AM Tuesday, September 18, 2012
Hi Mimi,

your result looks beautiful. I like the girl image that you put on the sky, that is a great idea! thank you for uploading your fairy tale photo manipulation :) reply
mai
mai
9:18 AM Thursday, January 31, 2013
thank you for the wonderful tut :)
that's what I made but I think there is a mistake with the man don't you think? reply
John
9:24 AM Thursday, January 31, 2013
Well I can't criticize your work because mine is far from perfect. I guess people that studied drawing & painting know exactly how to work with: proportions, lighting and shading and color matching/blending!
What I mean is that I really like your work :) reply
PSDDude
10:52 AM Thursday, April 4, 2013
I have some favorite artworks inspired by this tutorial that I want to show you.
Here is a beautiful medieval castle made in Photoshop by artist kolobok555 (http://www.photoshop-master.ru/users.php?id=289680) reply
PSDDude
4:29 AM Saturday, April 13, 2013
Romantic medieval castle made by LadyWinter http://www.photoshop-master.ru/users.php?id=124911) reply
Michelle
Michelle
12:11 PM Thursday, August 13, 2015
Hi PsdDude,
Have you received my work for this tutorial ?? Am I on your blog here ? what size should I use to send my work ?
reply
Michelle
Michelle
12:11 PM Thursday, August 13, 2015
Here is my work resized ! reply
Irina
Irina
4:17 AM Tuesday, August 18, 2015
I saw that many people like this photo manipulation theme. It is a very inspiring image. reply
Daniel
Daniel
1:06 PM Monday, April 29, 2019
It looks really beautiful, I like the tone colors and the compostion. I don't like the man silhouette that much, maybe I will find a better image! reply
Andrei Oprinca
Andrei Oprinca
1:06 PM Monday, April 29, 2019
Nice tutorial. Like the instructions on the images. The illumination and ambient is really cool reply
Michelle
Michelle
1:06 PM Monday, April 29, 2019
I have been playing with Paint shop pro for years now but started to learn Photoshop 5 months ago and decided to try some of your tutorials as I like the atmosphere you create. I have enjoyed this one very much ! Thank you so much for sharing your great artistic talent.
Michelle from France reply
Nisha
Nisha
1:06 PM Monday, April 29, 2019
very nice mood of this one! loved it! reply
rod rodriguez
rod rodriguez
1:06 PM Monday, April 29, 2019
Nice job, uber cool composition and this "Upload" idea is very interesting as well! reply
Jim
Jim
1:06 PM Monday, April 29, 2019
Love the light ray brush work! reply
Su Hall
Su Hall
1:06 PM Monday, April 29, 2019
I found this and linked to it for a group where we do photo-manips and digi-art. I had several folks work on it and they all enjoyed it! It offers all the info one needs to complete this image, yet, it is open, too, for personalizing. Your site is one that I like to refer to for a lot of our projects!
Thank you! I'm ready for another! LOL

Su reply
Mimi
Mimi
1:06 PM Monday, April 29, 2019
Hi,
This is what I did with your great tutorial : reply

Have something to say? Leave us a comment

Click to Upload Fan Art!

Share your Psd Dude inspired works


Get new posts by email:
LIKE US ON FACEBOOK

      Online Photo Editor
top