Hi guys, I am here with another Photoshop tutorial for you. I wanted to make something keeping in mind the festive season, so I thought of creating a delightful vector set. And I am going to walk you through the whole process.
For more tutorials for Christmas check out this list of Beautiful Christmas Photoshop Tutorials
Today we'll make Christmas cookies based vectors. Along the way, you will learn to use basic shape tools, pen tool, various layer styling techniques and much more. You will also learn how to make an interesting cookie texture in less than a minute. So, let's start!
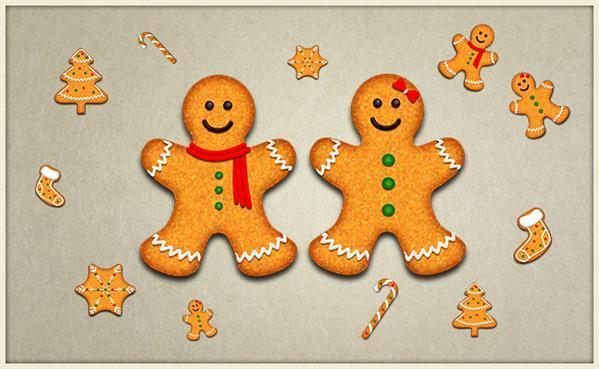
Christmas Cookie Vector Final Result

How To Draw Vector Cookies In Photoshop
Create a new document in Photoshop with 800px width and 500px height.

We'll start with making a man shaped cookie. So, we'll draw the basic shape, and then we'll add texture to it. Set #e09a38 as your foreground color and select the pen tool (Tool mode: Shape) to draw the shape as shown below.
If you want to learn some nice tricks for working with the Pen Tool I recommend this tutorial for creating round corners in Photoshop or check out this quick tip video tutorial:

Now right click on this new shape layer and select the option of “Duplicate Layer”. After that, go to “Edit”> “Transform”> “Flip Horizontal” and position this half adjacent to the other shape to form the body. To make the head, select the ellipse tool and draw an adequate sized circle while pressing “Shift” key and position it over the body.

Once you are done, select all the three shape layers by pressing “Shift” key and then right click over the layers and choose the option of “Merge Shapes”. Now we've a single layer, label it as “Mr. Gingerbread”.
How To Create The Cookie Texture
Now we'll move ahead to create cookie texture. Right click on the “Mr. Gingerbread” layer and select “Convert to smart object”, this will allow you to edit the filters anytime later on. Before applying few filters, we will darken its edges a bit. Double-click on this layer to open the layer style window and apply the given settings for inner glow.


Next, go to “Filter”> “Filter Gallery”> “Texture”> “Grain” and apply the following settings for it.

Now create new effect layer and select “Artistic”> “Palette Knife”. Apply the given settings for it.

You could also apply a real texture cookie from this list of cookie textures.
How To Make The Texture Of The Cookie Vector More Realistic
We've made a nice texture for the cookie; however, you can further enhance it. To do so, press Ctrl+ click on the cookie layer to make selection around it. Now create a new layer and fill the selection on this new layer with pure black color using paint bucket tool. Duplicate this layer, label it as “Shadow” and drag it below the “Mr. Gingerbread” layer. We'll use this layer in the next step for making shadow.

Now click on the original black layer and go to “Filter”> “Pixelate”> “Mezzotint” and select grainy dots. Change the blending mode of this layer to “Screen” and reduce its opacity to 20%.

Next, click on the shadow layer and drag it a bit downward and go to “Filter”> “Blur”> “Gaussian Blur”. Use 4px value for Gaussian blur and reduce its opacity to 75%.

How To Add Frosting Decorations To The Vector Cookies
We have created the basic cookie character so far. You can try it on any shape you want. Now we'll decorate it with cream and colorful balls. We need a brush for this; I'll show you how can make it. Firstly, create a new document in Photoshop of 50px width and 50px height with transparent background. Now draw a small rectangle using rectangle tool, rotate it a bit using “Free Transform Tool (Ctrl+ T)”, draw an ellipse at its corner and merge both layers. Duplicate and flip it horizontally. Merge all the layers once again and go to “Edit”> “Define Brush Preset” and label this new brush.

Before going further, check out this tutorial if you want to learn everything about how to draw a line in Photoshop. This will teach you how to draw straight lines and curved lines using brushes.
Ready? Ok, let's go on!
Come back to the original document. Set #d9d4d4 as your foreground color, select the brush tool and click on the “toggle the brush panel” option from the top properties bar. Use the given settings for the brush panel.

Now select the pen tool (Tool mode: Path) and draw a curved line as shown below. After that, create a new layer, right click the document> Stroke Path> Brush to get the brush stroke over the curved line. After that, hit “delete” to get rid of the path.

Make the rest of the curved lines in the same way.

Double-click on one of the curved line layers and apply the given settings for inner shadow and drop shadow.


Right click on this layer and select the option of “copy layer style” and then right click on rest of the curved line layers and choose “paste layer style” to apply the same effect on them.

How To Add Chocolate Style Cookie Decorations
Next, we'll make the face of Mr. Gingerbread. To make the chocolaty eye, draw an ellipse in #280a00 color.

Apply the following layer style settings on the eye.


Now create a new layer and apply a soft round brush on it in pure white color to make the highlight over the eye. After that, duplicate eye layers to make the other eye.

Next, to make the smile, select an appropriate sized hard round brush tool around 8-9px. Now make a curved path using pen tool (Tool mode: Path) and stroke this path in the same way as explained above.

Copy layer style of one of the eye layers and paste it over the smile layer. Make a thin highlight on a new layer using soft round brush tool and apply 1px Gaussian blur filter on the highlight to blend it nicely. Reduce the opacity of this layer to 60%.

Add Extra Colored Frosting Decorations To The Vector Cookies
Now we'll make few green buttons. Set #0a7704 as your foreground color and draw an ellipse on a new layer.

Next, apply the same settings for drop shadow on it as used for the eyes. However, use the following settings for inner glow.

Duplicate this ellipse few times and position it over each other as shown below.

Lastly, we'll make a red muffler for Mr. Gingerbread. Set #e30000 as the foreground color and select a 7-8px hard round brush. After that, draw a curved path using pen tool (Tool mode: Path) and apply the brush stroke over it.

Now apply the following settings for “Bevel and Emboss” and “Drop Shadow” on it.


Now keep on drawing different paths to complete the muffler and paste the same layer style settings on these paths as applied in above.

I don't want to leave Mr. Gingerbread alone so why not we'll make Mrs. Gingerbread as well.
Collect all the layers forming Mr. Gingerbread in a group and duplicate this group. Drag it towards the right or left side of the original group so you can view it clearly. Now delete the red muffler layers in this duplicated group. Increase the size of the buttons using “Free Transform Tool (Ctrl+ T)”. You need to adjust the inner glow settings on the enlarged button layer as shown below.


Next, we'll make the hair bow. Select the pen tool (Tool mode: Shape) to draw half of the bow in #f20000 color.

Apply the same settings for Bevel and Emboss and Drop Shadow on this layer as applied in step 15. Duplicate this layer and rotate it to form the other half of bow. Make an elongated ellipse in the center of the bow to complete it. Use same layer style settings on the ellipse but in white color.

Other Christmas Vector Cookies Made In Photoshop
You can make as many cookies as you want of any shape you like using the same techniques. Here are few examples.

That's it guys. Hope you enjoyed the tutorial and learned something useful. I'll be waiting for your feedback. Happy Holidays!
This beautiful tutorial was made by Websoulz.com, but unfortunately that website does not work anymore, so I thought I would save it here.
This tutorial is also part of the fantastic collection of 100 Photoshop Food Text Effects And Typography.
If you enjoyed this tutorial, check out the premium action Gingerbread Cookie Text Style Photoshop Creator which will allow you to create ginger bread cookies in Photoshop with just a few clicks.
1 comment(s) for "Cookies Vector Photoshop"