AutoCAD is, without a doubt, one of the best drafting tools; its longevity attests to its versatility and ease of use. For all that, though, CAD has its limitations. With all of the graphic design tools and image enhancers available these days, there are plenty of reasons why so many drafters want to migrate their CAD designs.

Let's say you're preparing a presentation for an urban development project. AutoCAD would be your first choice to design your slides; polylines will be especially effective at capturing all of the contour details you need to highlight.
Unfortunately, the rendered outline gives no hint of the layered complexity the presentation project demands. To better illustrate your concept, you need more access and control over your drawings. Photoshop is the perfect complement. With its wide array of raster tools, you can easily add precise topographical features to your design and layer in the hues needed to make your design visually compelling.
A quick internet search will show how often people ask how to export AutoCAD into Photoshop. This tutorial shows you how to do it.
Quick & Dirty Method: Use Print Screen and Paste
Once you've created your AutoCAD design and it presents on-screen as you'd like to see it in Photoshop, you can simply hit Print Screen key to save it to your system's clipboard. Then, you only need to open Photoshop and command a new document. When the dialogue box opens, you only need to click 'okay' and then, paste your image. Alternatively, you can paste the image into an existing document using CTRL+V on Windows or Command+V on a Mac.
There's no need to change any settings because the software has already intuited a photo on the clipboard and anticipates editing it.
As the Print Screen function prints your entire screen, the first step to editing your design is cropping everything but your design out of the picture. After that, you're free to manipulate your image in any way you want.
To avoid having to crop your design, you can take the screenshot using the screenshot Snipping Tool embedded in your operating system, beit Windows or Mac. The Snipping Tool allows capturing a portion of the screen
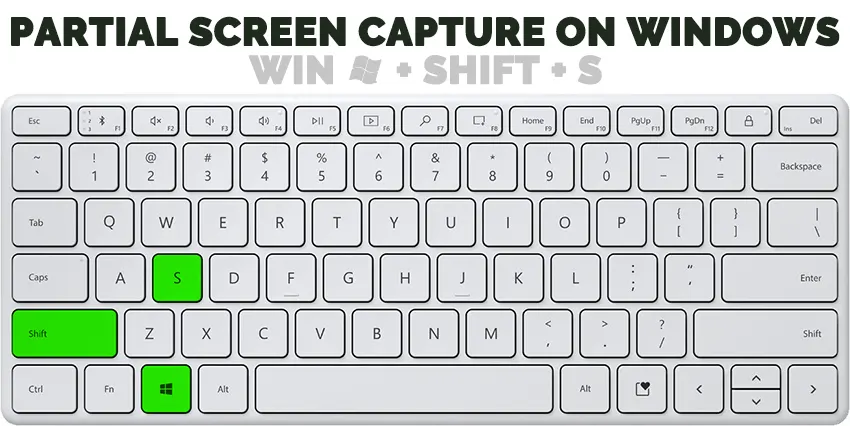
How to Take a Screenshot on Windows Using the Snipping Tool
To capture a partial screenshot on Windows, simply hit WIN + SHIFT + S simultaneusly on your keyboard. You will then be able to select the area of the screen to capture.
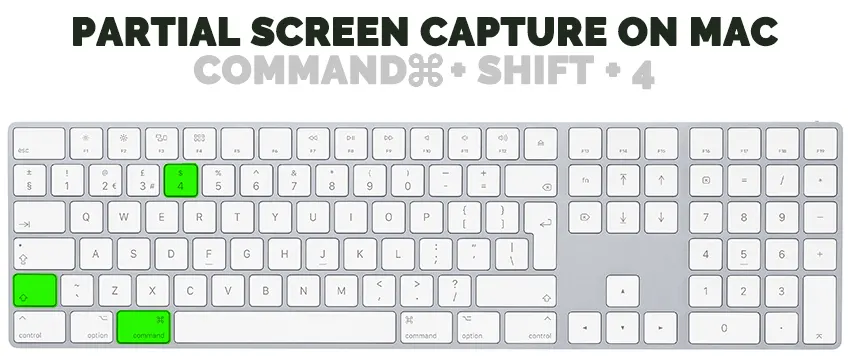
How to Take a Screenshot on a Mac Using the Snipping Tool
To capture a partial screenshot on MacOS, simply hit COMMAND ⌘ + SHIFT + 4 simultaneusly on your keyboard. You will then be able to select the area of the screen to capture.
There are two things to note when using this method.
First, your screen grab is limited to your monitor's set resolution. For instance, if you've not changed your monitor's setting from their default resolution, your design will paste into Photoshop at that resolution. If you need a more defined image, you will have to use one of the methods described below.
Second, before you capture your screen grab, make sure to move your cursor out of the frame and disable the UCS icon. Remember that whatever is on your screen at the time of your screen grab will also feature in the pasted image. Your ability to successfully edit those two visuals out of your pasted image depends on your skill level and where they are placed.
If they happen to be in a critical location that wouldn't stand up well to editing, you'll have to print-screen and paste again. Consider it a best practice to clear your design field before screen-grabbing it.
Export Your AutoCAD File To Encapsulated PostScript (EPS) And Take The EPS To Photoshop
As noted, pasting AutoCAD screen grabs into Photoshop has its limitations. If you need more latitude than that option offers, saving your CAD designs as Encapsulated PostScript files is the way to go.
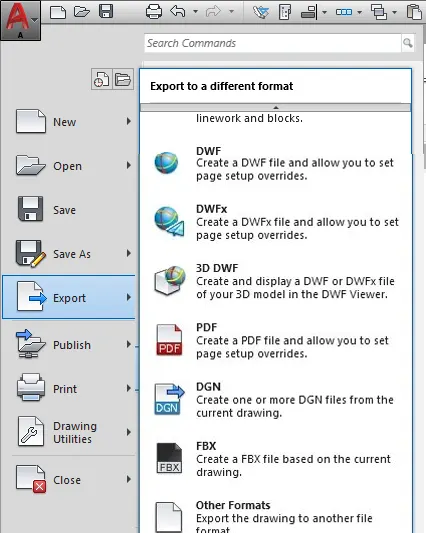
The Export option is on the File menu. Verify that your screen displays exactly what you need to export and then, simply pull down that menu, select Export and, when the dialogue box appears, make sure that the 'files of type' option is set to 'Encapsulated PS'. You only need to choose a destination to save your file to and, of course, name it.
After that, it's simply a matter of accessing Adobe Photoshop, locating the file and opening it.
Beware that it might look a bit rough; not the smooth, polished image you might have expected. If that's the case, you can open the PostScript Out Options dialogue box, which offers a menu of options you can use to refine your design, among them a scale setting and notional paper size.
If you're not looking for high resolution or more control over line weights, this export method may suit your needs. However, if your project calls for exquisite detail and the control you need to achieve it, the second EPS method is for you.
DWG to PDF and DWG to EPS - Plot to EPS or PDF
All Photoshop versions are able to work with PDF and EPS files. So, one way to get your images from AutoCAD to Photoshop is by converting your DWG to PDF or EPS. We do this using plotting.
Let's say you have a floorplan in AutoCAD.

If you've ever used a physical plotter, you'll be surprised at how uncomplicated it is to plot to EPS or PDF. As long as you have a PostScript plotter set up on your system, you only need to configure a few parameters and you'll be ready to go.
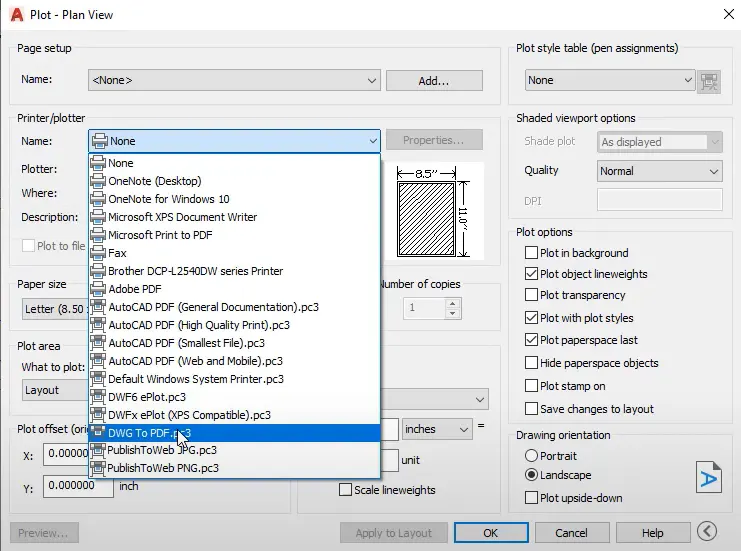
From the File menu, select Plot and, when that window opens, under the Plot Device tab, select the PostScript plotter. Next, name your file and choose where you'll save it once complete.
With those steps complete, go to the next tab, Plot Settings, and verify your design's orientation, scale and size. If you want to convert your DWG to PDF, in the plotter settings choose the DWG to PDF option in name
There are some other settings that you need to choose in order to get the maximum quality from your design when you get it from AutoCAD to Photoshop.
So, in the plotter settings choose Plot Area > What to plot > Extents.
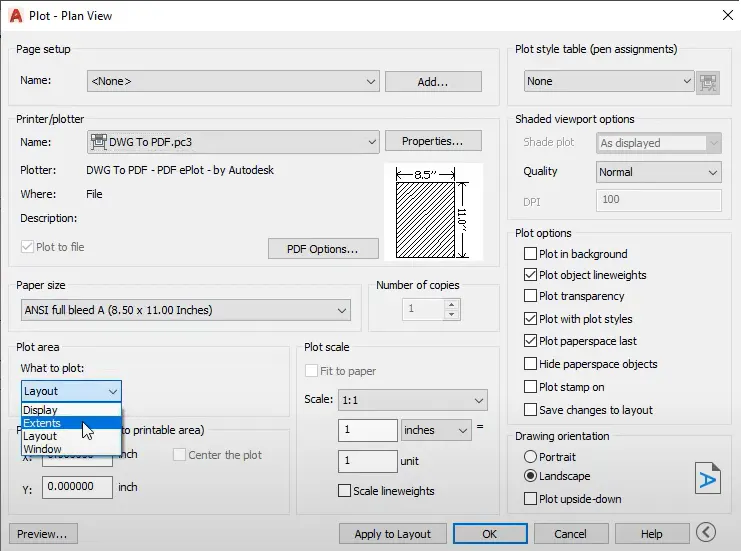
Also, make sure that you've set:
- the proper paper size
- monochrome for the Plot style as this will give us the best contrast especially for the thin strokes
- maximum quality

Previewing your file before clicking OK is always a good idea; it keeps you from having to repeat the operation.
This technique seems a little more convoluted because of the extra steps involved but once you get used to the order of operations, it will become second nature to follow them, even if you don't need particularly crisp, well-defined images every time.

AutoCAD Rendered Images
If all you need to transfer are line images, the operations covered so far would work well but if you designed your project using the AutoCAD renderer for future manipulation in Adobe Photoshop, the Render Window or Viewpoint options aren't the best.
The 'destination' dialogue box under the View – Render – Render menu lets you select a 'file' option which, in turn, gives access to the 'more options' button directly beneath. From there, you can set your output configuration for file type, size and colour depth. Once you're satisfied with how your image looks and all of the settings you've commanded, you only need to click 'Render'.
From there, you only need to access Adobe Photoshop and open the file you just rendered to continue working on it.
If you have the time and resources, playing around with these operations and testing the various settings and options will ensure you're thoroughly prepared for your next big project. Taking advanced Photoshop lessons to pick up on extra tips and tricks wouldn't be a bad idea, either.
No comment(s) for "AutoCAD To Photoshop"