
Create a Heart in Photoshop
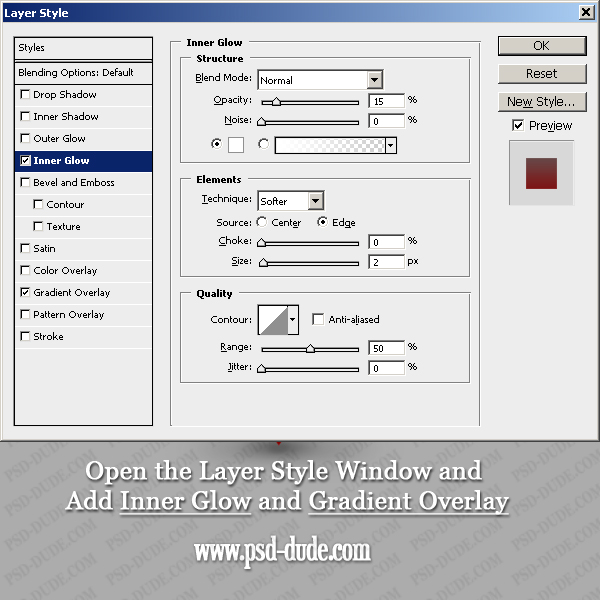
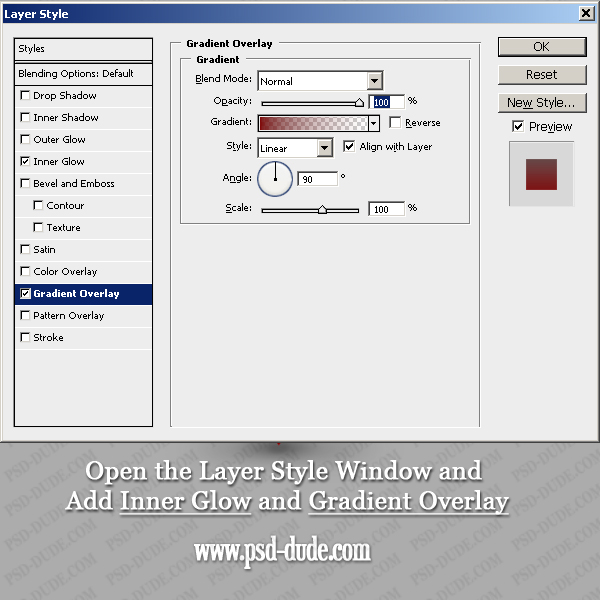
Simply use the default heart custom shape to draw a heart and choose a brite beautiful red color #f31f1f. Call this layer Heart 1 as it will be our base layer. Now open the Layer Style Window and add Inner Glow and Gradient Overlay:
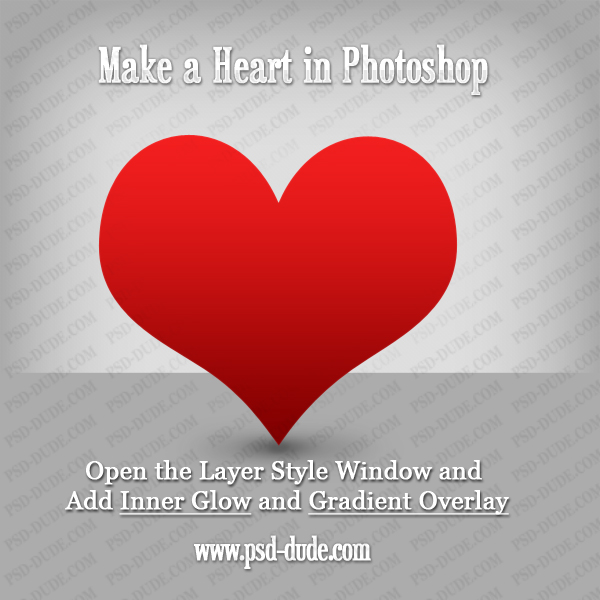
Choose white color for the inner glow and blend mode normal with opacity 15%.
For the gradient overlay I've chosen linear gradient, color #7f0000 with opacity from 100% to 0%. So I've made the bottom are of the heart darker.
Add a Glow Effect to the Heart Shape
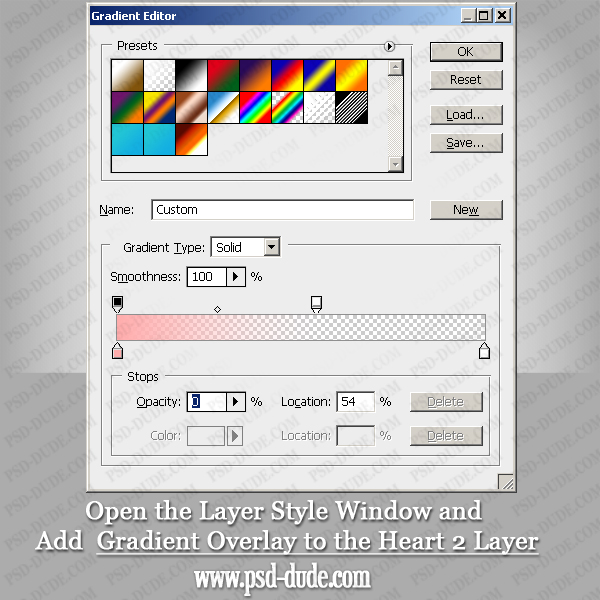
Duplicate the Heart 1 layer and call it Heart 2. Reduce the Fill of the Heart 2 layer to 0%. Add Gradient Overlay using color #ffadad. Make sure you have the Reverse option checked. The gradient is similar with the one use before, with opacity differences with small location changes. See the image of the Gradient Editor below:
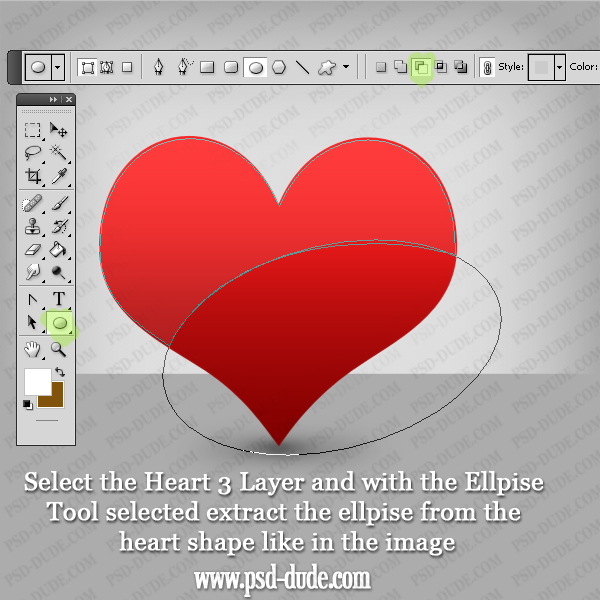
Duplicate the Heart 2 Layer and call it of course Heart 3. Lower the opacity of this layer to 10% and change its color to #ffdede. Being a vector shape you can easily change the color and more important, the shape. So click the Vector Mask Thumbnail to select the shape and simply extract an ellipse shape from our heart. Make sure you pick the right tool and the right settings.
Create a 3D Heart
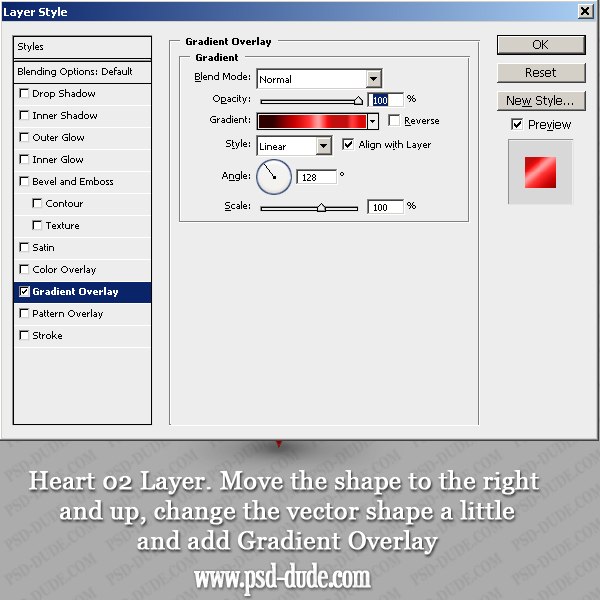
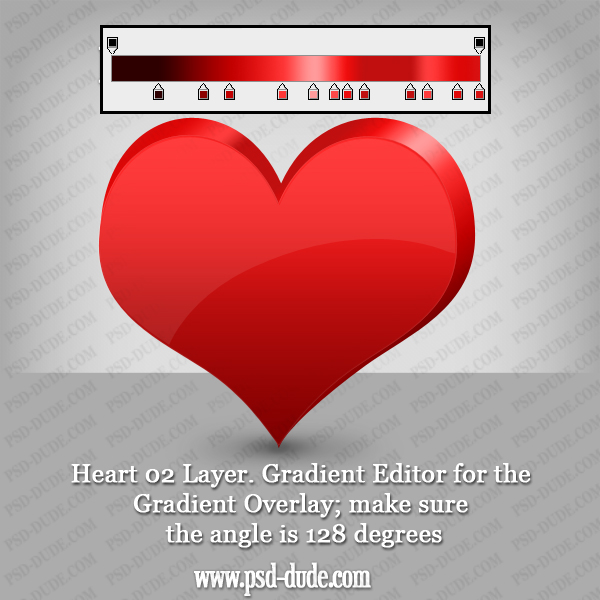
Duplicate the Heart 1 layer and place it below, call it Heart 02 layer. Move it to the right and up just like in the image. You can even change its shape a little by resizing it vertical/horizontal. Now add Gradient Overlay ... here comes the complicated part because my gradient is very complicated with lots of colors. You'd better download the PSD file to see the exact colors/locations.
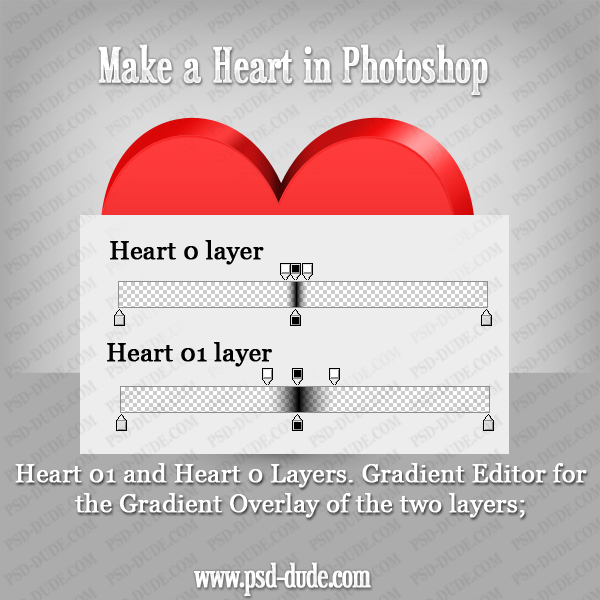
To make the 3D effect more realistic I will add a little more shadow. Duplicate the Heart 02 layer twice and place those layers above the original one but below the Heart 1 layer. Call them Heart 01 and Heart 0 layers. Add Gradient Overlay to both of them (normal; 42% opacity, linear, angle 0). The only difference between the two of them is the Gradient. You can see the gradient in the image below and for the exact locations check out the PSD file.
Add Stars Outline Glow Effect
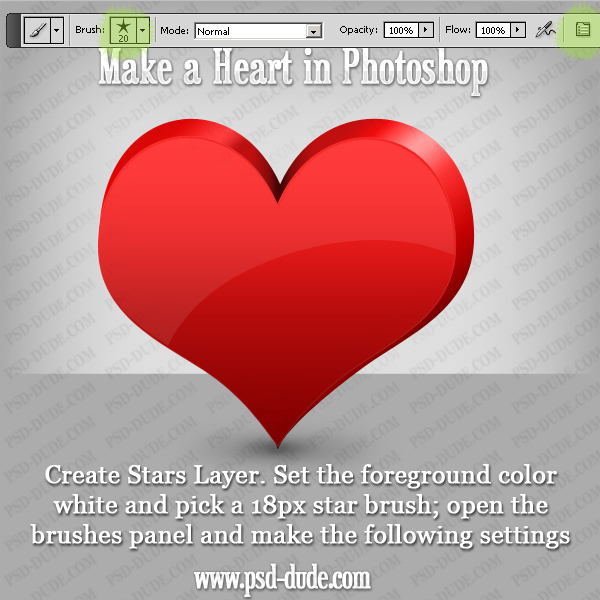
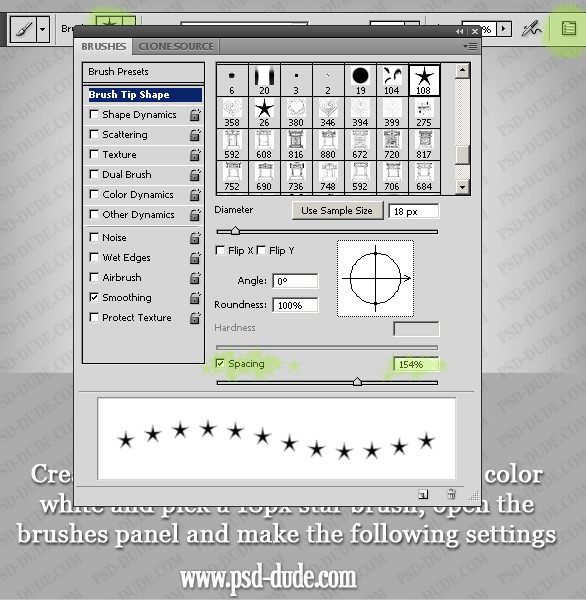
I have decided to add an extra touch to my 3D heart shape, more precisely to add a stars outline. For that create a new layer called Stars above all the others. Set the foreground color White. Pick a simple star brush, size 20 px. Open the Brushes Panel and make the following settings:
Go to Brush Tip Shape and increase the Spacing to 154%.
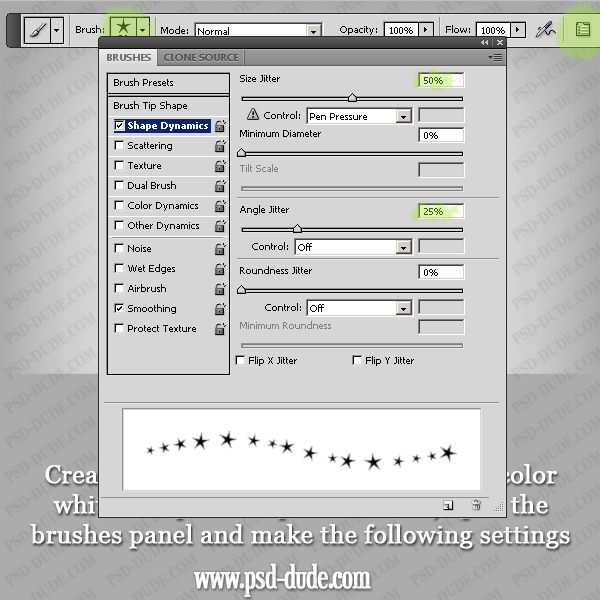
Go to Shape Dynamics and set the Size Jitter to 50% and the Angle Jitter to 25%.
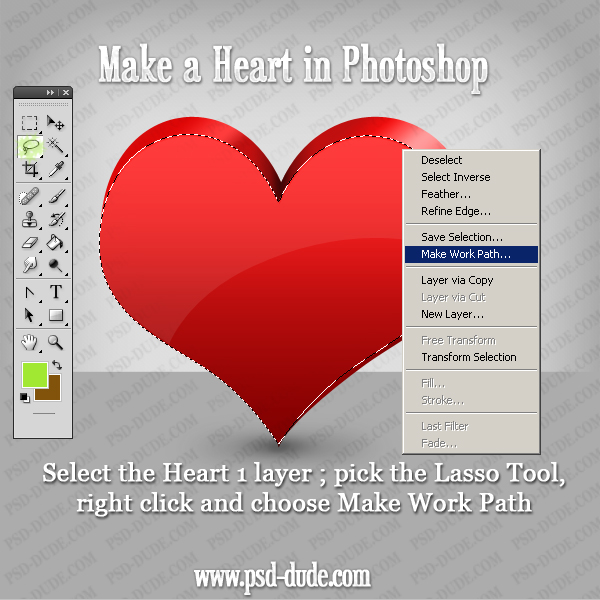
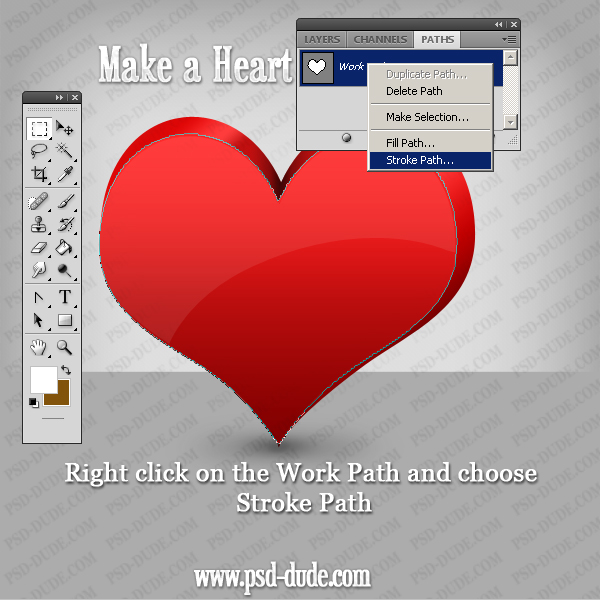
Go to Heart 1 layer and press CTRL and click the layer thumbnail to select it. Pick the Lasso Tool, right click and choose Make Work Path.
Go to Paths tab, simply click right on the Work Path and choose Stroke Path. Check Simulate Pressure and you should obtain a similar effect. You can add similar dotted outline or a double stars outline, just let your imagination flow.
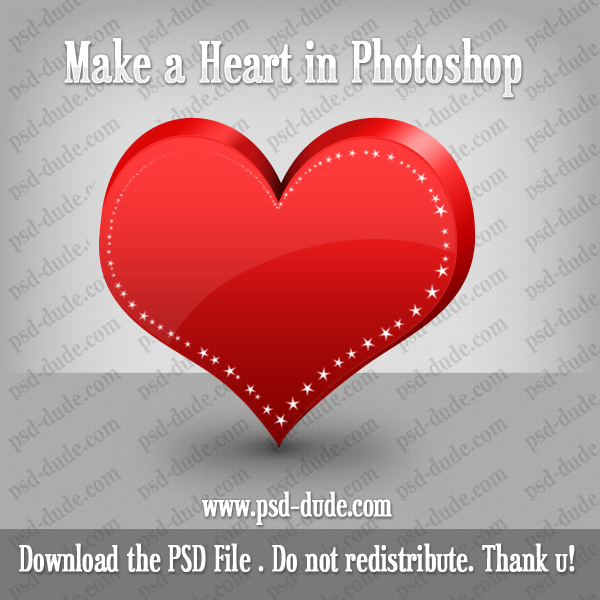
Here is the final result for my "Make a Heart in Photoshop" tutorial. Hope you've enjoyed reading it!
License
This file is free for personal, non-commercial use only and can not be redistributed or sold without our written permission. If you have any questions you can contact us.
4 comment(s) for "Make a Heart in Photoshop"
How did you manage to get you ellispe at an angle like that? I cannot seem to do that, and using the transform tool to change the angle doesn't work either cos that changes the angle of the whole heart...
*confused* :( reply
You are right about this issue. You have to rotate the Ellipse using the Transform Tool. Use the Path Selection Tool to select only the Ellipse Shape.
You will also have to modify the Anchor Point of the Ellipse Tool, moving it using the Convert Point Tool to select the Anchor Point.
I will have to write a tutorial on how to work with Vector Shapes and Vector Tools.
I personally know my way around photoshop fairly well and I was still lost, confused, and very bewildered by this tutorial! The images while wonderful, distract from the rest of the text giving us hex codes for colors and other instruction. There is no instruction on how to create a diagonal ellipse, or how to create that custom gradient (thankfully I had experience on that last one or I'd have stopped long ago).
Good idea and a really fun end result, but very confusing execution on the instructions. reply
I understand that this tutorial isn't so well explained from your point of view. I have really tried to explain all the steps ... with preview images for the brush settings, for the gradients used and so on.
It is true that I have missed the diagonal ellipse but I have added all the instructions in the first comment reply.
As for the custom gradient simply you have to click on the area you want to add the color point. The gradient is defined by Color, Opacity and Location and you have to set them like in the image.
I hope that the PSD file was helpful!
reply