The concept for this neon sign design was inspired by the neon lettering often saw during the 1980s in many places. If you want to learn more about the 1980s, check out my article about 80s font used in movie posters, video gammes, music album covers, etc.
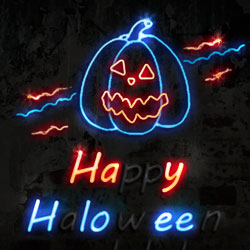
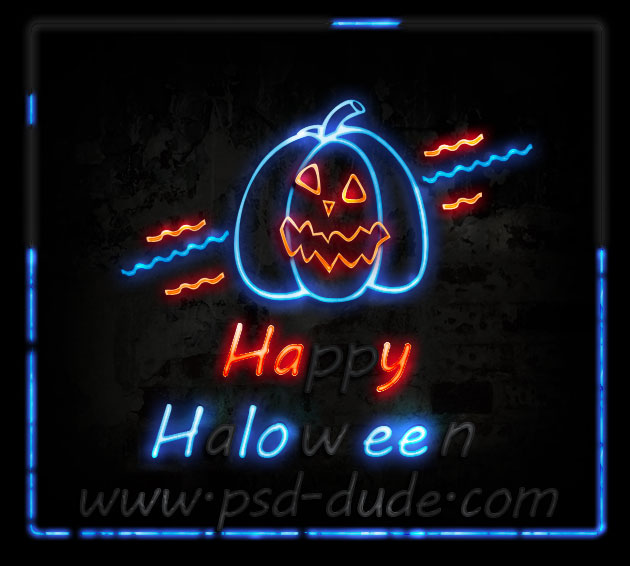
Learn how to create a neon sign using a neon font and a Halloween pumpkin shape. The tutorial result is really easy to customize so you can use your own shape, text and so on. You can also replace the colors with other combination using a Hue/Saturation adjustment. And to be even more creative you can add a blood texture to obtain a more dark horror effect.
With the Pen Tool draw a simple pumpkin shape. I prefer drawing my own pumpkin vector shape instead of downloading one from the internet because I need an outline shape. I assume you are familiar with vector drawing in Photoshop, if not you might want to check out these tutorials on how to work with Pen Tool in Photoshop.
If don't have the time or you don't know how to create the pumpkin from scratch you can download the shapes used in this tutorial from shapesforphotoshop.com. In thsi set of free pumpkin shapes you will find the two shapes used in this tut(www.psd-dude.com(pumpkin face) and www.psd-dude.com(pumpkin outline)).

Click on the Vector Mask Thumbnail to make sure you have the right layer selected. To obtain only the contour of the pumpkin, take the Pen Tool again and press the Subtract from Shape Area button like in the image. Draw shapes inside the pumpkin to obtain only an outline like shown in the preview.

When the shape looks ok, go to the Path Selection Tool and press Combine button to obtain only one shape. Call this layer Pumpkin Outline.

Create a new layer and again with the Pen Tool draw the face of the halloween pumpkin. I will use another color for the face shape simply to know that the face features are placed in another layer. You can use these halloween pumpkin face but you will have to trace the outline.
Make sure you have the Add to shape area button selected so that all the face feature shapes to be in a single layer.

Trace the outline like we did in the previous steps and call this layer Pumpkin Face; your result should look something like this:

I will also make some wavy lines using the same Pen Tool. You can use other objects instead of wavy line, for example arrows or dotted lines. As you can see in the image I have marked with red some shapes(pumpkin face features and wavy lines) and with black the other shapes(pumpkin and the other wavy lines). You will see in the following steps that we'll add a different layer style to each color.

Time to add a nice background for our neon sign effect. As you probably know the neon effect looks good especially on dark backgrounds so it is better to use night photography stock images; I will use as background this cracked paint and brick wall.

Because the image is way to light we have to darken it by adding some adjustment layers: Brightness and Contrast, Exposure and Hue/Saturation. If you want to know how tu turn an image from day to night you can check out this darken photo effect tutorial
First add the Brightness and Contrast adjustment layer. If you are not familiar with adjustments you can read this Photoshop adjustment layers guide for beginners.

Add the Exposure adjustment layer with these settings:

Now let's add a Hue/Saturation adjustment layer to desaturate the colors a little bit.

Finally open the layer style window and add an Inner Glow effect to the background layer.

Now let's make visible the pumpkin shape that we want to turn into a neon sign. I have colored the shape in two colors, red and blue and we will add a layer style to each color.

For the neon effect I have decided to use a free neon layer style instead of creating one from scratch. So download this Photoshop neon style. Open the ZIP archive and you will find a PSD file inside. Open the PSD file and inside you will find three groups of layers, each layer with its own layer style.

Open the layer style window of the NEON layer and pess New Style; call the new style Blue Neon. If you are not really sure on how to work with styles you can check out the Layer Style Guide for Beginners.

Do the same for the Free Layer that becomes the Green Neon style and for the Style Layer that becomes the Red Neon style. Last but not least, in the TEXT OFF Group you will find three layers with the same layer style. Save this style as Neon Off style.
Back to our pumpkin shape; apply the Blue Neon layer style to the shapes colored with blue and the Red Neon style to the shapes colored with red.

Your image should now look like this with the Halloween Neon Pumpkin Sign.

Next let's add a text, the font and size are not really important, you can customize as you wish. I have used the MV Boli Font but you can use another font that you like. Learn how to install font in Photoshop from this easy to follow tutorial for beginners. I have written the text in separate layers, one with Red Neon style attached, one with Blue Neon style and the third with Neon OFF layer style. The distribution letter/style is up to you.

For the final touches, simply add a new layer above all the other layers and call it Light Layer. Change the blend mode of this layer to Overlay; use the Brush Tool with a soft round brush of different opacities paint over certain areas to create light sparkle effects. Use white color for the brush.

2 comment(s) for "Create a Halloween Neon Sign in Photoshop"
I am glad you like the tutorial, unfortunately the facebook link you posted is not working...maybe you should upload the neon style work on my blog and put a link to your facebook account! reply
Thanks for another awesome tutorial. Thank you for the resources, too!
Su reply