
Step 1 Download the Resources
Before we begin you have to download the stock images and resources that we are going to use in this tutorial.
Planet Texture
Star Field
Landscape
Galaxy Brushes
Comet Brushes
Star Brushes
Galaxy Nebula
Step 2 Add Star Field Stock Image
Create a new psd file. Because I intend to make an wallpaper from this image I will
create a new file with the size 1920x1200px. This is actually one of the wallpaper's
standard sizes. Copy the Stars Field Stock Image and call this layer Stars Layer.
This is our initial scene.

Step 3 Add The Landscape
First copy the Landscape Stock Image into your file. Resize it to 50% to fit into
place. Press Ctrl+T again this time lock the width, because we will change only
the height to 70% (vertical scale).

You can see that there is an unpleasant area where the Star Layer and the Landscape Layer
meet. So to fix that, add a Layer Mask to the Landscape layer. There is a little button on the Layers Tab. With a Soft Round Brush, color black, opacity 80% paint over the area that you want
to blend.
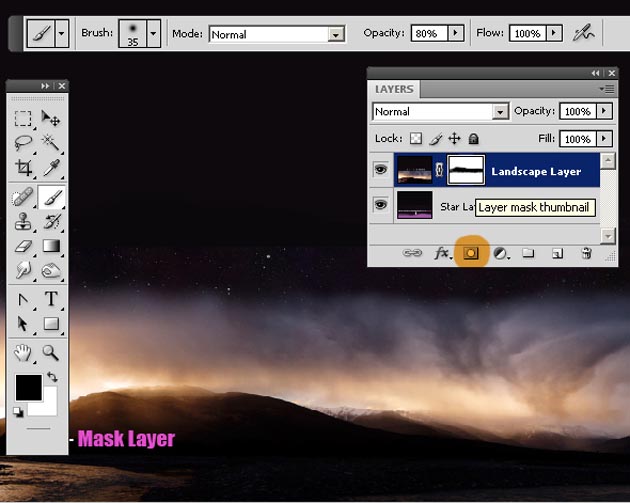
You can see the image before and after adding the layer mask.

We will change this layer in the next steps while the other elements are added.
Step 4 Galaxy Nebula Stock Image
copy the Galaxy Nebula Stock Images into another layer called Nebula Layer. Resize
it to 50% and duplicate it. Place the 2 nebula layers as shown in the image. Change
the blending mode from Normal to Lighten, opacity 50%. With a round size brush,
use the eraser tool to fix the little blending problems.

Step 5 Create a Planet in Photoshop from Texture
Before going further with the lighting, colors and other adjustments I want to add
two planets that are almost colising.
Create a new layer, called Planet Texture. Copy the planet texture stock image and
resize it to 50%. With the Eliptical Marquee Tool selected, press Shift to draw
a circle selection. Select Inverse and remove to have only the circle.

Use Hue/Saturation to change the color and the lightness of the texture with following
settings:

Press Ctrl and click the Thumbnail of the Planet Texture Layer. As a result you
can see that the planet is selected. Go to Filter - Distort - Spherize and set the
amount to 100%, mode normal.
Go to Brightness and Contrast and do the following settings. Reducing the contrast
and the brightness, the planet will blend in better wth the rest of the image.

Select the Planet shape. Create another layer and fill the selection with white.
Call this layer the Highlight Layer.
Move the selection like in the image and press delete.

Now Duplicate this layer and press Ctrl+T to flip it. The settings are W:-100%
and H:-100%. Now place it like in the image. Merge the two Highlight Layers.
Select the center of the Highlight Layer and create a new layer. Fill the selection
with black color. Call this layer Shadow Layer.

Add Gaussian Blur, setting radius 42 px, to the Highlight and Shadow Layer. Change
the Blending Mode of both layers to Overlay 100% and Overlay 80%.

You can see a small change. Now i have duplicated the Highlight Layer to obtain
a better contrast.
With the same technique create and play with multiple Highlight Layers but this
time use smaller sizes. You can see in the image where I will add light sources.
There will be 2 light sources coming from oposite sides.
Step 6 Add Planet Explosion Light
Duplicate all the Planet Layers and put them into one group called Planet Group.
Keep the initial layers into another group and hide it! It is always best to keep
a copy of every step you never know when something will go wrong!
Resize the Planet Group to 40%.
Now i will add light effects, stars and other galaxy elements. For that you need
to load the three sets of brushes presented in the first step.
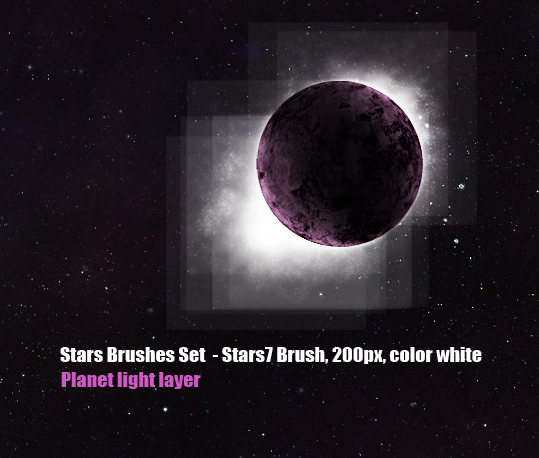
I will start with Stars Brushes Set. Choose Stars7 Brush from this set, size 200
px, color white. Create a new layer below the Planet Group, called Planet Light.
Paint with the brush to obtain something similar to this:
Now with the Eraser Tool, round brush, size 100px gently eraser the edges to blend
in the Planet light layer with the rest of the image.

With the technique presented in the previous step, add another Highlight Layer to
adjust the luminosity of the planet with the new added light.

Create another layer above all the others, called Light Edge Layer. Take the Brush
Tool, round shape, size 20px, color white and simply draw lines around the edges.
Use the Blur Tool and eraser Tool to make the light diffuse and real.

Step 7 Add Another Planet
Select all the planet layers and the light layers and put them in a group called
Planet+Light Group. Duplicate this group.
Move the group copy up and rotate it with 180 degrees.

Step 8 Work with The Landscape Layer
It is time to return to the Landscape Layer and adjust the image. Use the Eraser
Tool to delete some areas and to obtain only a focal light area. Use a 100 px round
brush, opacity 60%.

Paint with Smudge Tool. Use the Smudge Tool, 20 px round brush, opacity 20-50% to
change the clouds and light shape. Use also the Dodge Tool to lighten areas from
the clouds and also pats from the water like in the image:
I have used my graphic tablet to obtain a better result but it can be dome with
the mouse also.
Step 9 Work with Planet Light Layers
Return to the Planet Light Layers (remember that we have two planets) and use also
the Smudge Tool to adjust the light trails like in the image. It is up to your imagination,
you can give whatever shape you like.

Step 10 Add Galaxy Stars Brushes and Nebula Brushes
In this last step i will add another space elements and adjusting the colors. Create
another layer, call it Comet Layer. Lets use the other sets of brushes. So use Galaxy
Brushes and Comet Brushes to add elements on the sky. Use color white, different
sizes and opacities. The rule is: if the object is in front is bigger and with higher
opacity and if the object is in the back use lower opacity and smaller size.

Sep 11 Adjust Color and Luminosity
For the final adjustments we have to create three layers called: Light Accents,
Clouds and Color Layer.
So lets start by creating a new layer above all the others, called Light Accents.
With a soft round brush, color white, paint the areas where you want a lighter tone.
Change the blending mode of this layer to Soft Light 40%.
The second layer, Clouds layer. Set the foreground color white and background color
black. Fill the layer with white color. Go to Filters - Render - Clouds. Go to Filters
- Blur - Motion Blur and set the angle 40 and distance 35. Set the blending mode
of the layer to Soft Light 70%.
For the third layer, Color Layer, use the Brush Tool, round, 200px size to paint
over almost the the entire image. The reason we do that is because we want that
the planet, planet lights, stars, glaxy elements to have a similar color mixture.
So the colors I have chosen are orange #ea4300, red pink #eb0022 and purple #a24c5c.
Set the blending mode of the layer to Color 20%. This way you can paint and see
the result in real time.

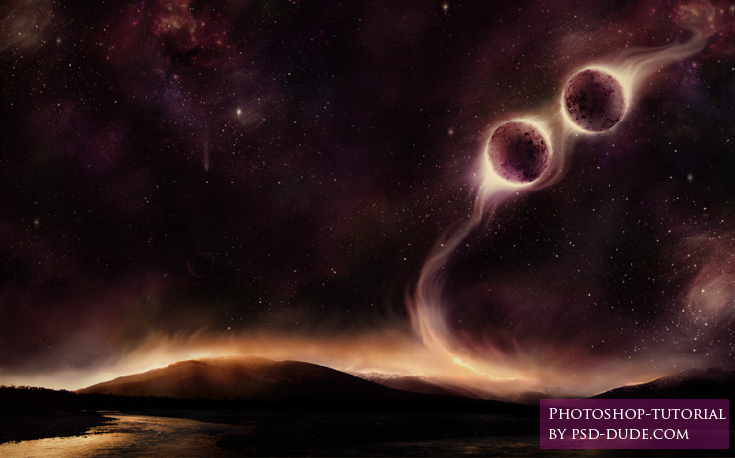
Photoshop Planets Collinding in Photoshop
Here is the final result for this planets colliding photo manipulation; you can check out other amazing space galaxy planets Photoshop tutorials that will inspre you for sure.
Free Galaxy Photoshop Brushes
Check out these free Photoshop brushes for creating galaxies: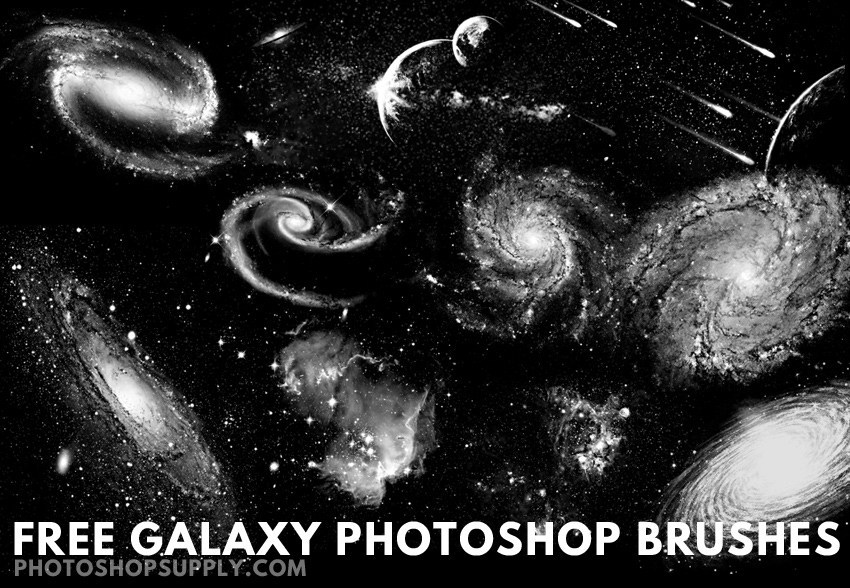
26 comment(s) for "Planets Colliding in Our Galaxy Photoshop Tutorial"
I am planning to create a beginner's section but I don't really have the time to do as much as I wish to do :( reply
your image looks great. If you have that kind of skills after just a few weeks of learning I guess pretty soon you will be better than me :)
Keep up the good work! reply
reply
usually I don't approve comments from people that input a fake email.
Thank you for posting your comment, but I disagree with it.
imho this tutorial is quite well explained and can help people that want to learn Photoshop - the main purpo reply
I am so happy that you like my tutorials.
Thank you for being a friend of our blog :)
reply
Thank you :) reply
not as good as yours tho lol
T
please upload your work result, I would love to see it :) reply
You have to add a Layer Mask to the Landscape layer. There is a little button on the Layers Tab. With a Soft Round Brush, color black, opacity 80% paint over the area that you want to blend (see the attached image)
I have updated the step, so hopefully now it is better explained. reply
My art teacher told me to do something of my own in photoshop and print it and show her and tell how i did it, so i have chosen your tutorial. the problem is that i cant understand how you do each step. it would be great if you start making videos on your next tutorials so that every one can understand it easily.
pls reply me with the link to to your great tutorials which are more easy.
Sorry to waste your time.
waiting for a reply. reply
I am really glad you like my website and my tutorials and, thank you!
Regarding to video tutorials, I am afraid my spoken english is not that good so I can't make video tutorials.
I am really trying to create complex tutorials that are explained step by step. Here is a link to my photo manipulation tutorials, but I don't really know what tutorial to suggest you .... choose one and tell me exactly what step you can't make!
reply