
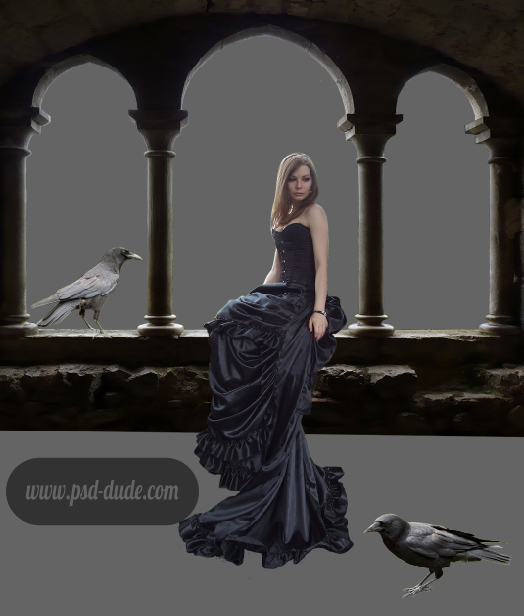
I was always inspired by fantasy novels, mythology and fairy tales when I create my photo manipulation tutorials. Many times my Photoshop skills can not reproduce all that I read and imagine but I try to improve with every work that I create. In this tutorial I want to create a Queen of Ravens, a character that has beauty but also a dark and mysterious image.
I like that Photoshop allows me to create a world different from my sometimes boring reality, a world where I can create fantasy landscapes and unique characters. And I am sure that this is a thing that you and me have in common.
Resources Needed for This Tutorial
For this new tutorial we will need free stock images, Photoshop brushes and textures. It is better to download all the resources needed for our photo manipulation tutorial before we start.
- Raven Queen
- Raven Image
- Raven Image
- Castle Balcony
- Sky Clouds
- Chess Board Texture
- Ruin on the Hill
- Bird Brushes
Crop The Stock Images and Resize Them
First open a new psd file (my file has 1070x1300 pixels but you can choose whatever size you want) and copy all the stock images. Resize them to fit your file and start croping them.
This process requires a lot of attention payed to details so take your time. There are several tool you can use. For example you have the Magic Wand Tool that works great when the background has only one tone color. In our case all of the images have detailed background so, either you use the Pen Tool to trace the shape of the object and copy it in another layer or use the Eraser Tool like I did.
You have to have a graphic tablet and to use a hard round brush if you use the Eraser Tool. And also you have to Zoom In the image and a small size brush to make sure you capture all the details.

Ok, so the castle balcony was relatively easy to crop. Now do the same with the Girl and the Raven Images. Don't worry about the hair and feathers details, just crop the shape and we will fix these problems later.
So far we have 4 layers called Raven Queen Layer , Raven 1 Layer, Raven 2 Layer and Castle Balcony Layer. This is how your image should look like so far with all the cropped images put in place.
Create a Chess Pattern Floor Using Patterns
I don't know how other guys create their photo manipulations, but I like to add all the images/objects cropped in the right place and after that to change each image, to adjust the light, add shadows, etc. So I will now add a nice chess pattern floor. I create one myself that way it will look great and you will learn something new.
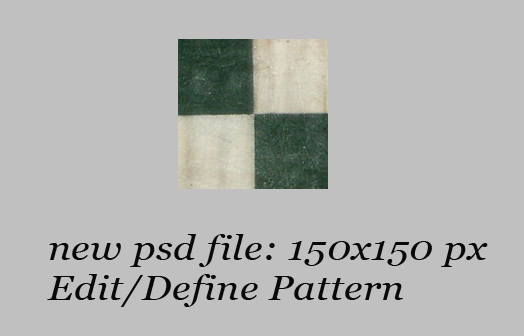
So let's create a chess pattern from the Chess Board Texture stock image. Create a new layer, size 150x150 pixels and copy the chess texture to look like in the image. Go to Edit menu and choose Define Pattern and enter Chess Pattern.
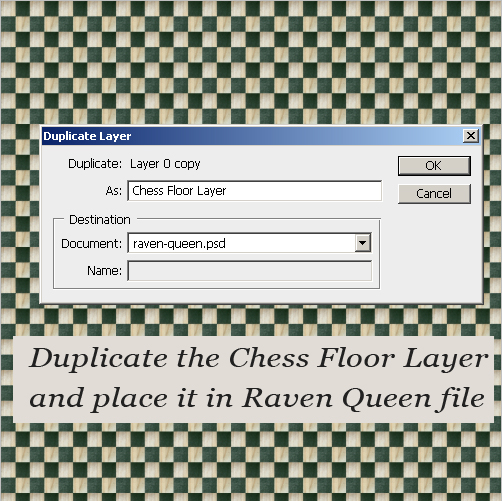
To create the floor we need to create another psd file, size 2000x2000 pixels. Add Pattern Overlay and choose the Chess Pattern made in previous step. Duplicate this layer and merge the two layers. That way we obtained a huge chess texture that we are going to use to create our floor. Duplicate this layer in Raven Queen psd file and name it Chess Floor. Return to the Raven Queen psd file and place the Chess Floor, under the Castle Balcony Layer.
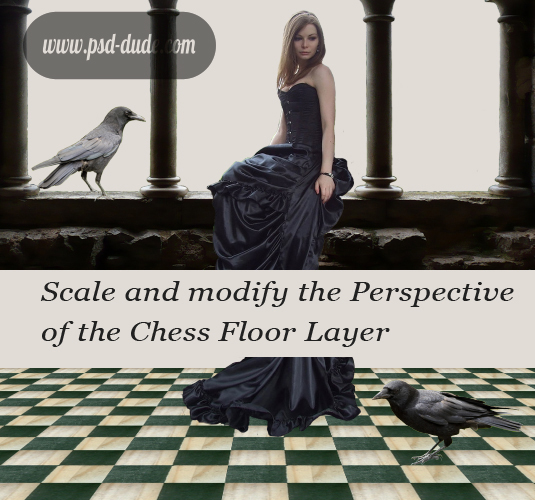
Rotate the Chess Floor Layer by 45 degrees. Place the chess texture in the center of the image and scale it on the vertical line. Then go to Edit, Transform, Perspective and modify it so that it looks realistic.
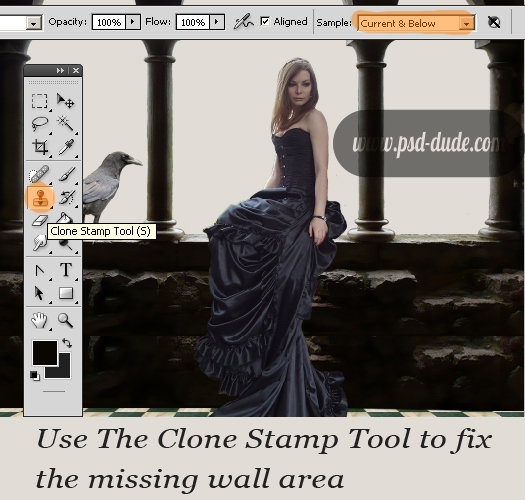
Draw the Castle Wall Using the Clone Stamp Tool
As you can see there is a gap between the floor and the castle wall, so we really need to fix that. So create a new layer above the Castle Balcony Layer and with the Clone Stamp Tool, select Sample Current&Below and start cloning.
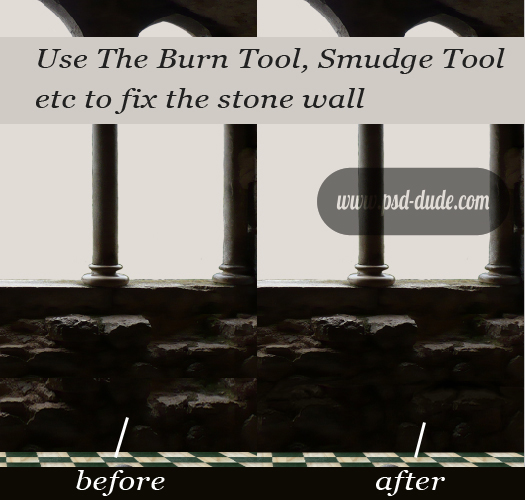
It looks ok so far but to look even better we have to work with the Burn Tool and the Smudge Tool and combine the two pieces together. You have to paint every stone wall, darken the edges with the Burn Tool or paint with the Brush Tool. It is very easy if you have a graphic tablet.
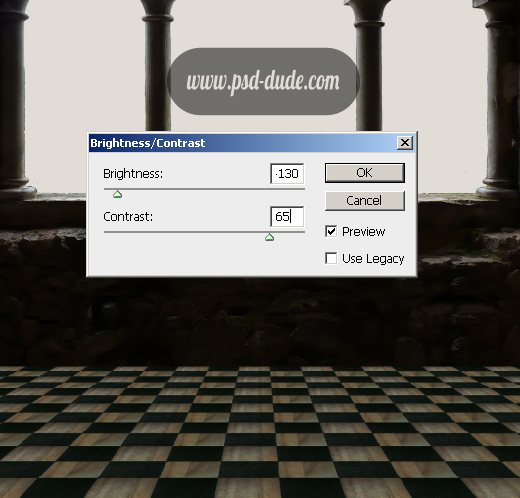
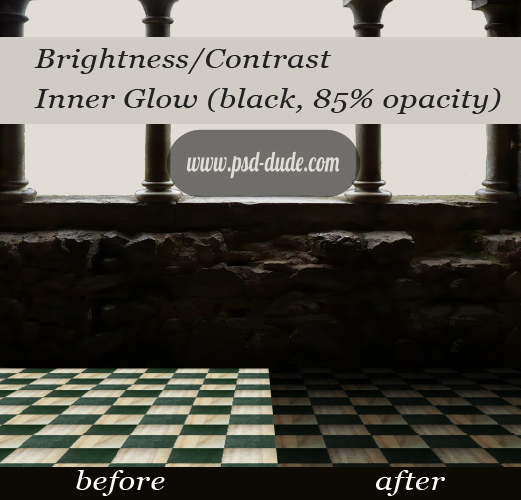
Work with The Chess Floor Layer and Change its Brightness
The castle wall is very dark in comparison with the floor so we will darken the floor as well. Modify the Brightness/Contrast balance with the following settings:
Double click on the layer's name and add Inner Glow, normal, color black, 85% opacity, 15% choke, size 165px and with the rest leave the default settings.
Add Sky Clouds
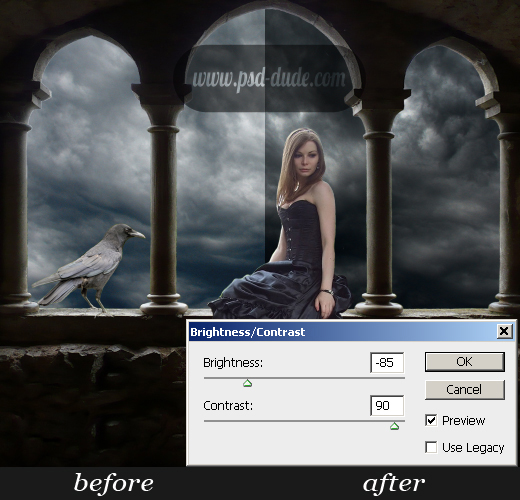
Place the Sky Clouds stock image behind all the layers. To turn this photo into a night sky image we have to adjust the Brightness/Contrast levels like in the image. To obtain a more dramatic impact you can increase only the Contrast with 50.
Adjust Color Balance
One of the most common problems when trying to blend different photos is that they have different tone colors. These annoying variations are caused by a number of factors such as:
- photo camera exposure
- time of the day when the photo was taken(night/day time)
- different lighting
- photographer skills
- the place where the photo was taken(indoor/outdoor)
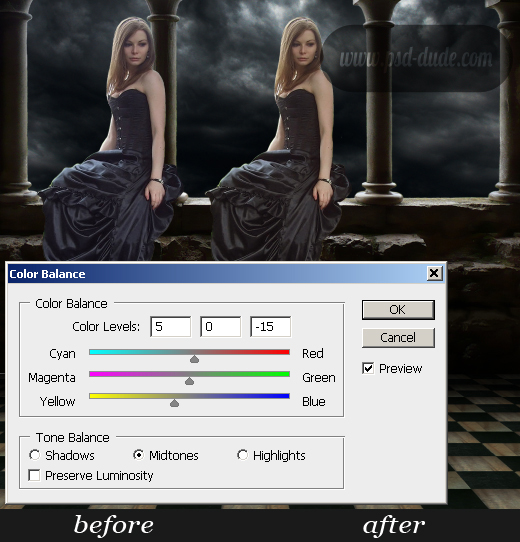
First thing that we have to do is to establish which of the images has the right color/ contrast and exposure. After you did that, try to bring the other elements to a common ground.
In our case I have decided that the Castle Balcony(with the floor) is the base for our photo manipulation. We have so far three elements that do not match with the rest of the image: the queen and the two ravens.
I will start with the Queen image and adjust the Color Balance, increasing the yellow and red tones.
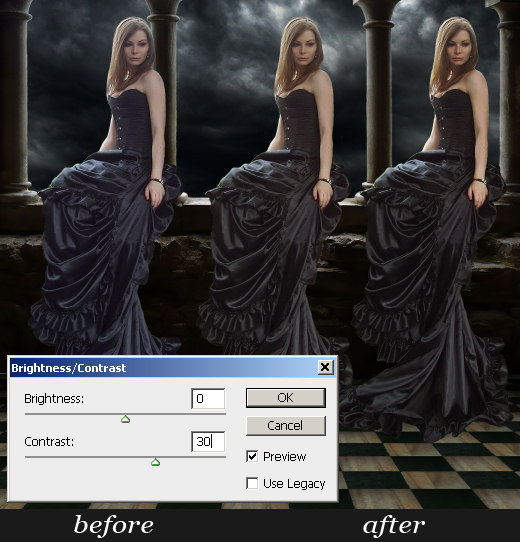
Now change the Brightness/Contrast settings and add more contrast.
Add Gradient Overlay to the Queen Layer with the following settings. The gradient is black(location : 0 ; opacity 100%) and black again(location : 100 ; opacity 0%).

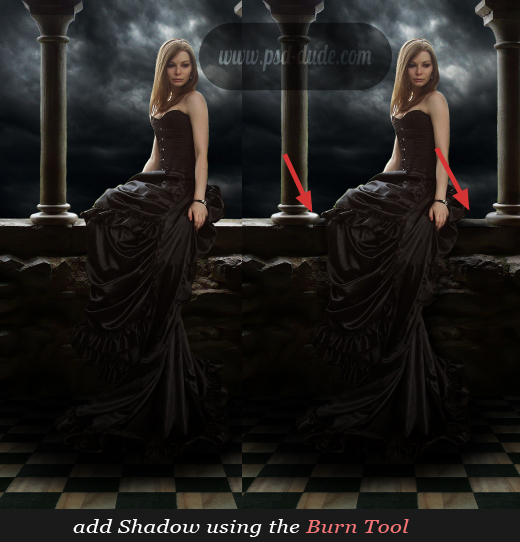
Add Shadow and Light
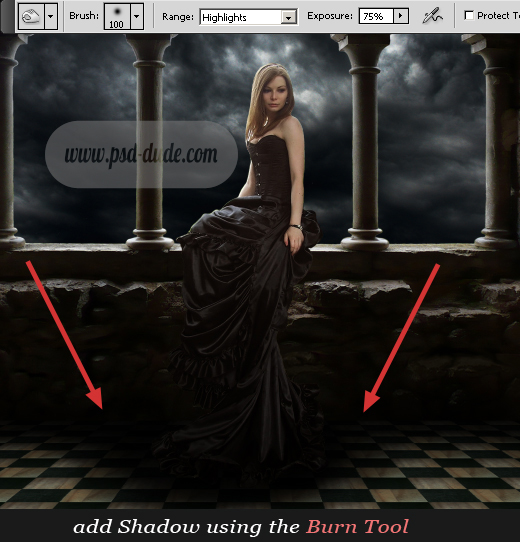
Another important thing when you blend multiple croped images together is the shadow. This means that every object has to have one or even more shadows depending on the situation.
For instance an object has to drop a shadow on the floor, on the wall, on other surrounding objects. You also have to take into accound the light source (or sources) because they determine the direction and size of the shadow.
In our case we have to add different darken areas around the Queen to simulate shadow. And I will use the Burn Tool to do that, even if there are other ways to do it. First work on the Chess Floor Layer and darken the area under and arround the dress.
Now work with the Castle Balcony Layer and darken some areas like in the image.
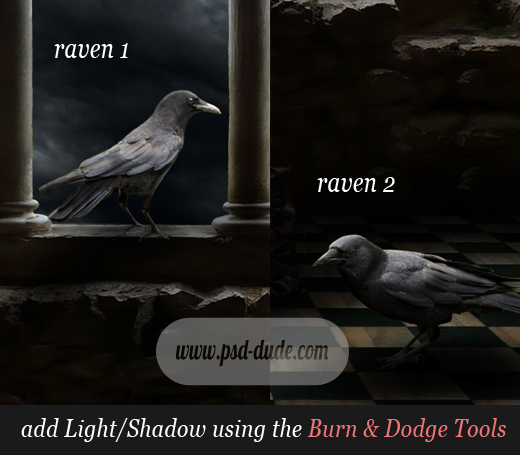
Do the same adjustments for the Raven Layers with the mention that for the Raven 2 Layer the Gradien Overlay is Darken (Blending Mode). Use the Dodge and Burn Tools to adjust the raven images according to the image lighting.
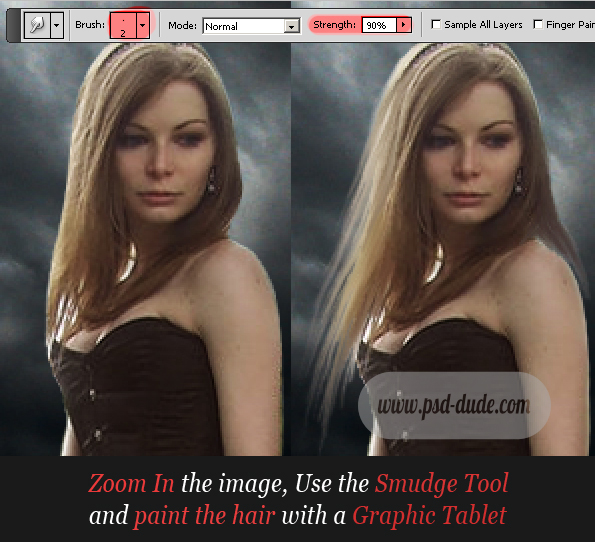
Paint Hair in Photoshop
First of all duplicate the Raven Queen layer and merged with the initial one, that way the Gradient Overaly will become part of the image.
To adjust all the minor details of the Raven Queen we have to Zoom In the image and work with a Graphic Tablet. I will start with the Hair of the Raven Queen. Use the Smudge Tool to paint the hair like in the image. Use a small size brush, 2px. Painting Hair in Photoshop is not my strongest point but I have to be honest and say that I did not practise enought. Simply drag the hair wires in their normal direction.
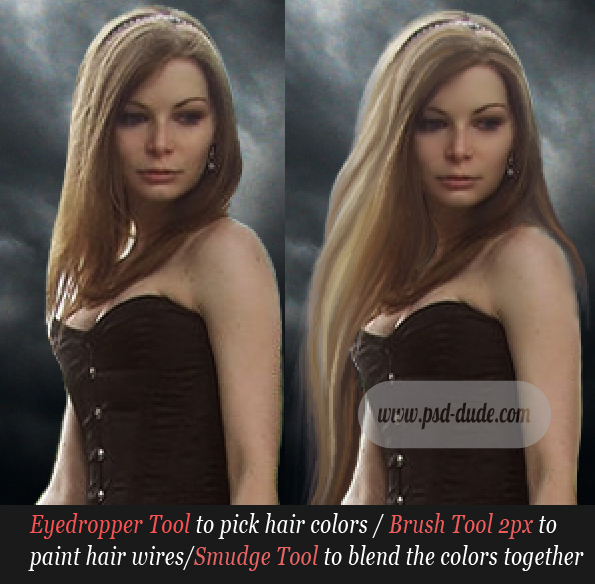
Go further with this process until you obtain a beautiful lenght and shape. Use also the Brush Tool, 2px size to paint the hair. With the Eyedropper Tool pick colors from the existing hair and draw little wires. Than with the Smudge Tool blend the colors together to make it look real.
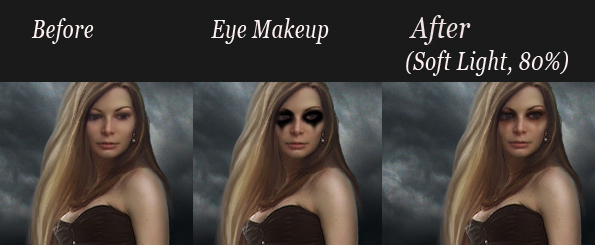
Make-up and Other Details
I will now add a little drama make-up to the Raven Queen. Create another layer called Black Eyes. Use the Brush Tool and paint with black color around the eyes like in the image. Use the Smudge Tool and Blur Tool to make it softer around the edges. Next change the Blending Mode of this layer to Soft Light, opacity 80%.
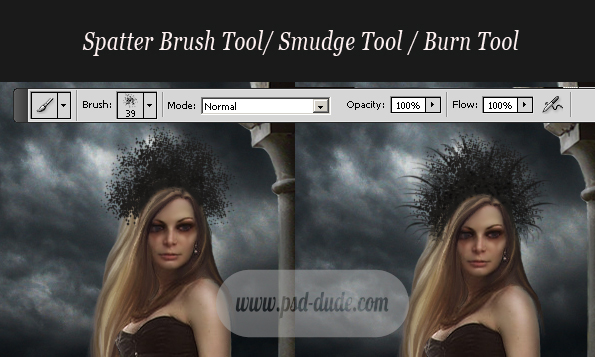
Use Brush Tool to create a Tiara made of feathers. Pick the color #34322d to star sketching the tiara. Use a Spatter Brush, size 39px to begin creating the shape. With the Smudge Tool and Burn Tool, paint some wires like you did with the hair.
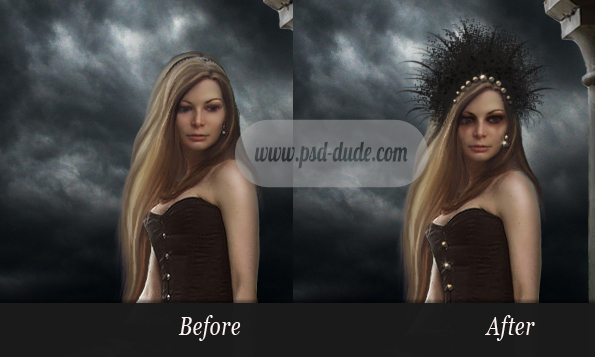
Add pearls around the Feathers Tiara and on the dress like in the image blow. Add also little sparkle accents, using sparkle brushes.
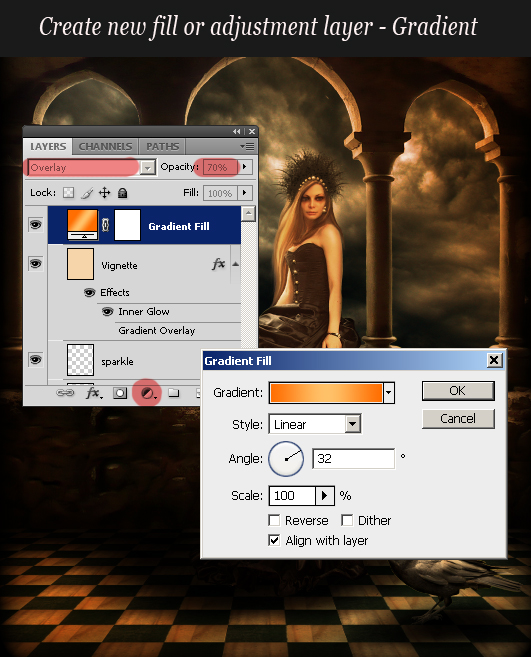
Add Image Gradient and Adjust the Lighting
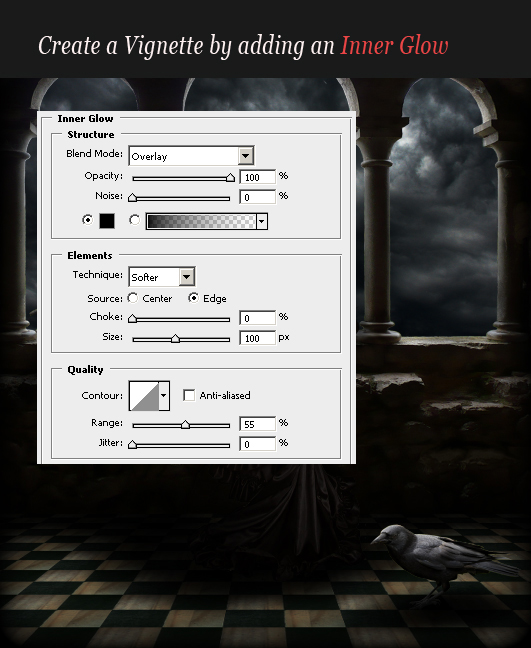
One of the final steps is defining the way the image will look like in the end, in terms of color and lighting. So, create a new layer above all the other layers and call it Vignette. Fill it with a random color. Change the Fill of this layer to 0%. Add Inner Glow with the following settings, using a black color:
Press the Create new fill or adjustment layer button from the bottom of the Layers Tab and choose Gradient. Make sure you set the blending mode of the Gradient layer to Overlay, opacity 70%.
The gradient color map is: #ff6e02(location 0), #ffc168(location 50) ,#ff6e02(location 100). The big advantage is that you can always change the gradient map without affecting the other layers.
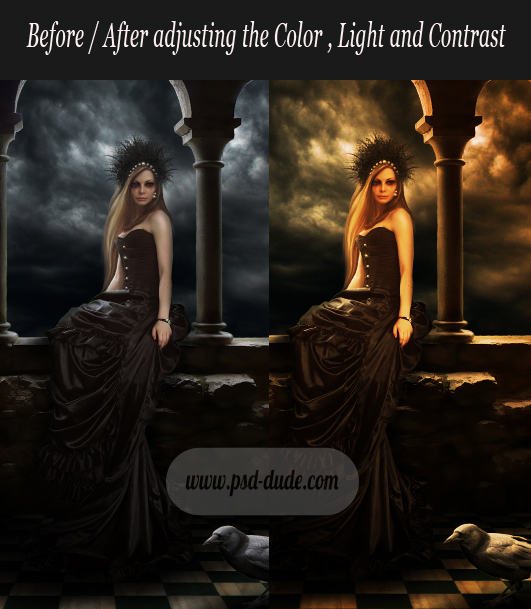
Create new fill or adjustment layer, this time choose Brightness/Contrast and increase the Contrast to 50.
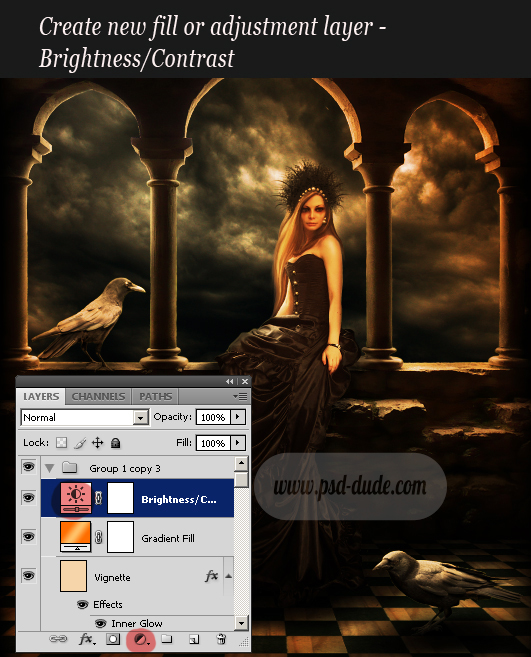
These is how our photo manipulation looks like after adjusting the color, the light and the contrast of the images.
Fantasy Landscape in Photoshop
I have decided to add a landscape that you can see between the balcony columns, simply because the image added gives depth to my photo manipulation.
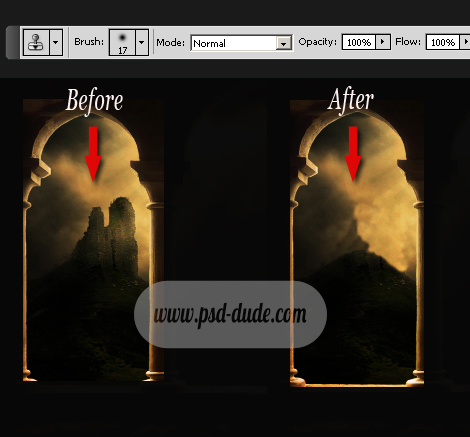
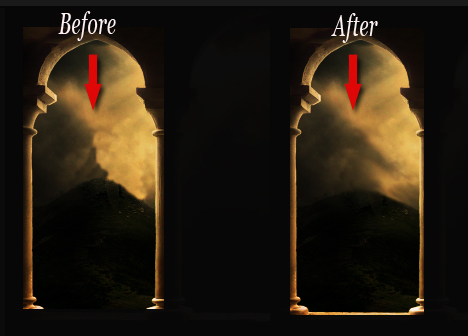
So copy the Ruin on the Hill stock image, below the Castle Balcony and Sky Clouds layers. Change the blending of Sky Clouds layer to Soft Light. Now you can see the new image added and you can work with it.
First resize the Ruin on the Hill image to 60% and place it to the left side. Duplicate this layer and Flip Horizontaly. Place the duplicated layer to the right side.
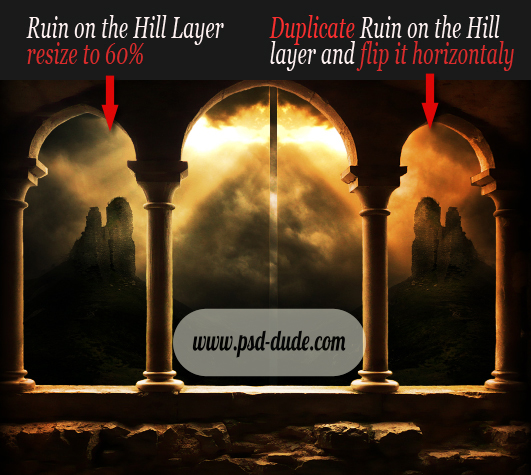
Merge the two Ruin on the Hill layers. You can see that there are some problems with the image. First we have to fill the gap between the two parts. Use the Clone Stamp Tool to fix it.
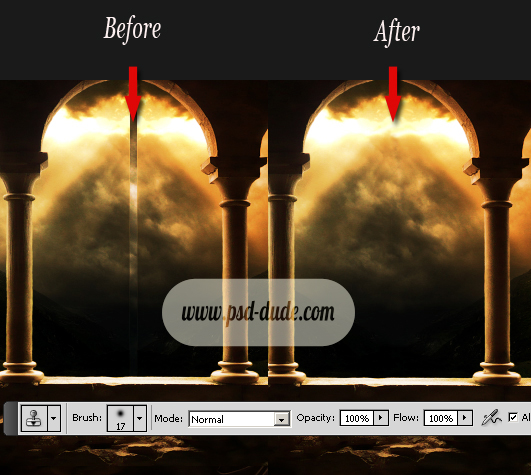
Use a Soft Round brush for the Clone Stamp Tool and press ALT to choose the cloned starting point and than simply draw the empty space. Try to make it as realistic as possible.
Another problems that needs to be fixed is the ruin from the left side. With the Clone Stamp Tool try to hide it with clouds.
As you can see the result is not perfect so I will use the Smudge Tool to blend the colors together so that it looks like realistic clouds.
Reshape the Sky Clouds by adjusting the light and color using Burn/Dodge Tools. Use the Dodge Tool to lighten the Shadows and the Burn Tool to darken the Highlights.
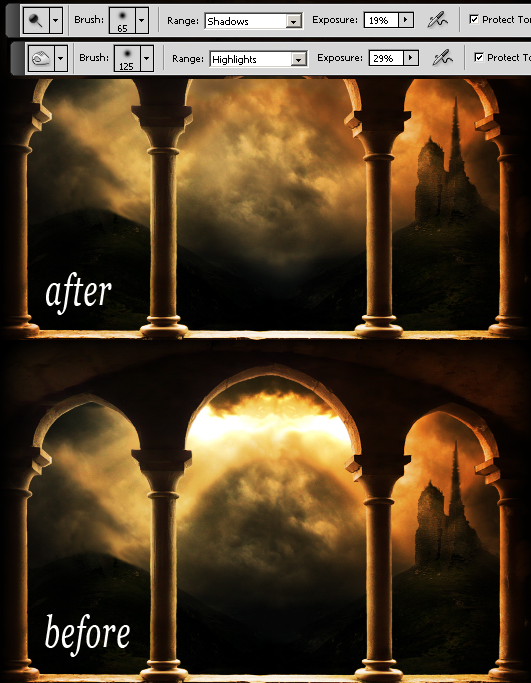
The final touch is to use the Bird Brushes to add some little black birds on the sky and our photo manipulation is complete. You can see how the final image looks like. I hope you've enjoyed reading this photo manipulation tutorial!
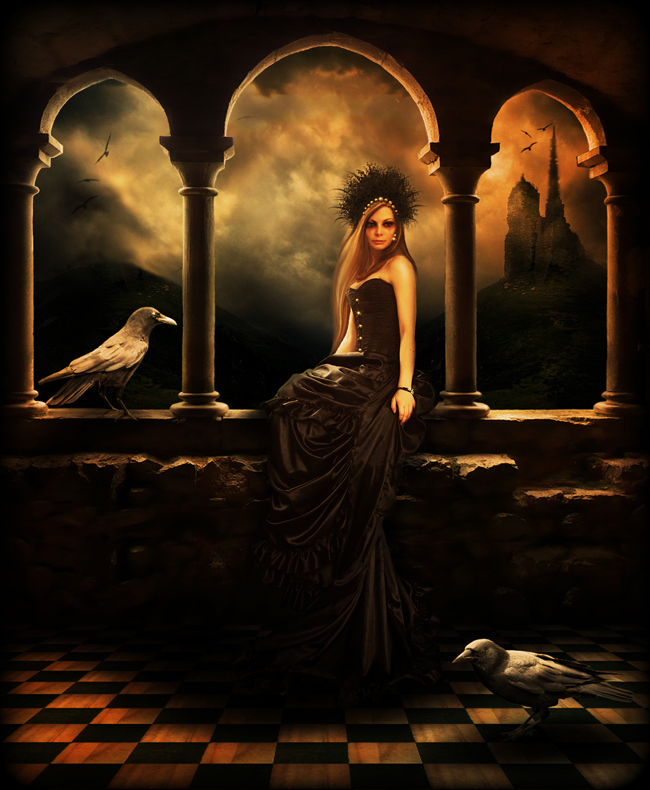
Raven Queen Photo Manipulation
28 comment(s) for "Raven Queen Photo Manipulation Tutorial"
But again, it is a very beautiful photo manipulation! Keep up the good work reply
Please don't be too long before your next tutorial.. ;-) reply
you have to press the UPLOAD button to load your result !
I really appreciate your work but it really needs a little improvement:
- first thing is the lighting ... too much light from all the directions, you really have to focus on an object, character; the idea with the lamps is good but leave only one lamp on for example
- second you have to see where the light is coming from and darken areas from the balcony, floor, etc...all looks too flat now; you need to obtain a 3D look by adding shadows.
- third the composition is too much with animals and birds and the girl costume much too busy
I hope that my comments didn't upset you, and hopefully you will improve your technique!
reply
this is my new creation.........i watchedthe tutorial for this and i created it
1. There are way to much elements with the same size (the moon, the star, the girl, etc) so the composition is too crowded.
2. there are too many light sources and the lighting and shading is not right. You have to add more depth to your image by adding more light levels/layers, especially on the man with the guitar. You have to look in perspective to create the dynamic light effect.
So I suggest you to learn more about dynamic light in Photoshop. And also to learn more things about composition.
Here are some tutorials that might help you:
Lighting and Shading Photoshop Secrets
Dynamic Light in Photoshop reply
Mich????le from France