


Broken Dreams Photo Manipulation
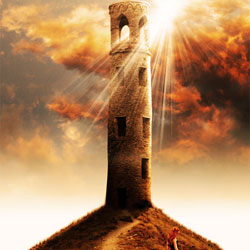
Before we begin let's take a quick look at the photo manipulation that we are about to create. You can always customize the image and give it your own personal touch, using other tone colors for example and even other stock images, brushes and other Photoshop elements.
Red Sky Clouds
Let's start our new photo manipulation with this beautiful red cloudy sky stock image. Resize the image to fit your document size and to look like in the image below.
My canvas size is around 850/1300 px and the Sky Layer has 850 px height so remains an area of 850/450 pixels that remains empty. So create another layer below the Sky Layer and fill it with #fdf1e6 color.

To blend the two layers, add a Layer Mask to the Sky Layer and in this mask add a gradient using the Gradint Tool. For the gradient use a black 100% opacity to black 0% opacity.

Add a Color Balance adjustment layer right above the Sky Layer. The changes will not be very visible but in the end you will see the difference. Just remember that this Color Balance adjustment layer is only for the Sky Layer, so all the other layers will be placed above these two.

In this step I will add two more Adjustment Layers. Let's start with a Photo Filter that will give the image a nice orange color tone. The color for the filter is e79622.

The second adjustment is a Brightness and Contrast with the following settings made to increase the contrast and give a more dramatic look.

Mountain Hill Path
Time to add another stock image to this photo manipulation. So copy the Mountain Path image and use the Lasso Tool for example to make a selection like shown in the image.
You can use of course another method to make the selection, to trace the path using the Pen Tool.

Copy the selection in a new layer called Mountain Path Layer simply by pressing CTRL+J to make a Layer via Copy.

As you can probably see there is a small difference between the color of the mountain path and the tone color of the sky image. To correct that problem I will add a new Color Balance Adjustment Layer that applies only to the Mountain Path Layer.
Make sure to press the This adjustment clips to the layer button so that the Color Balance to affect only the Mountain Path Layer.

Grass Brushes
Create another layer below the Mountain Path Layer and name it Grass Brush Layer. Download this grass brush and use it to add grass on the mountain path edge. Make sure you set the Foreground Color to #c25814 and the Background Color to #281004 color.

Castle Tower
Crop only the tower from this Tower Stock Image and place it on top of the hill like shown below.

Add Brightness and Contrast and Color Balance adjustment layer that affect only the Tower Layer.

Open the layer style window of the Castle Tower Layer and add it Inner Shadow, Inner Glow and Gradient Overlay to blend it even more with the rest of the image.
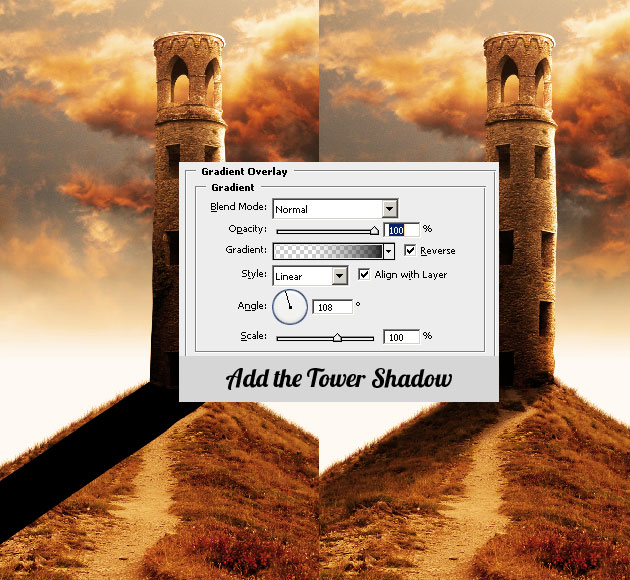
We have to take into account the light source so that we lighten/darken the right areas. As you can see in the image I have pointed the place from where the light is coming. And further on the light will become even more intense.

Make a selection out of the tower, create another layer called Tower Shadow and fill the selection with black. Flip Vertical the shadow shape and use the Perspective Tool to give its direction ( opposite from the light source).
To make it look realistic, add a soft Gaussian Blur of around 5 pixels. Set the Fill of the Tower Shadow layer to 0%. Open the layer style window and add a Gradient Overlay.
The Second Path
Select the Mountain Path Layer and its two adjustment layers and merge them by pressing CTRL+E. Call the new layer Path Layer. As you can see it has a little arrow attached, meaning that the Mountain Path Layer is acting like a Clipping Mask for the new layer.

Rotate the Path Layer and use the Eraser Tool, to remain only with the path area, no grass. Use the Warp Tool to give the path the desired shape like in the image.

The Girl
Place this Girl Stock, resize it to fit in the place and Flip Horizontal like in the image.

Add Color Balance and Brightness and Contrast adjustment layers only to the Girl Layer with the settings shown in the image below. We are doing that to equalize the tone colors and the brightness/contrast levels.

Now we elly have o attach a shadow to the girl, as we did for the tower, taking into account the light direction. So duplicate the Girl Layer, Flip Vertical, reduce the fill to 0% and add a Gradient Overlay using the shadow gradient (black 100% to black 0%).

Rays of Light Brushes
For the final touches let's add a new layer called Rays of Light. Download these amazing rays of light brushes and using the white color and the brush "burst 1" add this effect.

Create another layer and add a new light effect, this time using the "beam2-particles" brush from the same set. Adjust the brush angle to -60 degrees, using the Brush Pannel.

Use the Brush Tool to erase some parts from the Rays of Light layers; for example the light doesn't pass trough the tower so erase that part of the light. Try to make it as realistic as possible.
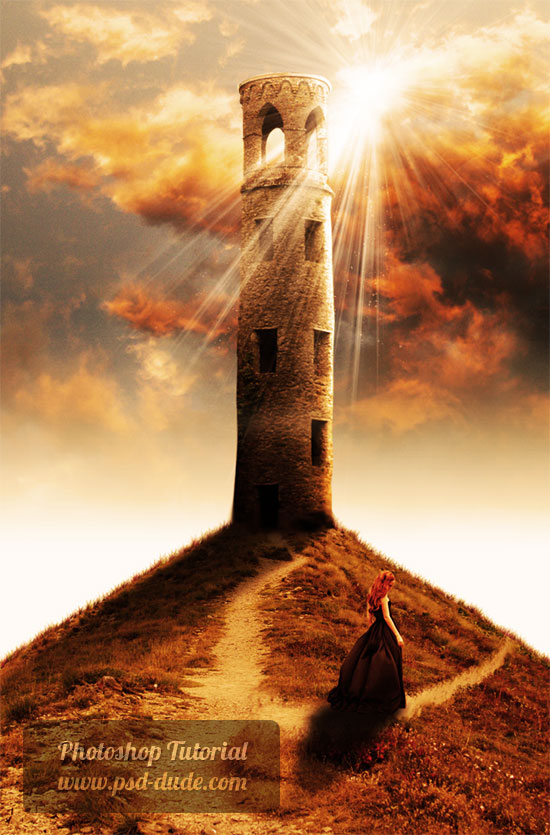
So here is the final result for my new Photoshop fairy tale tutorial, an emotional photo manipulation that I hope you will enjoy reading. As usual I am waiting to see your results.

7 comment(s) for "The Broken Dreams Photo Manipulation Tutorial"
Danke f??r teilen.
LG
Finja reply
Your result looks great, I am really glad that you
liked my tutorial ! merci
Your result looks great. I wanted to add a dragon in my original photo manipulation but I didn't find the right dragon photo.... so in a way you read my mind :)
Keep up the good work my friend! reply
Ma r??alisation:
http://www.chez-mireilled.com/article-photomontage-reves-brises-avec-photoshop-108351452.html reply