


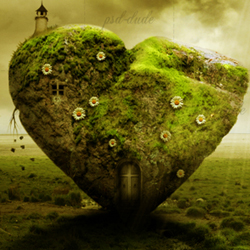

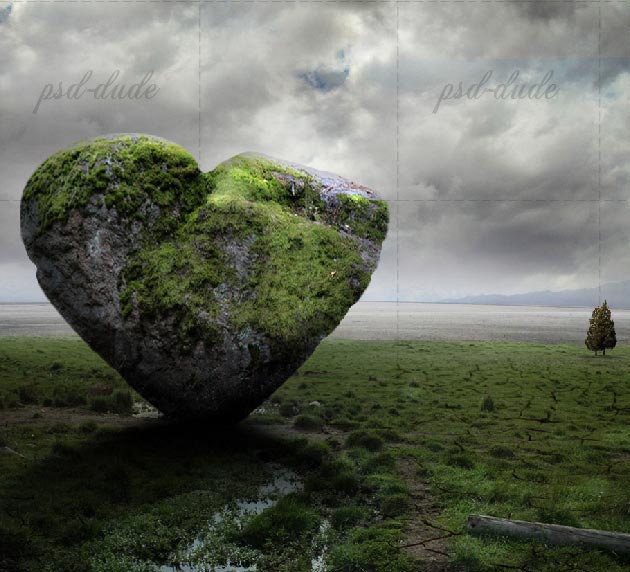
Preview of The Final Image
Before we begin let's take a look at the final image of this Valentine Day Photoshop tutorial.

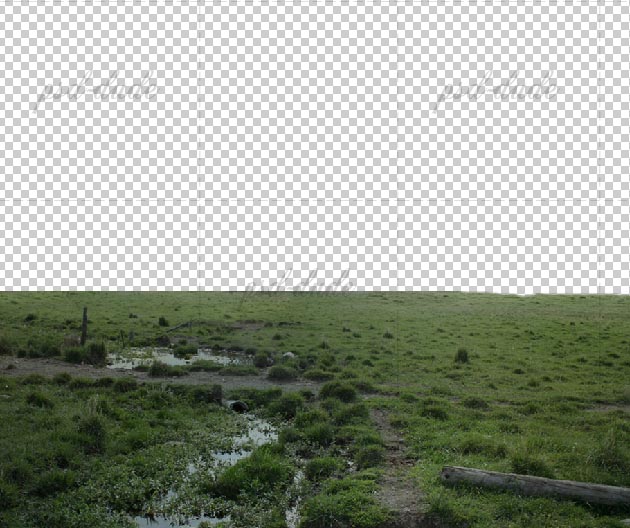
Add the Landscape stock image and remove the sky area. Use the Smudge Tool and the Clone Stamp Tool to fix some areas and cover them with grass texture. You can always use the Brush Tool with a proper color.
Add the Sky stock image and place it behind the Landscape Layer. Add a Gradient Overlay like in the image:

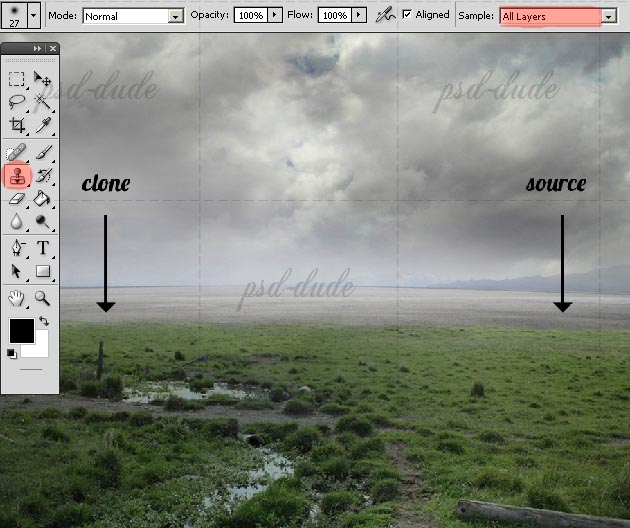
Create a new layer above and use the Clone Stamp Tool to paint the area where the two images meet and blend them even better. Use a Soft Round Brush and clone the right side area on the left side. Make sure you set Sample All Layers before you begin.
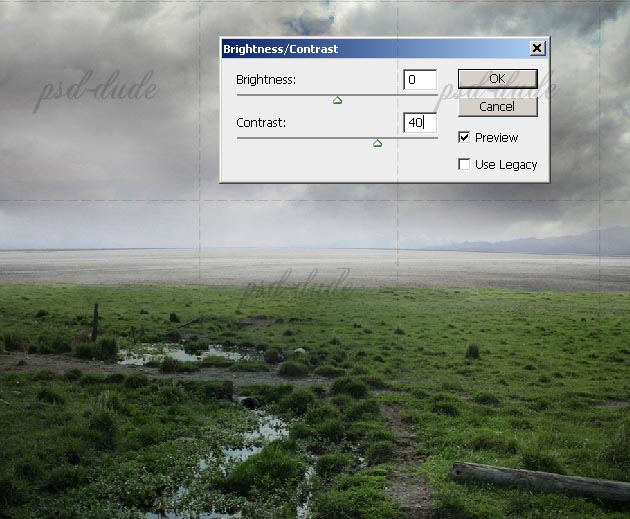
Merge the three layers and change the Brightness and Contrast of the new image.
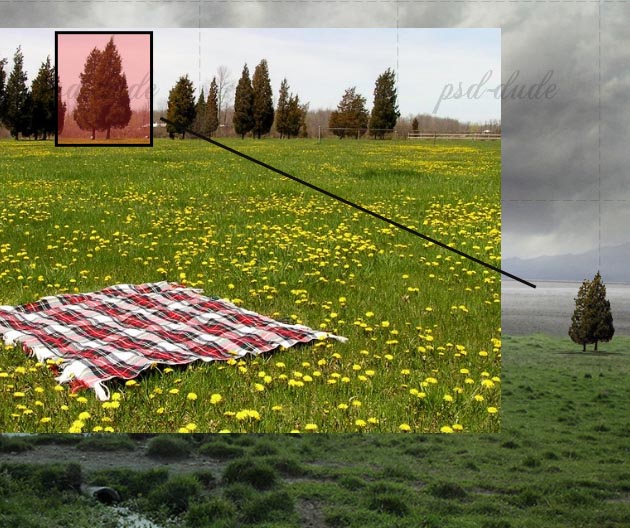
Copy the Landscape with Trees stock image, crop just two trees and place the on the right side of the image. Set the Blend Mode to Darken 100%; that way the trees will blend perfectly with the rest of the image. Use the Dodge Tool to lighten the trees on the top area. Add a soft shadow below using the Brush Tool.
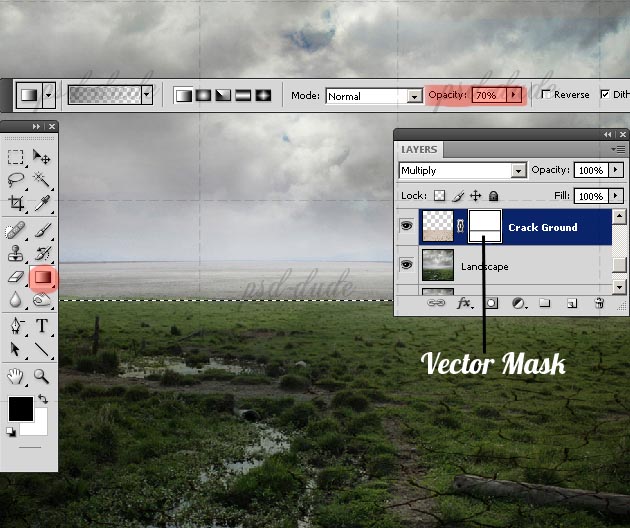
Add the Crack Ground stock image and set the Blend Mode to Multiply 100%. Make a selection out of the Ground Layer shape. Add a Vector Mask to this layer and add a Black(100%) to Black(0%) transparency gradient using the Gradient Tool. Make sure you add the Gradient while being in the Layer Mask.
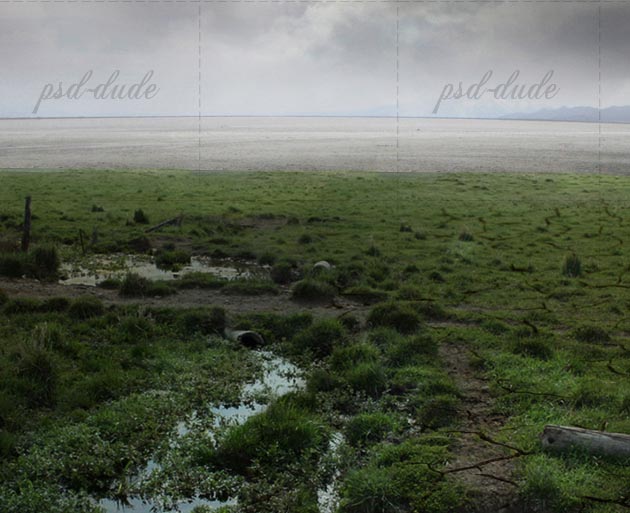
Now with a Soft Round Brush and color Black, paint inside the Layer Mask of the Ground Layer to remove the cracks from certain areas like the water surface for example.
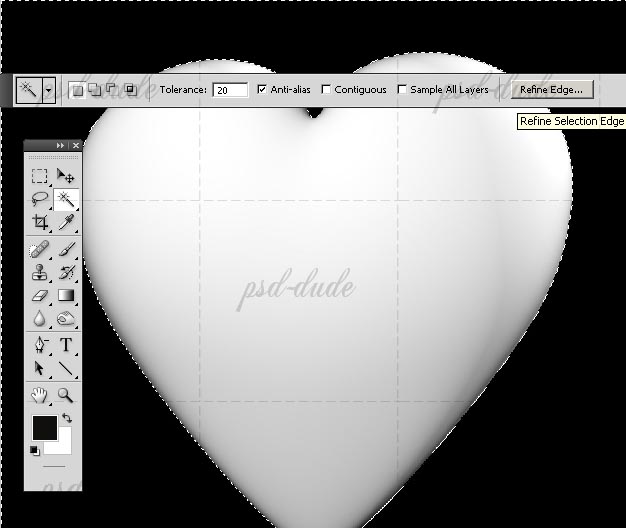
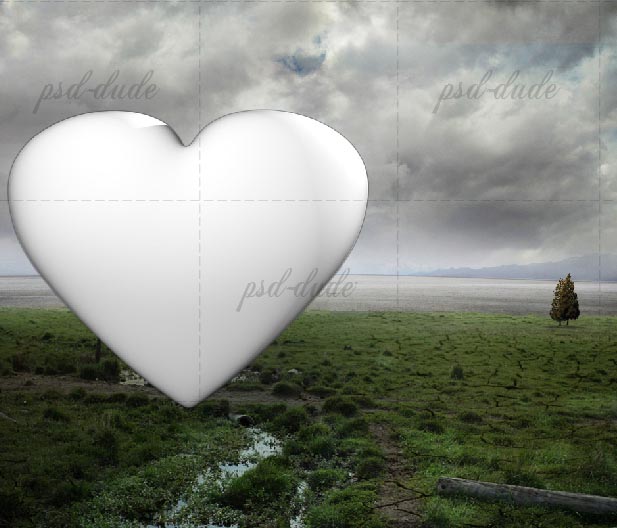
Copy the Heart stock image in a new layer and remove the black background. Use the Magic Wand Tool to select the background and also use Refine Edge Option to obtain a smooth cut.
Resize the image and also use the Persective tool to change the heart view point. Place it on the left side of our image like shown below:
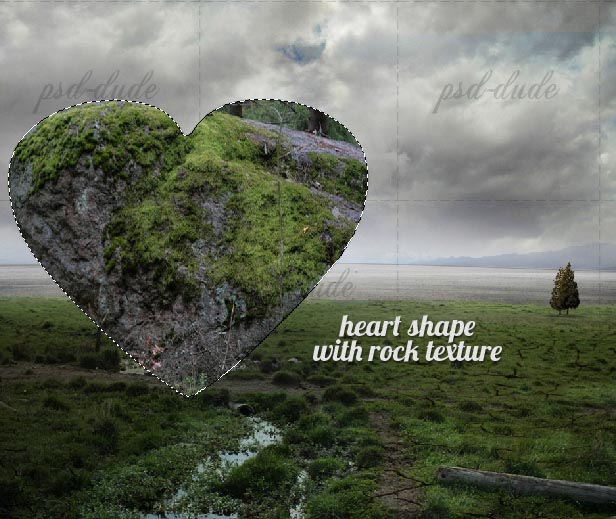
Copy the Rock stock image in a new layer and place it so that the rock covers most of the heart area. Select the heart shape and press CTRL+J to make a Layer via Copy.
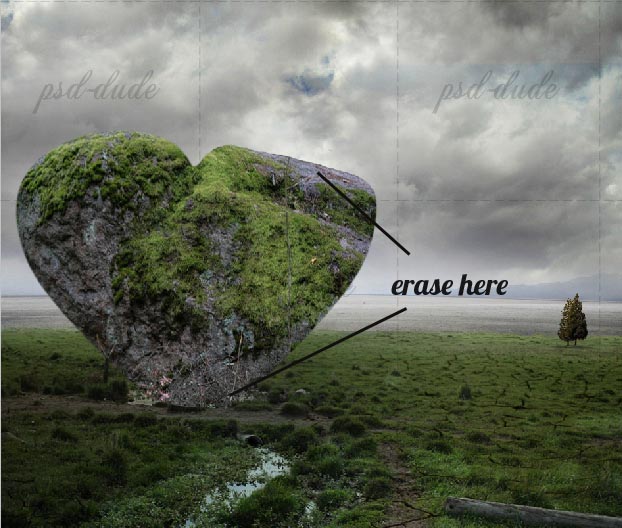
The next step is to use the Eraser Tool to remove some areas like shown in the image; make sure you use a Hard Round Brush.
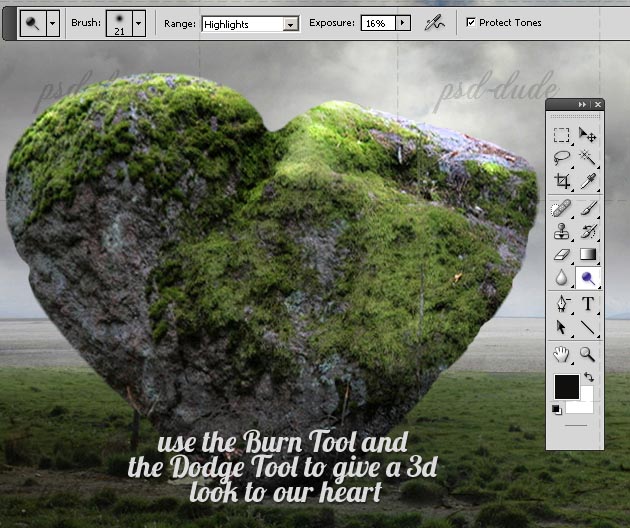
Use the Dodge Tool and the Burn Tool to lighten the top areas and to darken the bottom areas of the heart. That way our heart shape will get depth and a 3D look.
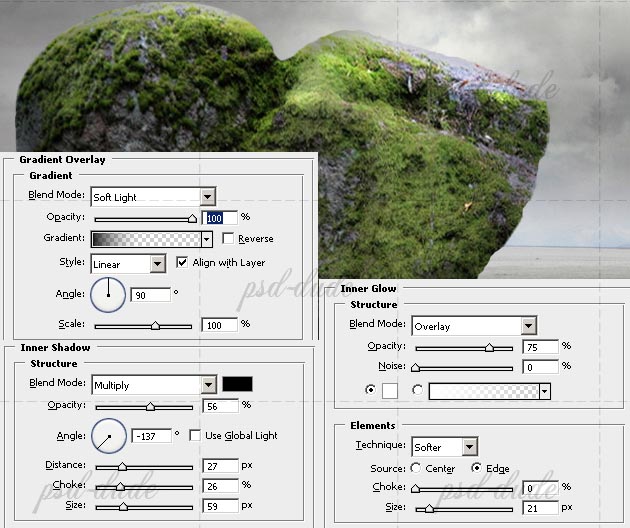
Use The Clone Stam Tool to fix some areas that are not looking good such as roots or any other elements that look weird. Open also the Layer Style Window and add Inner Shadow, Inner Glow and Gradient Overlay with the following settings.
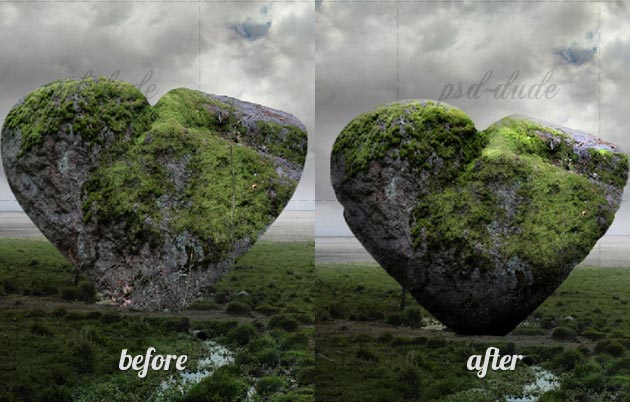
After all the previous retouches this how our rock heart should look like:
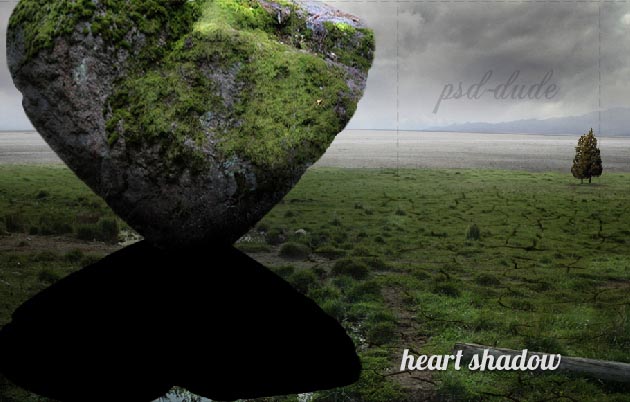
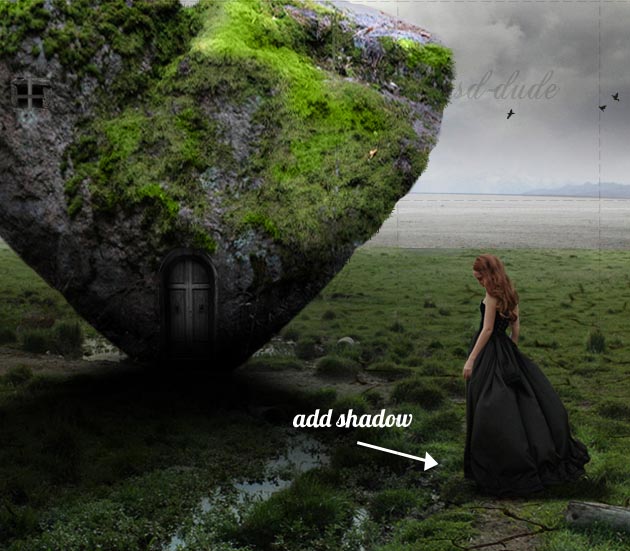
Looks pretty good, the only thing that needs to be added is a shadow. Select the Heart Shape and create a new layer. Fill the selection with black in the new layer. Call it Shadow. Press CTRl+T to transform the selection anf flip it vertical like shown in the image. Also resize it to 70% on the vertical scale.
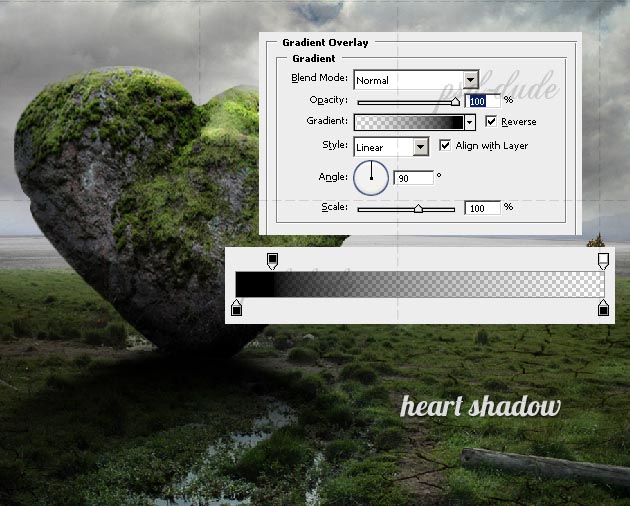
To make it look realistic add a Gaussian Blur to the Shadow Layer. Reduce the Fill of this layer to 0%. Add a Gradient Overlay using a transparent Black(100%) to Black(0%) gradient.
The Stone Heart will now look like this. You can use any other shapes instead of the heart shape.
As an alternative to this step of the tutorial, you can use this premade stock images: Stone Heart 1 and Stone Heart 2
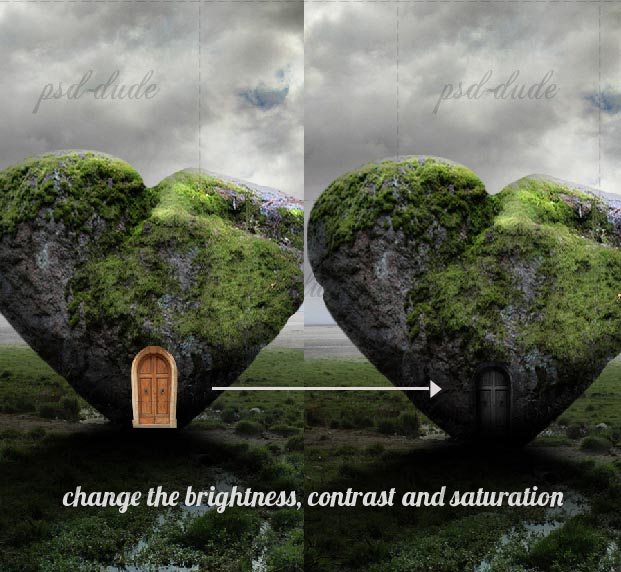
Crop the Door from the Door with Balcony stock image. Resize the door and place it above the Stone Heart. Decrease the Brightness and the Saturation of the Door image. And also increase the Contrast to blend it with the Stone Heart.
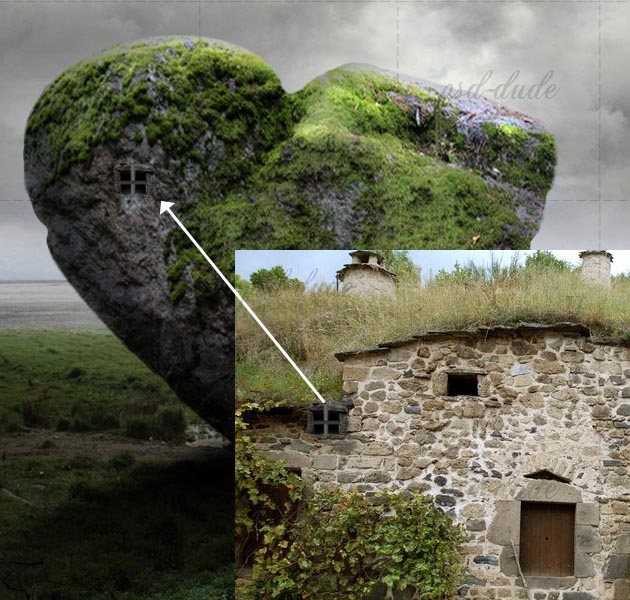
Now crop a window from the Old House stock image and attach it to the Stone Heart House. You might have to adjust the Brightness and Hue balances.
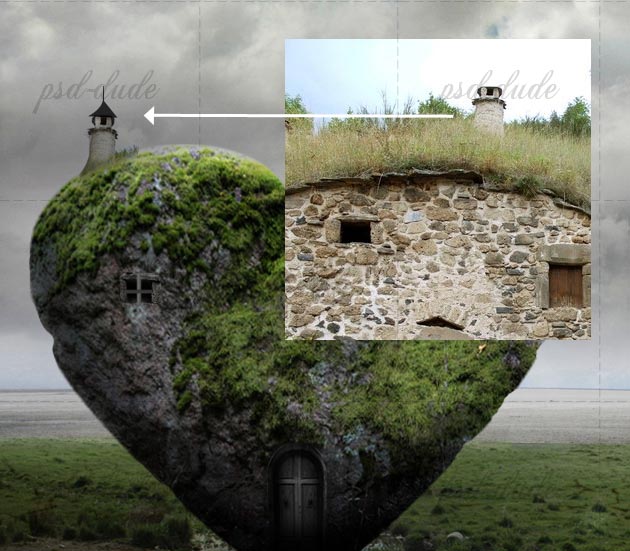
Crop the horn from the same Old House stock image and attach it to the Stone Heart House. Again, you might have to adjust the Brightness and Hue balances. Use the Brush Tool to add a roof to the horn using the #222323 color.
Create another layer and in this layer use the Brush Tool to paint over the image details like Roots, Grass, Falling Rocks. For the Roots use the Smudge Tool, Strenght 90%, to make it look more real. Make sure you check Sample All Layers.
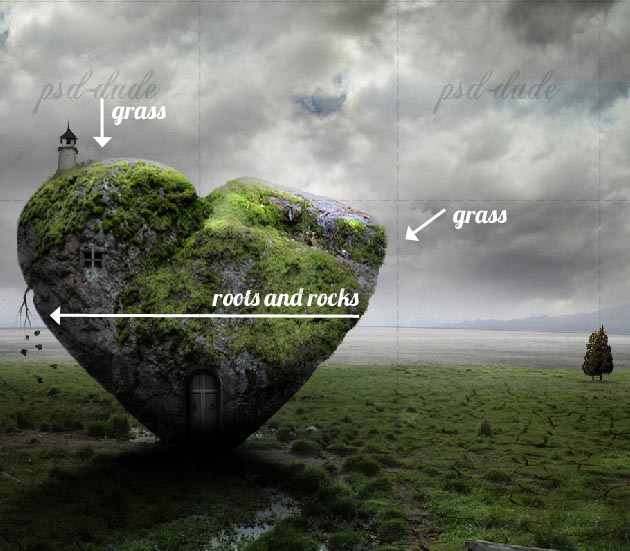
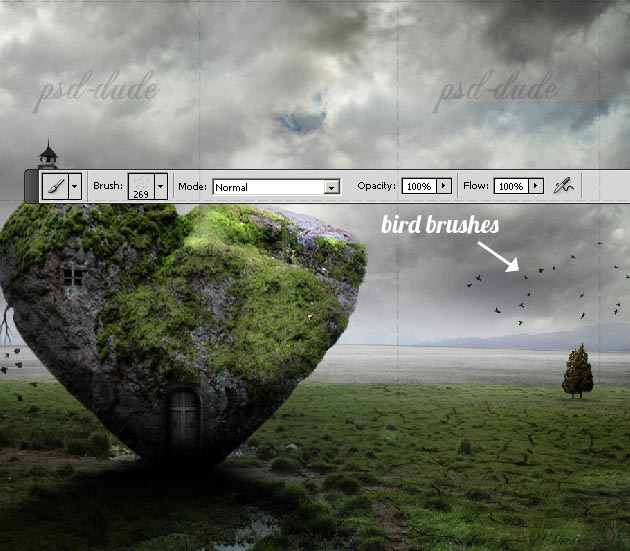
Add this Birds flying PNG image. Or you can download these Bird Brushes and use them with color #171e14 to add some birds over the trees.
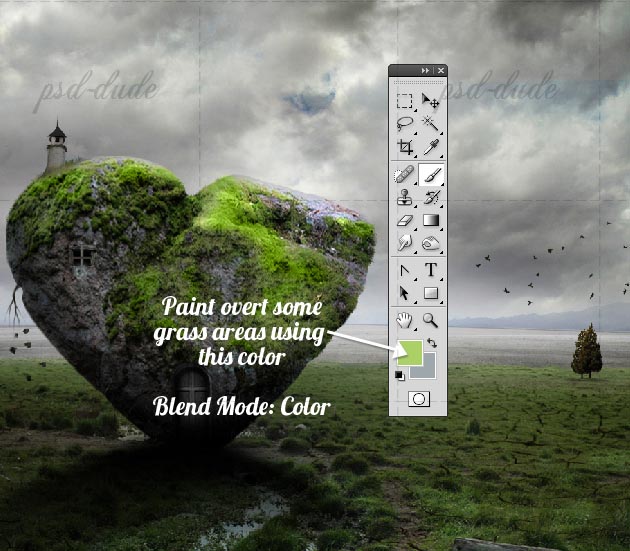
Add a new layer and call it Color Accents. Change the Blend Mode to Color 100% and start painting over the Heart grass area using a soft green color #aad068
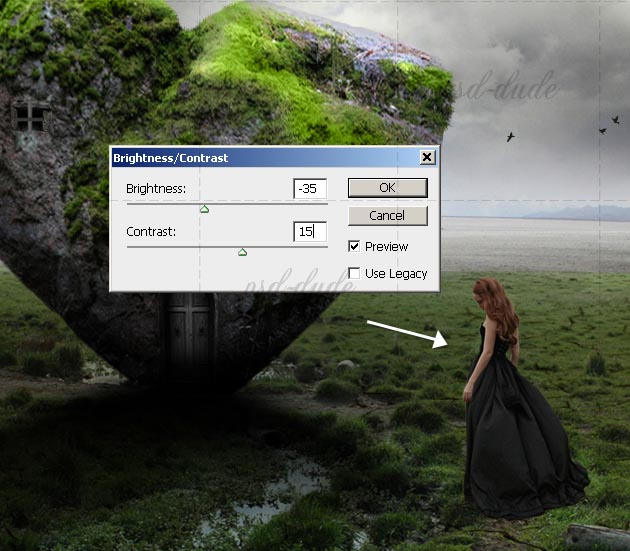
Crop the Girl from the Girl stock image and resize it to fit with the rest of the image. Adjust the Brightness and Contrast Balance like shown in the image.
Now add a shadow below the Girl Layer using black a color. Use the Gaussian Blur to soften the shadow.
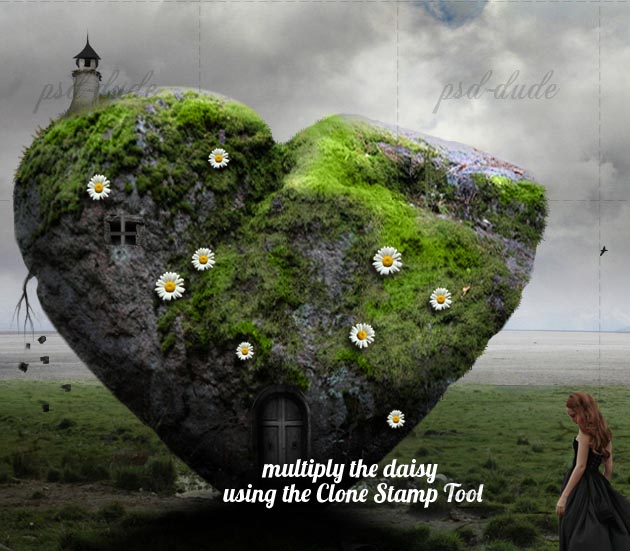
Copy the Daisy stock image and crop only the flower. Resize it and use the Stamp Clone Tool to multiply the daisy throughout the heart surface. To make it look more realistic select daisy flowers and resize them; being the same size will only make them look unrealistic.
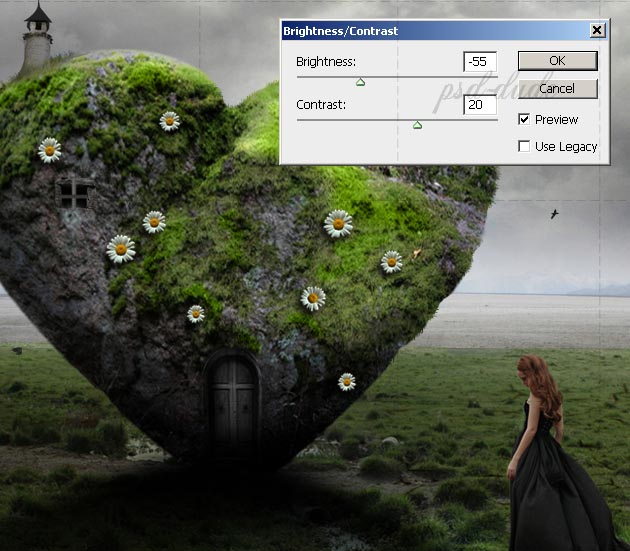
Change the Brightness and Contrast balance and also add a Drop Shadow effect.
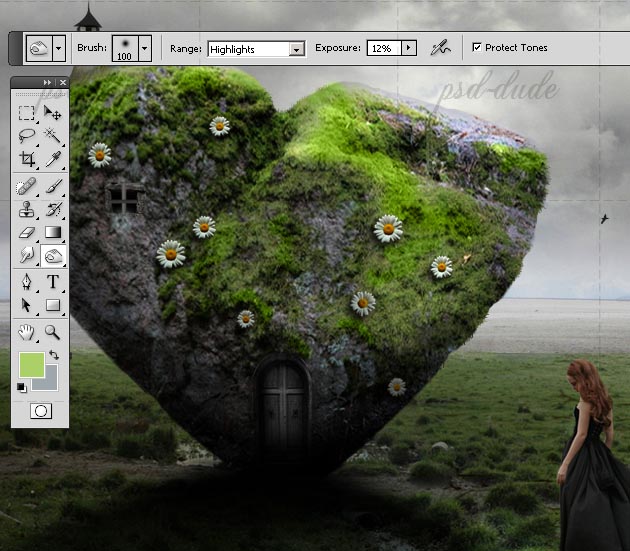
Use the Burn Tool and use it to darken the Highlights, so that every daisy to match with the Heart lighting.
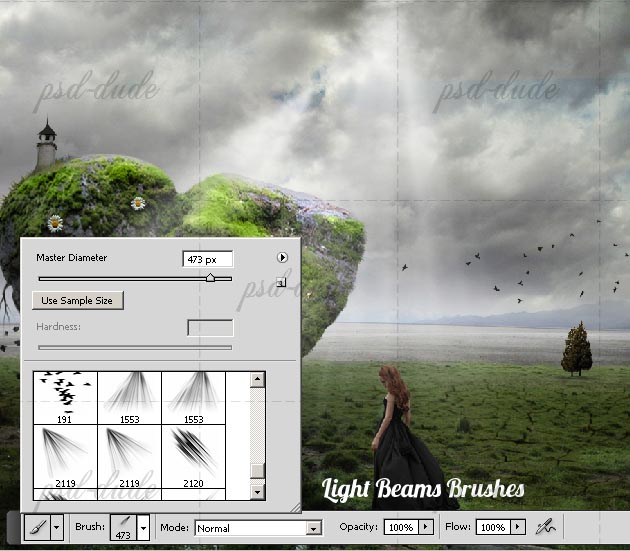
Add this Light Beam texture overlay with Screen blend mode. Or you can use these Light Beam Brushes using color white. Set the opacity of the Light Beams Layer to 80%.
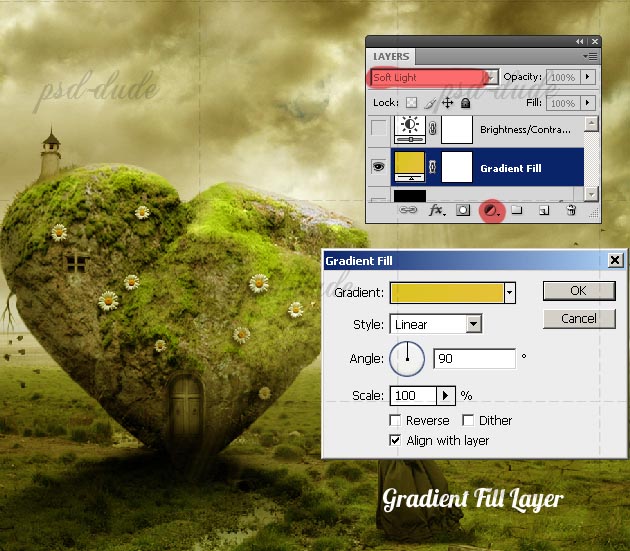
Add a Gradient Fill Layer using the colors #dcc423 and #dcb61d for the gradient. Set the Blending Mode of the Gradient layer to Soft Light 100%. It is really important to add a Gradient Fill Layer, that way all the elements of this photo manipulation will have the same color tone, in our case a warm yellow-orange tone.
Press again the Create a New Fill or Adjustment Layer button and add
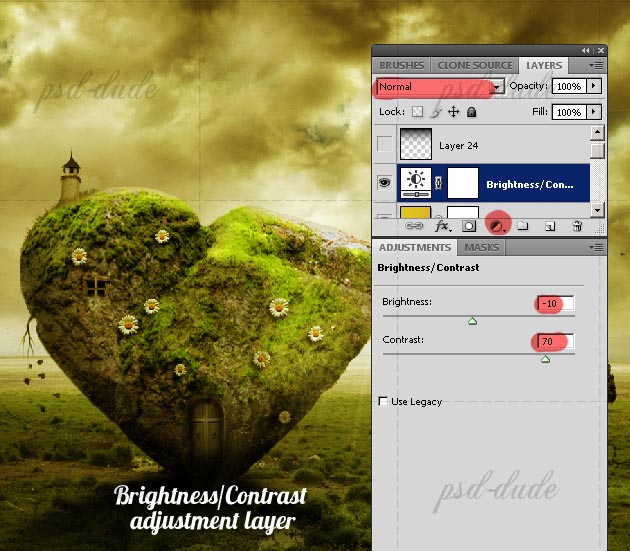
For the final touches you can use the Dodge/Burn Tools to add even more contrast on targeted areas. The same effect can be achieved if you create a new layer with a Soft Light blending mode and paint with white (for the lighten areas) and with black (for the darken areas). I prefer this second method.
So, here is the final result, hope you like it and decide to make it for this Valentine Day. And don't forget to upload your work!

Beautiful Fan-Art Images Collage


42 comment(s) for "The Stone Heart Photo Manipulation Tutorial"
The original canvas size for this photo manipulation is around 950x950 px, so it's not such a big difference! reply
I am sorry but it is not my stock image. The author removed this particular image (or moved it) from her deviantart account.
However there are other images in her gallery that can replace that image night-fate-stock gallery but you will have to add a grass texture.
replyI am really glad you like my tutorials. If you decide to try this tutorial, please upload your work :) reply
Keep up the good work! reply
I don't really understand your question ... I guess you saw that I've added a Crack Ground texture with a Multiply blend mode. You decide the depth of the cracks by increasing the Contrast and Opacity of the texture. reply
My one --->
Let's take for example the trees. Make a square selection around the trees and copy them in a new layer and set the Blend Mode to Darken (with the Eraser Tool delete the areas that do not blend with the image)
As for the color of the trees you have to adjust :
1. Hue/Saturation - reduce the saturation a little
2. Color Balance - reduce the red, increase the blue
3. Brightness/Contrast - increase the contrast a little
With this 3 simple steps you can adjust the color, saturation, contrast and brightness of any cropped image and blend it with the rest!
Hope it helps...good luck with Photoshop!
reply
This is my modest picture with a little girl of Mark Ridden !
http://www.flickr.com/photos/8078381@N03/7378205190/
I also did a variation here
http://www.flickr.com/photos/8078381@N03/7384256104/in/photostream/
Thank you :) reply
I am glad you like my tutorial. All your works look great but my favorite is the one with the cat :) really unique!
http://nomilknocry.wordpress.com/2012/06/19/ghost-works/
thanks for sharing, pal ;) reply
Thanks you! reply
Thanks for the great tutorial. It has been much fun for me and a lot of ideas
Any suggestions on my image?
In the 5th from last picture the ground on the right side is grassy, but in the 4th from last picture the ground on the right side is much more cracked. Maybe I'm missing something but I can't find how you got those cracks, I really want to recreate wat you did and that detail is staying in my mind, thanks! reply
http://www.psd-dude.com/tutorials/resources/dispersion-effect-photoshop-free-action.aspx
Thanks reply
Thank you for sharing this set of V-day tuts! You always have good tutorials, anyway! This one is - magikal! I am going to do this today. If it turns out, I'll post my results.
Thank you!!
Su reply
Nice tutorial. reply