


Step 1 - Prepare the background
Open a new
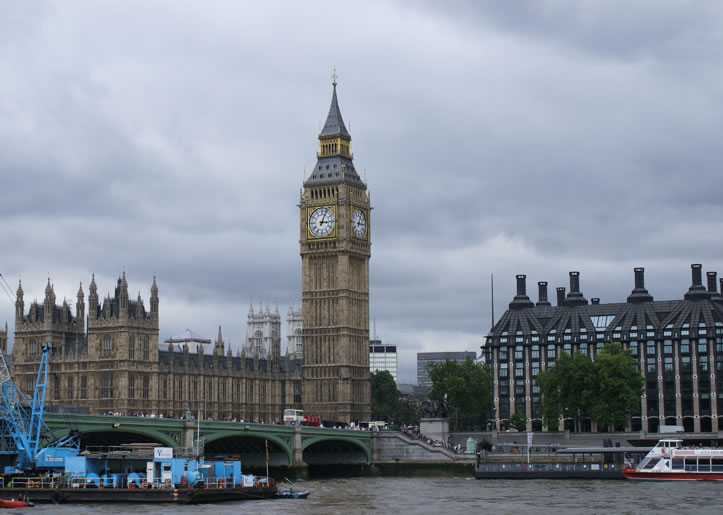
psd file 725/518 pixels. Go to
Stockvault.net and
download this
photo from London. Go to Edit - Transform - Scale and resize the
image to fit to the canvas.
Step 2 - Change the color of the image
Duplicate this layer and call it Background Image. Go to Image - Adjustments - Color Balance and do the following settings:


Now you should have the image with a light yellow tone.
Step 3 - Add Clouds
I have found a very beautiful photo with clouds . Copy this photo in your file above the Background Image Layer . Call this layer Sky Layer. Select the bottom part of the Sky Layer and delete it. Send the Blending mode of this layer from Normal to Luminosity 100%. The result should look like this:

Step 4 - Blend the New Sky
As you can see the Sky Layer covers the buldings. We have to erase the buldings area from the Sky Layer. For that I will draw the buildings silhouette with the Pen Tool. Call this layer Buildings Shape Layer.
Press CTRL and click the thumbnail of Buildings Shape Layer. The shape is now selected. Return to Sky Layer and press delete.

Step 5 - Add Red Filter
Duplicate the Background Image and change the Blending Mode from Normal to Color Burn 50%.
Create a new layer above all the others and call it Red Filter Layer. Set Foreground Color # ed0000 and Background Color # 40230b. Go to Filter - Render - Clouds.
Change the Blending Mode from Normal to Color Burn 100%.
You should now have something like this:

Step 6 - Add Strange UFO
Under the Red Filter Layer create a new group and call it UFO. In this group I will draw a UFO. Take the Ellipse Tool and draw a simple ellipse. The color is # 8e8886. Than with the Pen Tool change the ellipse vector points. I have deleted the bottom point and than I have added two new points. Right click on the layer name and choose Rasterize Layer.

With Burn Tool darken(shadows 14%) the bottom part of the UFO and with Dodge Tool(highlights 5%) lighten the top part.
Now with eraser Tool delete points from the shape like in the image.
![]()
Under this layer draw with Ellipse Tool an ellipse like in the image. We will add the same treatment: use Burn Tool to darken(shadows 14%) the bottom part of the UFO and with Dodge Tool(highlights 5%) to lighten the center part and the top part. The color for this ellipse is # 964f01.

Step 7 - Add UFO lights
For the lights I will use a nice lightning brush set from DeviantArt.
So download the set, open the archive and that load the brush from your Brush Tool options.

Create a new layer in the UFO Group. Pick a brush from Brush Tool list with the following settings:
![]()
Put this brush , select with Lasso Tool the part from the image below and than press CTRL+C and CTRL+V. Rotate this light and than place it like in the image. Use Blur Tool to blur the edges of the selection to blend in better.

Hide the lightning layer.
Now, create a new layer and go to the Blending Options of this new layer and do the following settings:

This layer must also be in the UFO Group. Set the Foreground Color white. With Brush Tool size 2 px, opacity 100%, mode normal draw a line.press SHIFT mo make a perfect vertical line.
Chane the size of the brush to 7 px, opacity 75% and draw in the areas pointed in the image below.

Duplicate UFO Group two times and place them like in the picture below

Step 8 - Add Final Details
To complete the image I will add a new layer under the Red Filter Layer. Call this layer Clouds Fire Layer. Set the Blending Options for this layer:

Now with Brush Tool size 5, opacity 40% add little details to the sky; they are going to look like fire, explosions coming out of the sky. Follow the image below for further explanation.
Another detail will be to return to Background Image and to lighten some areas like in the image below. Make sure that all the other layers are be visible. Use Dodge Tool , size 15, range midtones, exposure 10% to lighten the area. Use than Dodge Tool size 15, range highlights, exposure 10% to lighten more the areas that are closer to the UFO lights.

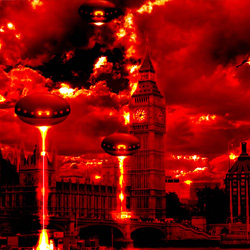
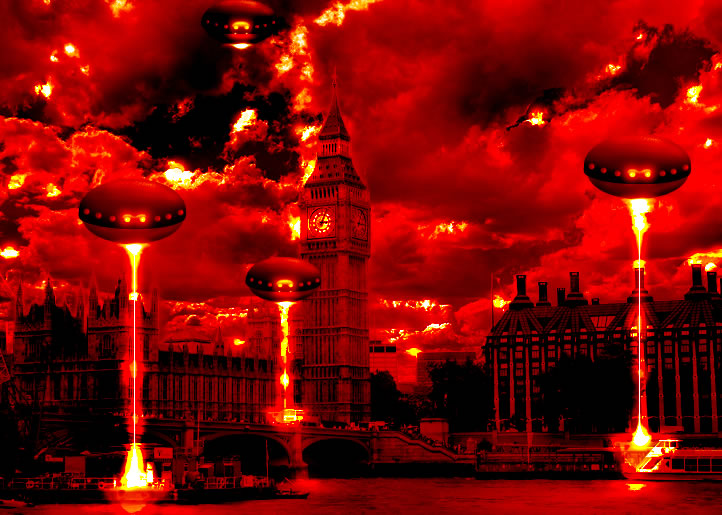
That is all! I hope you like it!

9 comment(s) for "London Alien Invasion - The Apocalypse"
http://www.hostingpics.net/viewer.php?id=813424trcity.jpg