


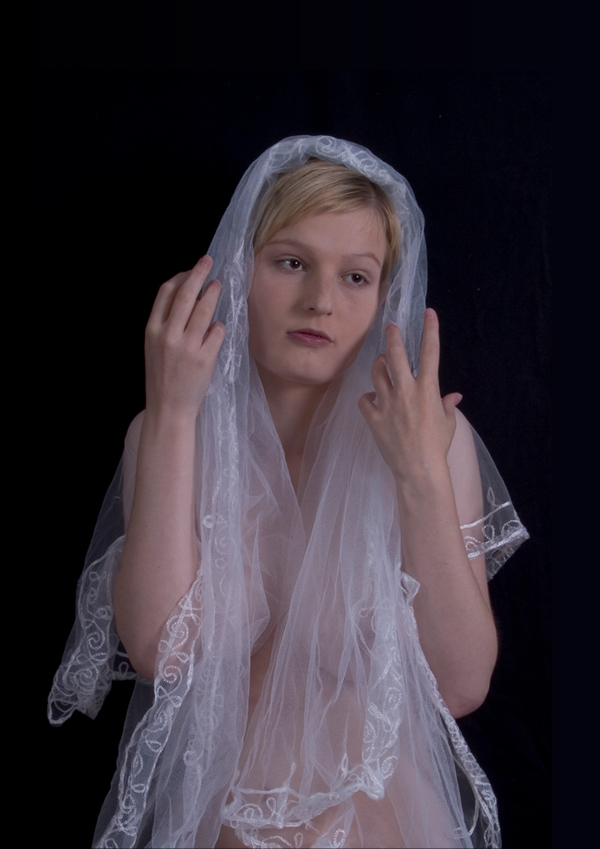
Sad Angel Layer
Open a new PSD file and copy this beautiful image of a Portrait White by almudena-stock. Call this layer Angel Layer.
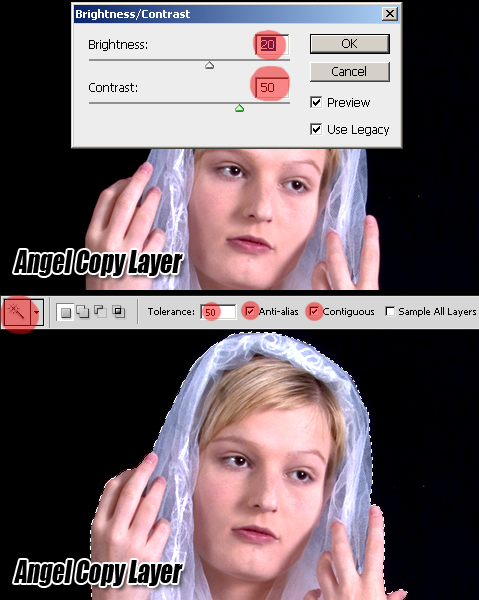
I will remove the background using the Magic Wand Tool. This Tool works well when we have a one color background for example. Simply adjust the Tolerance and you can obtain a good result. This technique is faster then using the Eraser Tool or the Pen Tool slection. Duplicate the Angel Layer. Go to Edit, Brightness/Contrast Menu and make the following settings and than with the Magic Wand Tool, tolerance 50, select the black background.
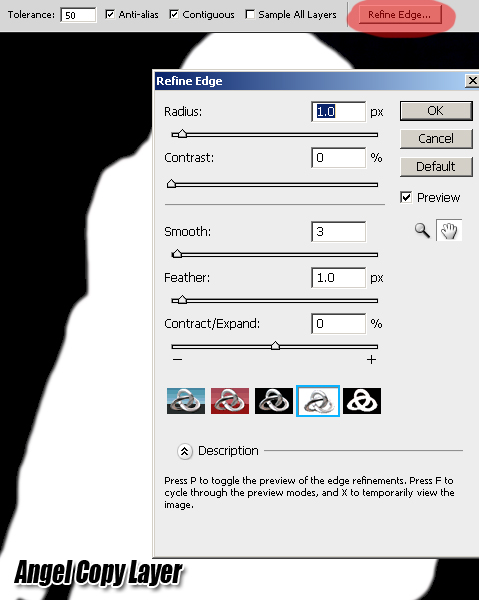
With the area selected press the Refine Edges button of the Magic Wand Tool. The result is that the edges of the selected area are now smoother.
With the area selected return to the Angel Layer and press delete. Now we have a well croped girl image. If you are not pleased with the result you can adjust the edges with the same Refine Edges button. Remove the Angel Copy Layer(we used it only for making a better selection).
Change Face Features with Liquify
Remodel the face for a more sweeter, almost angelic look. I will use the Liquify Tool to change the face features like eyes, mouth, nose and so on. And also try to make it as realistic as posible. Let's start with the eyes. Press CTRL and + to Zoom In the image. Eery little detail is important. Use the Bloat Tool and the Forward Warp Tool to make the eyes bigger. Use a 20 - 30 size brush.
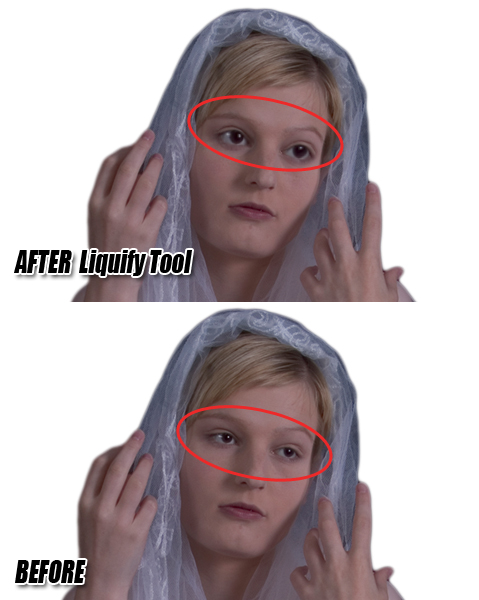
Adjust the Eyebrows shape with the Forward Warp Tool like in the image. Try to make them as simetric as possible.

Next remodel the nose and the face shape of the girl with the same Forward Warp Tool.
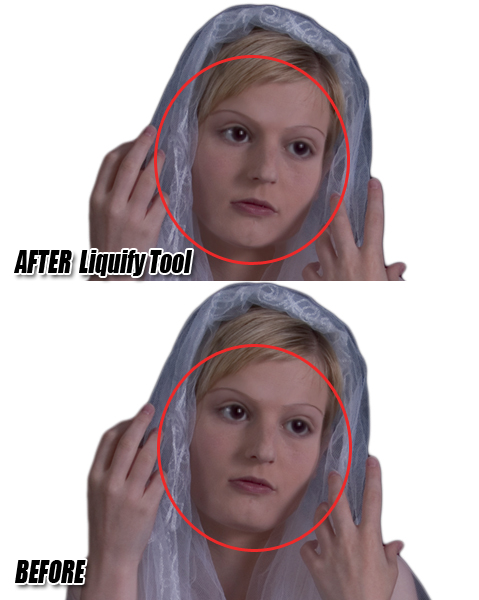
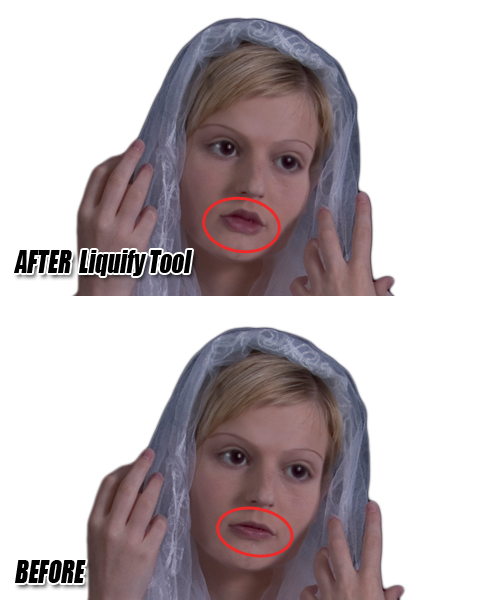
Last step is to change the shape of the mouth and retouch other little details.
Remember to Zoom up to 300% to obtain a good result and make every step slow and pay attention to the details. Press CTRL and 1 to see the image in real size, because sometimes zoomed in looks ok but in real size it doesn't look so good.
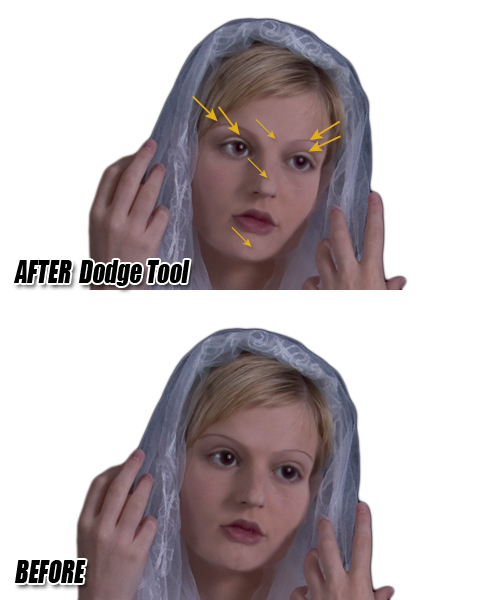
Another small retouch of the skin and face color. Usually I would have used Surface Blur to create a smooth skin, but it looks good enough as it is. Simply use the Dodge Tool to highlight certain areas like: the eyes, top nose surface, under the eyes, cheen etc. I f you have a graphic tablet you can paint over the skin to hide little imperfections. Use a round small size brush, 30% opacity. Use the Eyedropper Tool to pick a color from the skin surface.
Background Wall with Photoshop Patterns
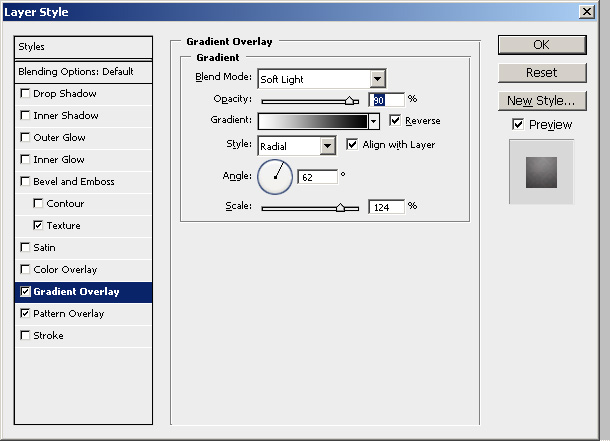
Time to add a Background Layer. Create a new layer behind the Angel Layer and fill it with #624c42 color. Open the Layer Style Window and add Gradient Overlay and Pattern Overlay with the following settings:
For the pattern I decided to use my new Geometric Patterns , but you can use whatever pattern you like as long as it is not a busy one.
 This is how our image looks, with all the transformations made so
far:
This is how our image looks, with all the transformations made so
far: 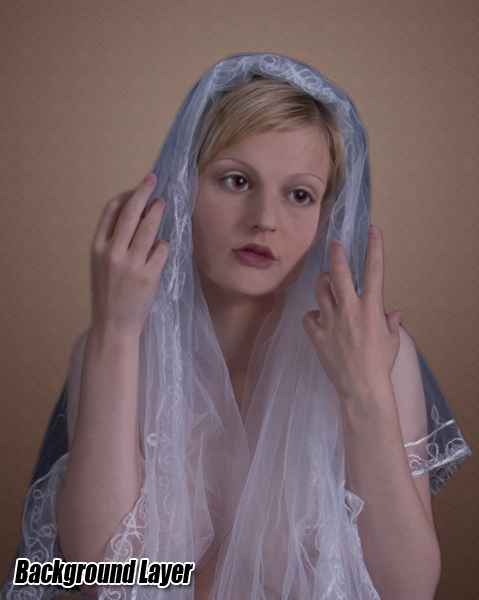
Adjust the Angel Veil
The purpose of every photomanipulation is to make it as realistic as posible, so
we have to take into account every little detail. You saw that we tried to crop
the image as good as we could. We replace the background with a light brown color
to match the colors of the Angel Layer. The next step is to blend even more the
girl with the background. For that we need to fix some problems with the veil. As
you remember the initial background was black so the veil surface being transparent
still has that black color behind it. We now have a lighter background so we need
to lighten also the veil color. Use the Dodge Tool, work on shadows as shown in
the image. If the area looks too flat use Dodge Tool, size 3 px, this time on Highlights
or Midtones to accentuate the veil pattern. 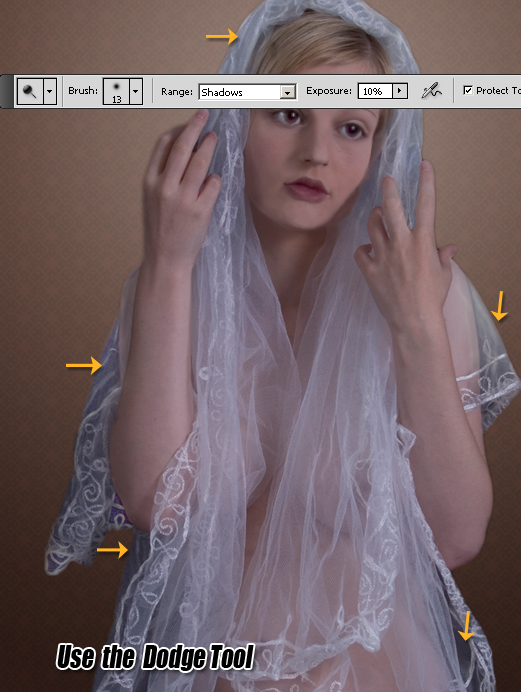
Emphase the Angel Eyes
I decided to lighten the color of the eyes. So simply create a new layer above the
Angel Layer. And with the Brush Tool, 3 px round brush, color #c8c8ce, paint over
the iris surface as shown in the image. Set the Blending Mode of this layer to Lighten
30%. 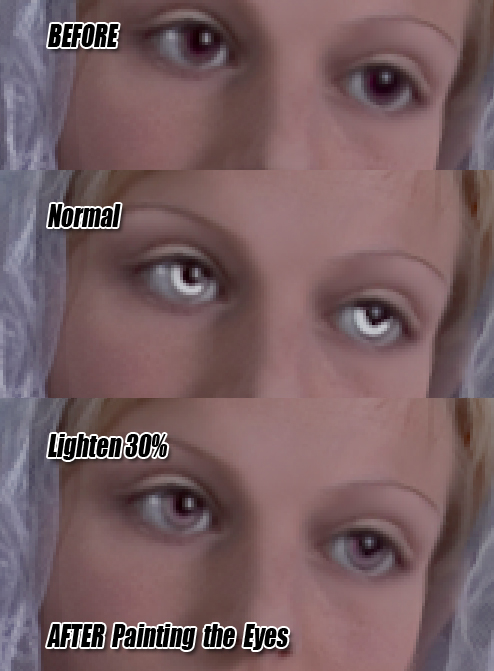
Create a Glowing Aura Around the Angel
In this step I will try to create a beautiful shiny aura around the angel's head.
I will make something like a sunburst using multiple layers. I could use a sunburst
custom shapes but I preffer to make it from scratch exactly how I want it. But first
I want to change the tone color of the hole image. I could do that by adjusting
the Color Balance for example but instead I will make a new layer called Yellow
Filter, above all the other existing layers. Fill this layer with #ffd303 color.
Change its blending mode to Overlay 70%. 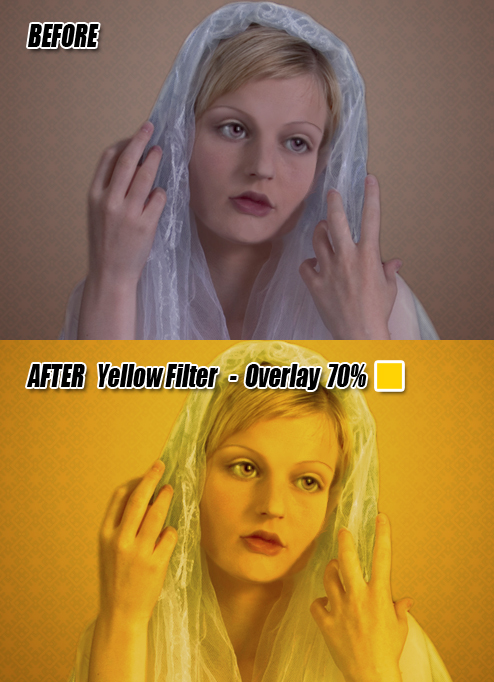 Let's make a quick inventory
of our layers so far, from bottom to top: Background Layer, Angel Layer, Light Eyes
and Yellow Filter. Create a new Shape layer between Background Layer and Angel Layer.
Use the Elipse Tool to create a circle filled with #f4d60b color. Go to Blur, Gaussian
Blur, 30 px radius. Call this layer Glow Aura.
Let's make a quick inventory
of our layers so far, from bottom to top: Background Layer, Angel Layer, Light Eyes
and Yellow Filter. Create a new Shape layer between Background Layer and Angel Layer.
Use the Elipse Tool to create a circle filled with #f4d60b color. Go to Blur, Gaussian
Blur, 30 px radius. Call this layer Glow Aura. 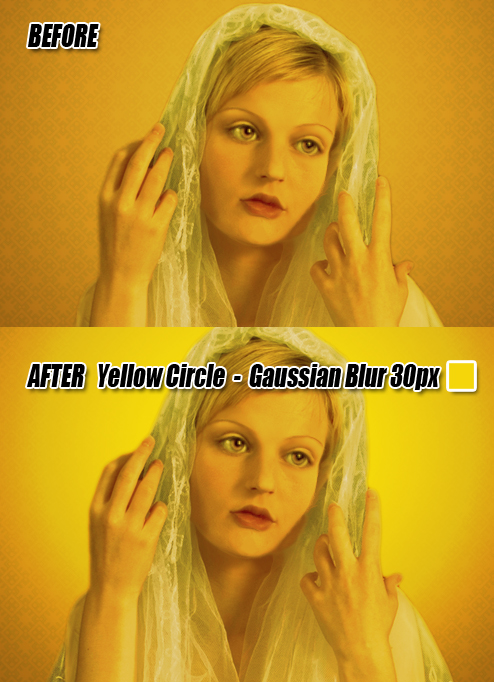 Time for the first
sunburst. Create a simple shape like in the image.
Time for the first
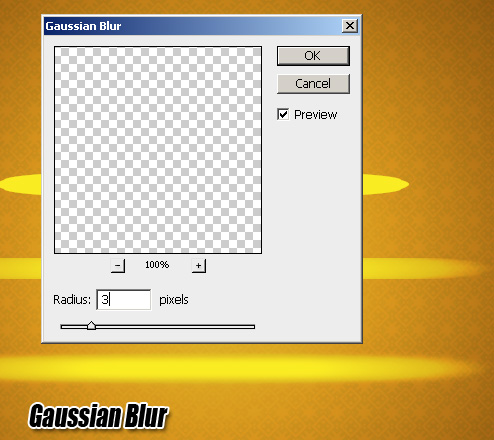
sunburst. Create a simple shape like in the image. 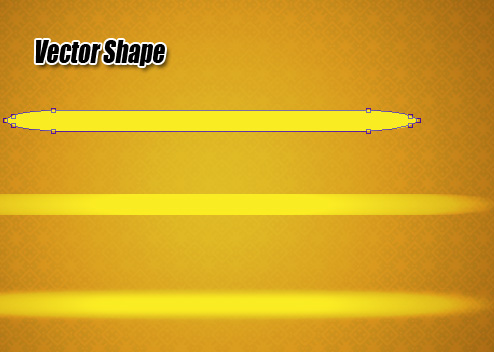 Add Motion Blur
and Gaussian Blur with the settings shown below.
Add Motion Blur
and Gaussian Blur with the settings shown below. 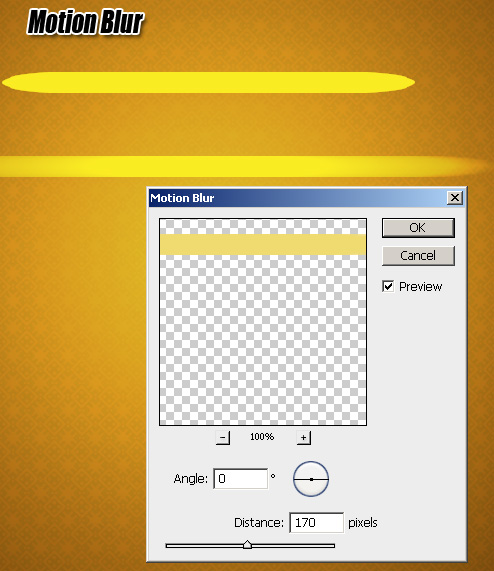
 Than Duplicate the resulted layer and rotate it by 90 degrees. Duplicate the two
layers (cross shape) and rotate them by 45 degrees. Merge the 4 layers and obtain
a simple Sunburst shape. You can duplicate it again, resize it to 80% and rotate
it by 22.5 degrees to obtain a more beautiful sunburst. Merge all the layers together
and cal this layer Sunburst Layer.
Than Duplicate the resulted layer and rotate it by 90 degrees. Duplicate the two
layers (cross shape) and rotate them by 45 degrees. Merge the 4 layers and obtain
a simple Sunburst shape. You can duplicate it again, resize it to 80% and rotate
it by 22.5 degrees to obtain a more beautiful sunburst. Merge all the layers together
and cal this layer Sunburst Layer.  Place the Sunburst Layer just
below the Angel Layer.
Place the Sunburst Layer just
below the Angel Layer. 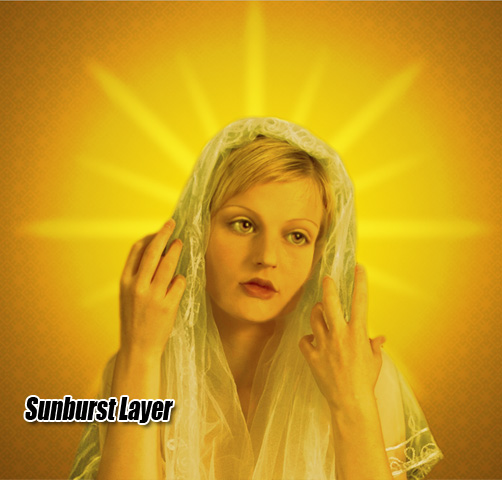 Create Another Sunburst Effect Around the
Angel You can play with this effect to obtain cool results. I have decided to add
another rays of light with the same technique presented in the previous step. Draw
a simple line of 1px, color #e1ca44. Apply motion blur and gaussian blur as you
did before and duplicate/rotate several times to obtain a nice rays shape.
Create Another Sunburst Effect Around the
Angel You can play with this effect to obtain cool results. I have decided to add
another rays of light with the same technique presented in the previous step. Draw
a simple line of 1px, color #e1ca44. Apply motion blur and gaussian blur as you
did before and duplicate/rotate several times to obtain a nice rays shape. 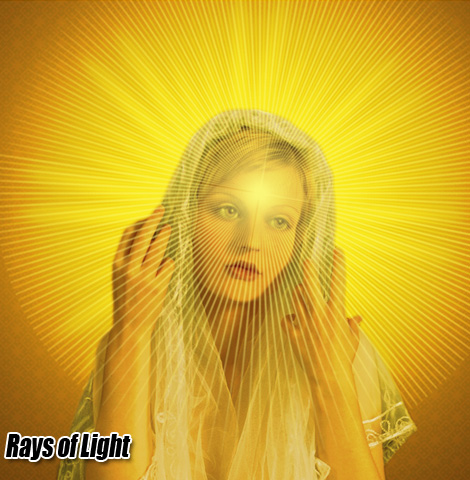 Create two Rays of Light Layers and place one below the Angel Layer and one above
the Angel Layer. Add Gaussian Blur to the Above Rays of Light Layer and lower the
opacity.
Create two Rays of Light Layers and place one below the Angel Layer and one above
the Angel Layer. Add Gaussian Blur to the Above Rays of Light Layer and lower the
opacity. 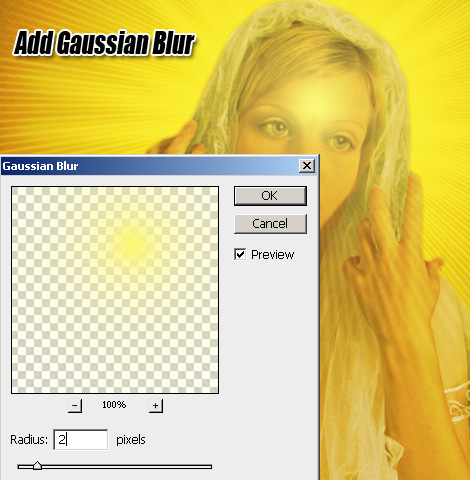
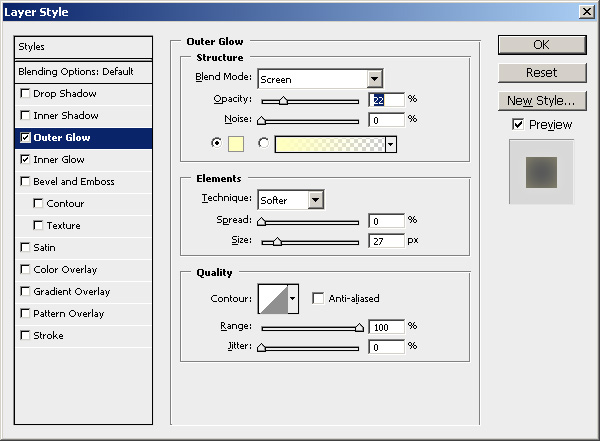
Inner Glow
As you can see the light that surrounds the angel is really powerful, yet the edges
of the croppd angel are too visible. So we need to blend the images better. For
that I will add a Inner Glow and Outer Glow to the Angel Layer. 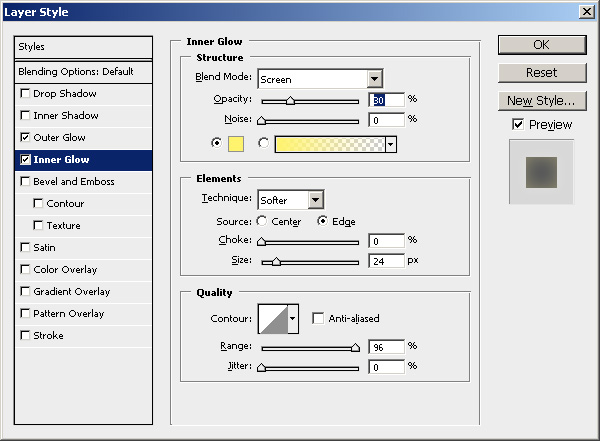
Add Sparkle and Light Effect
As final touches you can add sparkle effects. You can also add another layer above
all the other but below the Yellow Filter Layer. With the Brush Tool, color #ffef6b,
paint around the head to obtain a realistic glowing aura. 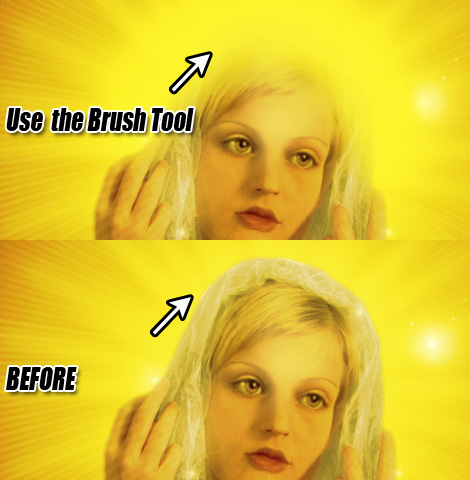 From here
you can add whatever effects you want. Increase the contrast if you want. Dodge
and Burn certain areas for a more dramatic look. Add Lens Flare or other light effects.
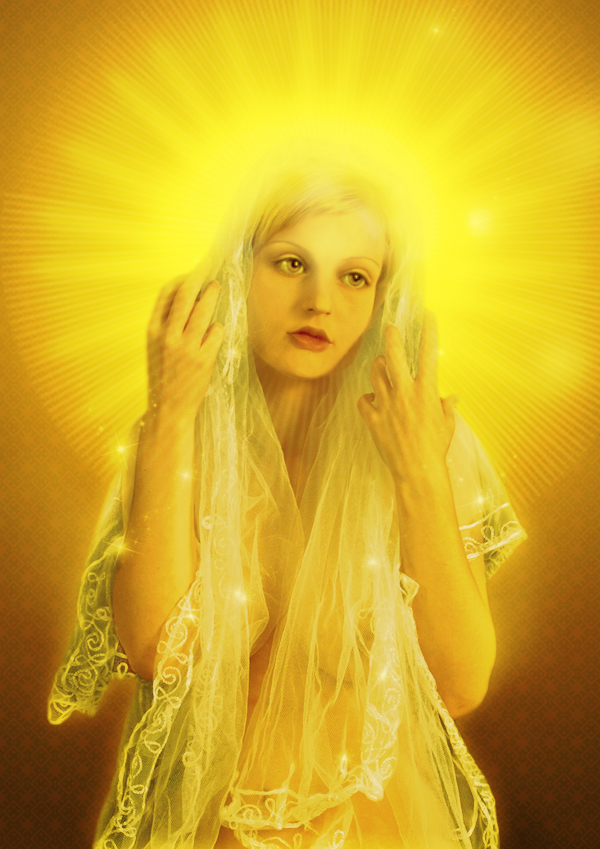
This is my final result, hope you like it:
From here
you can add whatever effects you want. Increase the contrast if you want. Dodge
and Burn certain areas for a more dramatic look. Add Lens Flare or other light effects.
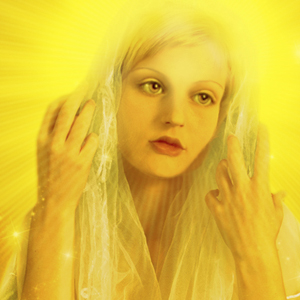
This is my final result, hope you like it:
Glowing aura around a person
(move mouse over the image to see the original image)

19 comment(s) for "Glowing aura around a person"
I've changed this tutorial and made a totally new one. Hope this one is more clear and you find it more useful than the old one.
cheers reply
I am sorry angelos, I really don't know how to convert a PSD to Wordpress simply because we don't use it. Our site is made entirely from scratch by us (John and Ralu)
But here is a tutorial that seems really good http://themetatio reply
.
.
.
.
.
DHOKAAAAAAAAAAAAAA reply