


Let's start with a simple background layer and fill it with color #90c7e5 or any light blue color that you like. Now I will add a Text Layer and use the Type Tool to write a text. I am using the free font type called Intro font , size 425px, type Regular, color white. Learn how to install font in Photoshop from this quick tutorial for beginners.

Use this quick tutorial on how to create rounded corners in Photoshop and apply it for the text layer.

Add these layer styles to the Text Layer.


Choose the giraffe fur texture from this collection of skin textures collection. Resize the image and duplicate it several times so that the entire text layer to be covered. To make a smotth transition from one texture copy to another use the Eraser Tool and a soft round brush.
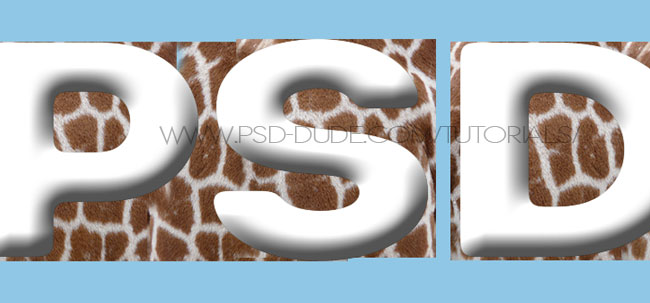
Place all the Giraffe Leather Texture layers above the Text Layer and convert them into clipping mask by simply right click on the layer name and choose create Clipping Mask.

Now let's add some adjustment layers for the Giraffe Leather Texture; the reason we are doing that is because we want our leather texture to match with the giraffe stock image that we will add later on. The color for the Photo Filter is #f4d146


Use this giraffe stock and add it as shown in the preview. Resize it to match with your text.

The image doesn't need any adjustment of color, contrast, etc. The only thing that you have to make is to remove the background. For that you can use a Selection Tool. Learn how to effectively use the Selection Tools to remove background in Photoshop.

To blend the giraffe stock image with the text you have to use the Eraser Tool with a soft round brush, opacity 30%; try to match the two leather textures so that the transition to be as seamless as possible. If you want to use a non-destructive method you can add a layer mask to the Giraffe Stock layer. That way you can always undo if something goes wrong. Use the Brush Tool instead of the Eraser Tool if you use the layer mask.

In a new layer use one of these fur brushes to add some furry effects on the text border like shown in the image. Try to use a fur brush similar with the original giraffe fur. Use the Eyedropper Tool to pick a color from the original image. Use multiple layers of fur with different sizes, colors, opacity levels.

Create a new layer and use one of these clouds brushes to make the sky more realistic. You can use a sky clouds texture if you want but I prefer using only brushes for this tutorial. Use a white color for the brush, different opacity levels. You can add multiple layers of clouds with different opacity levels. Add a Drop Shadow layer style for the clouds like shown in the image.
Sometimes the clouds brushes are too sharpen, so if you decide to use the Gausian Blur Photoshop filter you will obtain a more soften look for the clouds.

We will now add some leaves and foliage elements using this stock image around the giraffe. We will use this image only; that means we'll have to duplicate the leaves, resize it, rotate, crop, flip horizontally, change the color/contrast/brightness and so on, so that we obtain a realistic bush foliage.
The image has no background so less effort from our part, which is really good. Open the layer style window of the Foliage Layer and add these layer styles.

Convert the Foliage Layer into a smart object. Duplicate the Foliage Layer and arrange the leaves and branches randomly so that it covers part of the text like shown in the image.

For every branch added you have to add a shadow layer. So make a duplicate layer, color black, opacity 65%, soft blur effect. Make sure that the shadow drops only on other branches and leaves and on the giraffe. The area that falls over the sky area must be removed.

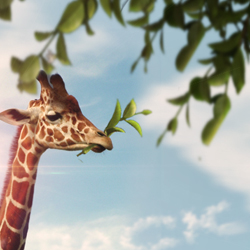
Add more foliage layers, use the Gaussian Blur to add depth, increase the size and also darken the image using a Brightness/Contrast adjustment layer. You can add as many layers as you want; I have added some branches coming from the top of the image and also I added a leaf in the giraffe's mouth. Don't forget to add the proper shadow effect.

If you want to add more interesting clouds effects or to write with clouds you can try this cool cloud shapes Photoshop creator; you can use it for text, shapes and even photos. You can create unique clouds brushes with this tool.
To make the image more vibrant I added a sun flare effect; learn how to add lens flare in Photoshop from this quick tutorial. You can also try these premade lens flare textures and set the blend mode to Screen.

For the final touches I added a Photo Filter, color #ec8a00 , density 30% and also I added a Brightness/Contrast adjustment layer and increased the contrast to 60. To sharpen the image you can use the High Pass Photoshop filter. So here is the final result for our giraffe leather skin text effect made in Photoshop using some simple layer styles, an animal skin texture and just a few stock images.

7 comment(s) for "Create a Giraffe Leather and Fur Typography in Photoshop"